Mind Map Card ①: Creating and Editing Cards
💡What is a mind map card?
The mind map card is the core note unit in MarginNote. You can think of it like this:
- When you excerpt content in a document, it's called an "excerpt"
- When you organize it in a mind map, it's called a "mind map card" or "note card"
- After you add it to a review card deck, it's called a "flashcard" or "review card"
They are different identities of the same object, free to move between documents, mind maps, and review card decks.
💡What you'll learn on this page:
- The parts that make up a card (title, excerpt, comment)
- The 5 ways to create a card
- Quickly editing one or several cards
- In-depth editing with the card editor
1 The three parts of a card
1.1 Title (Title)
- Plain-text field; does not support Markdown formatting
-
Has a length limit; up to 250 characters
💡Tip: Keep titles short. When you exceed the character limit, move the extra content into the comment.
1.2 Excerpt (Excerpt)
- Content from a document, such as text or images.
- The original content extracted from a document with the excerpt tool
- Keeps its link to the document, so you can jump back to the original text
1.3 Comment (Comment)
- Note content you add yourself
-
Supports many formats:
- Handwriting
- Rich text (supports Markdown/LaTeX/HTML/CSS)
- Code blocks and Mermaid flowcharts
- Audio and images
- Tags
-
Use
Edit Commentsto reorder comments or delete them
💡Excerpt vs. comment:
- Excerpt: original content from the document that keeps its document link
- Comment: supplementary content you add, such as your understanding, analysis, memory techniques, and so on
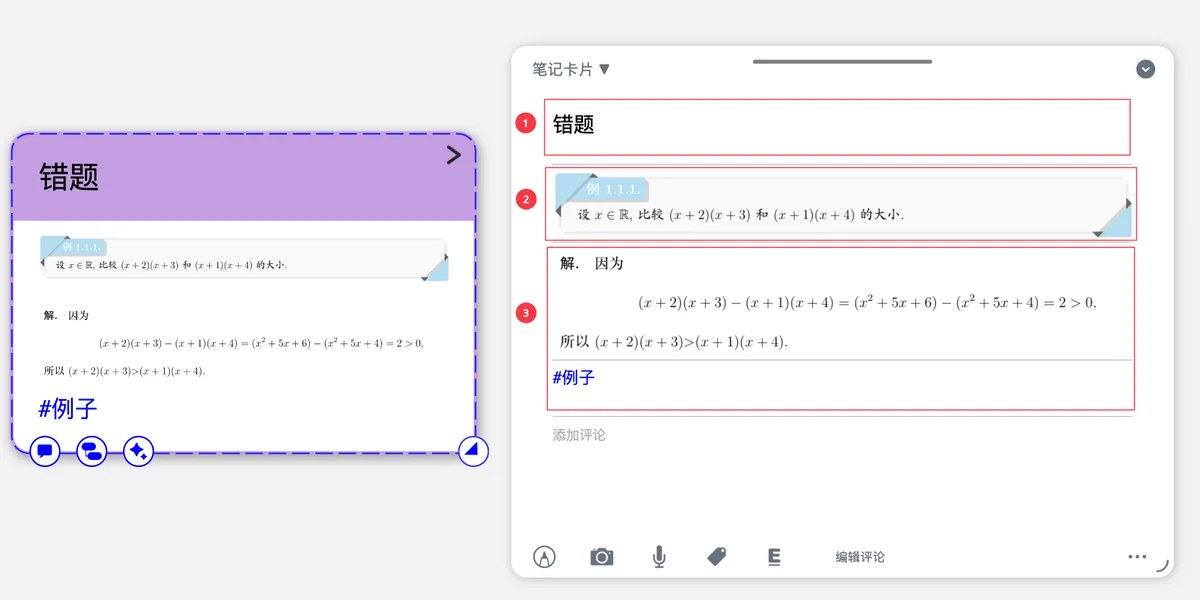
2 The 5 ways to create a mind map card
2.1 Comparison of the 5 creation methods
| Method | Best for | Pros | Quick action |
|---|---|---|---|
| Create from blank | Brainstorming, free creation | Fast, flexible | Double-click an empty area of the mind map |
| Create from a node | Extending an existing structure | Preserves the hierarchy | Select a card → ➕ |
| Create from the outline | Quickly entering lots of text | Word-like, efficient | Press Enter in the outline |
| Excerpt from a document | Extracting content from textbook documents | Preserves the source text | Use the excerpt tool to select document content |
| Create with AI | Batch-generating cards | Saves time and effort | AI chat + [Create Card] module |
2.2 Method 1: Create a card from blank
Double-click an empty area of the mind map to quickly create a card; or 🖼️ image
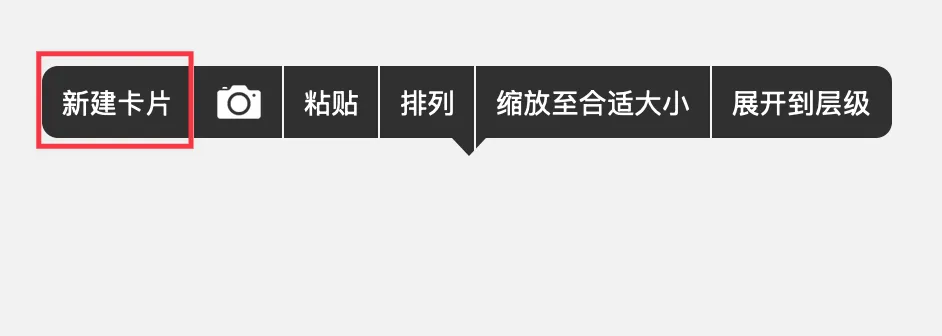
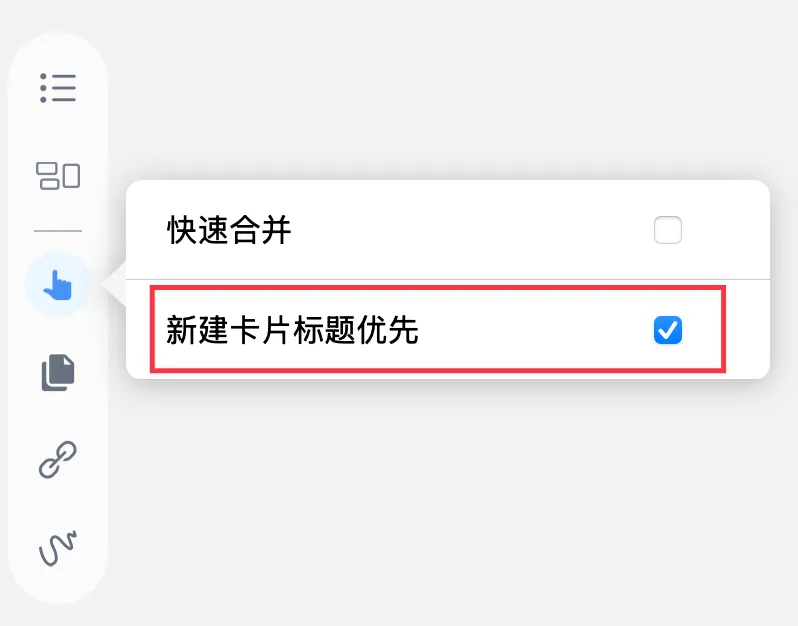
💡Setting: Enter the title or the body when creating a card?
By default, creating a card prompts you to enter the card body. If you'd rather enter the title first, you can set this up:
Tap the mind map side toolbar → hand tool → turn on
Title First for New Cards
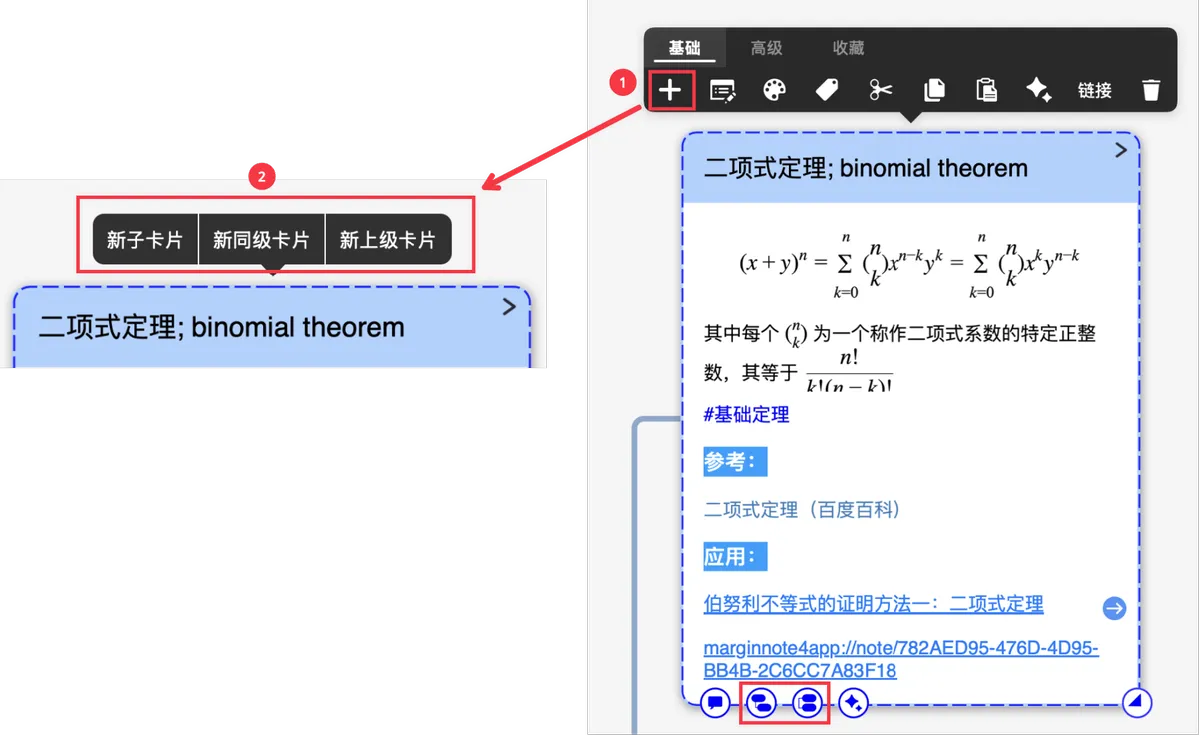
2.3 Method 2: Create a card from a mind map node
New Child Card
New Sibling Card
-
🖼️ image (as shown by the icons above)
New Child Card: becomes a child node of the current cardNew Sibling Card: sits at the same hierarchy level as the current cardNew Parent Card: becomes the parent node of the current card
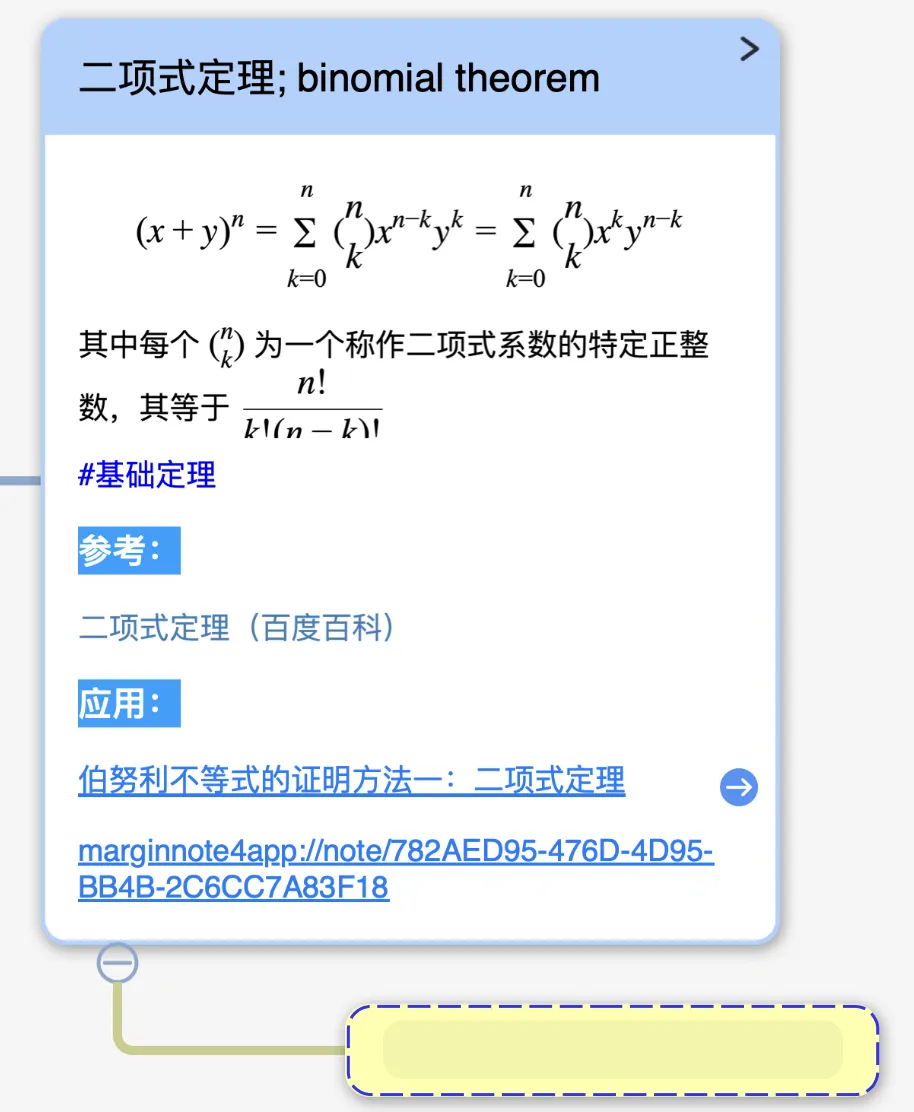
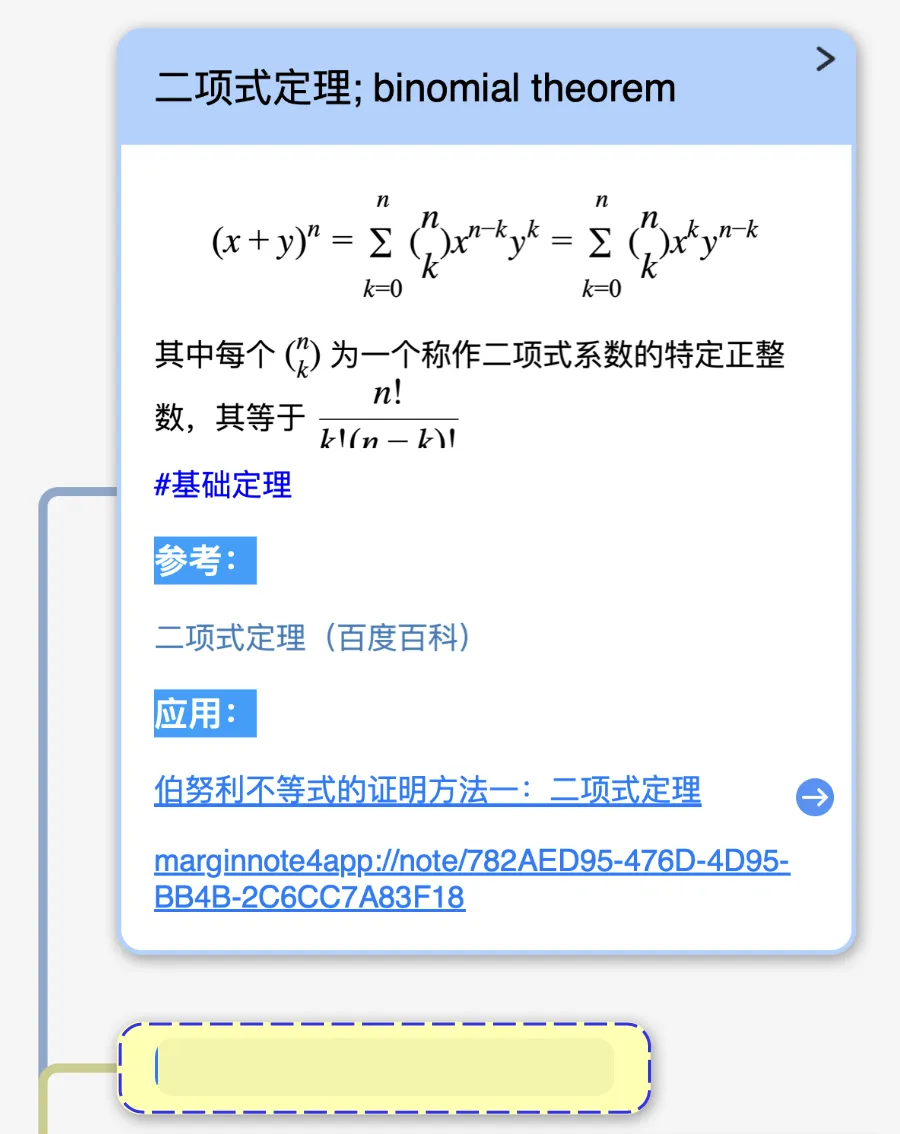
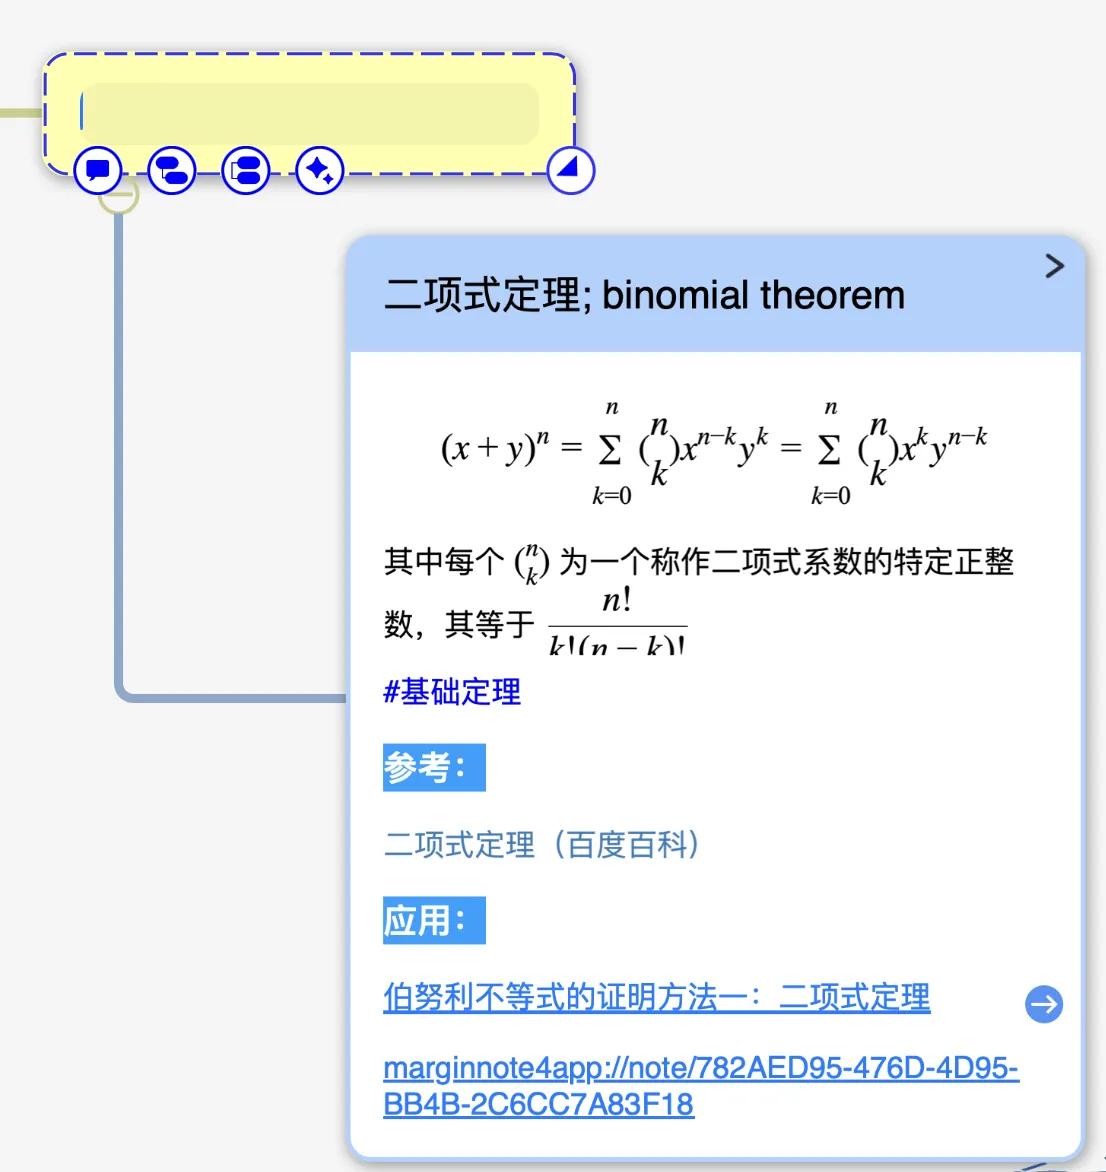
💡When to use:
- New Child Card: expand on the details of a knowledge point
- New Sibling Card: add related knowledge alongside it
- New Parent Card: group existing cards under a higher-level category
2.4 Method 3: Create a card from an outline node
Outline
Enter the outline editing view and press Enter at the end of any node to create 1 sibling card.
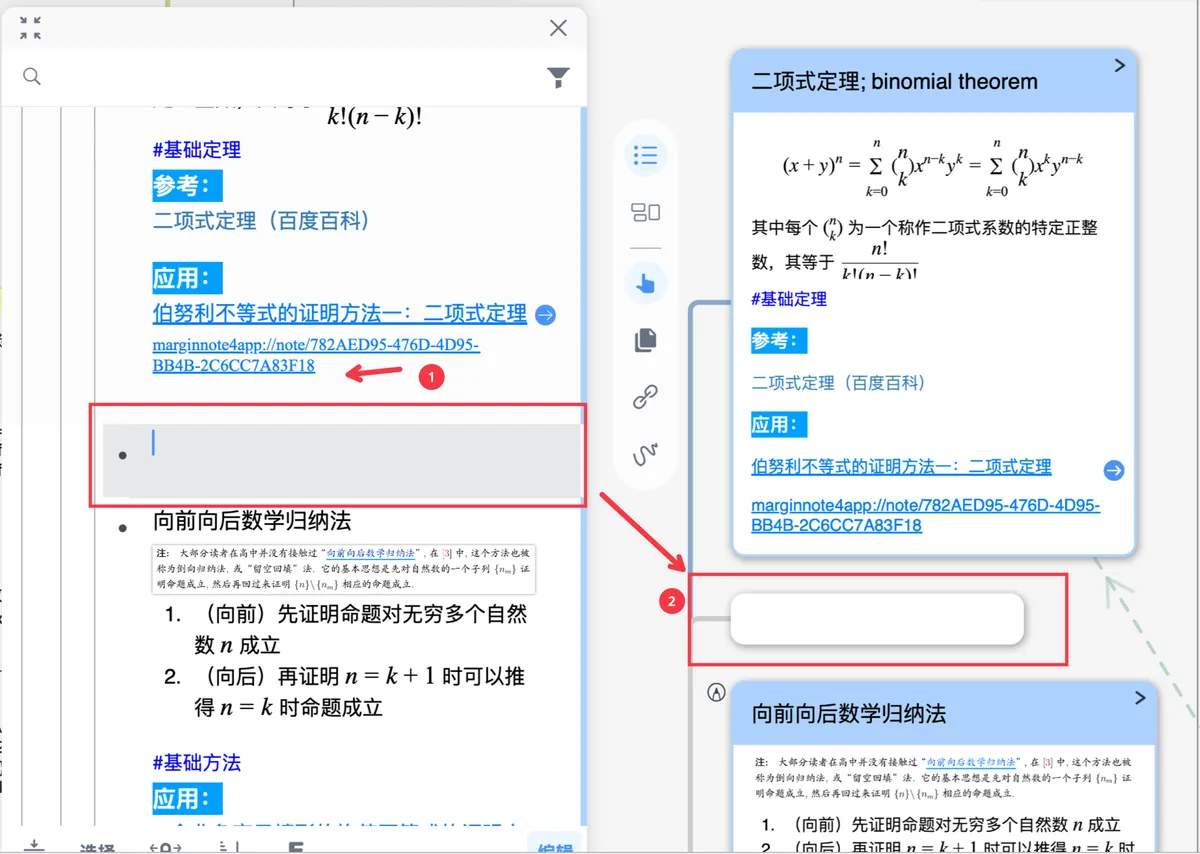
💡Advantage: The outline view is like Word's outline mode—great for quickly entering large amounts of text and then automatically generating the mind map structure.
For more on outlines, see: Outline editing and indentation
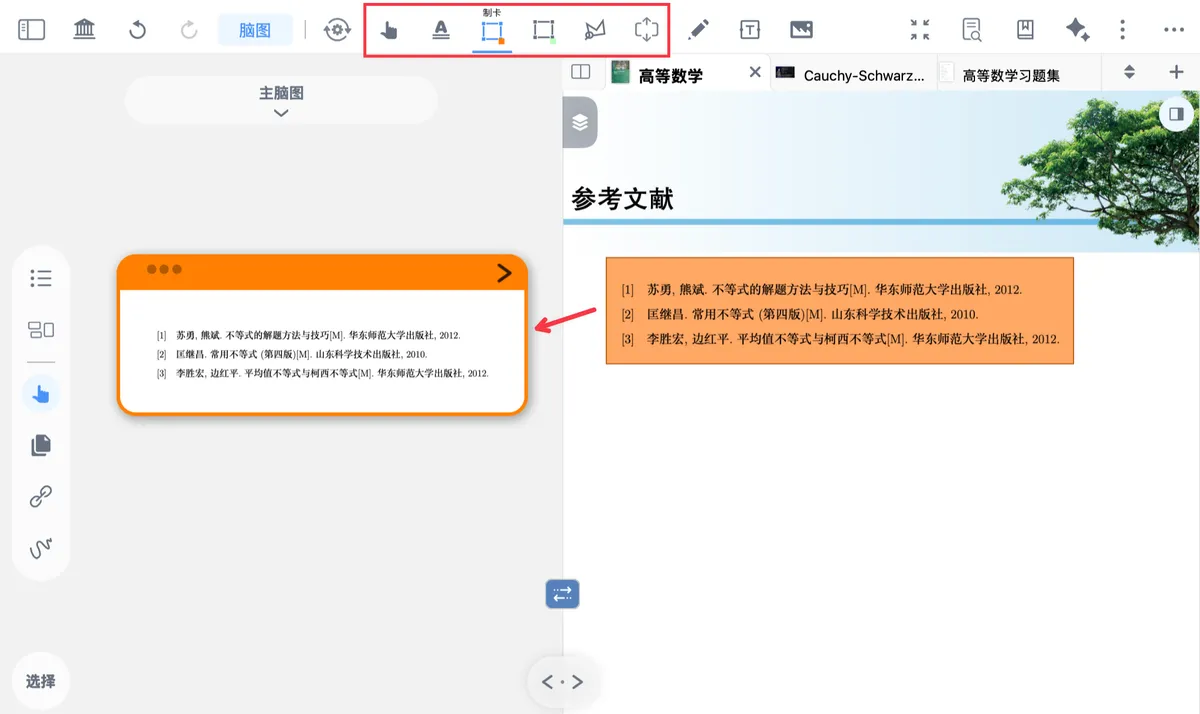
2.5 Method 4: Create a card by excerpting from a document
Use the excerpt tool (or the hand tool) to excerpt content from a document and add it to the mind map.
Cards created this way keep their link to the document, so you can jump back to the original text.
Detailed tutorial: Manually excerpt to build a mind map
2.6 Method 5: Create cards with AI
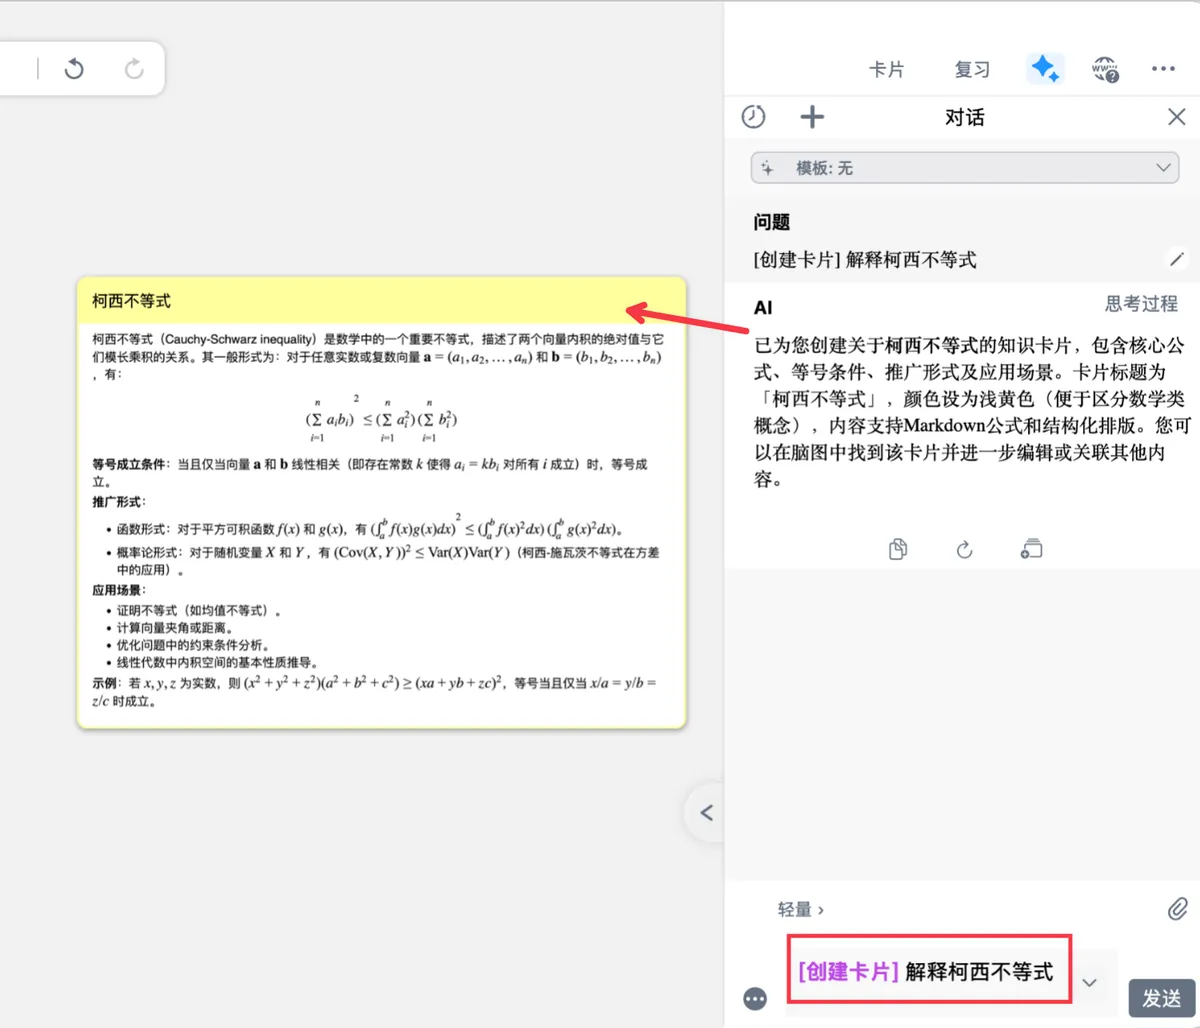
Open the AI sidebar or floating window, enter your specific card-making requirements, and add the [Create Card] module; the AI will create cards automatically based on your requirements.
💡Basic steps:
- Open the AI chat window
- Enter your card-making requirements, for example: "Turn this passage into mind map cards"
- Add the [Create Card] module
- Send it to the AI to generate cards automatically
For more on AI, see: Meet the Chat sidebar (Chat): reconstruct the full thinking process; Meet the Ask floating window (Ask): ask the AI in place within documents and mind maps; Make good use of modules: write a great prompt in 3 seconds
3 Quickly editing cards
3.1 Editing a single card
3.1.1 Quickly edit content
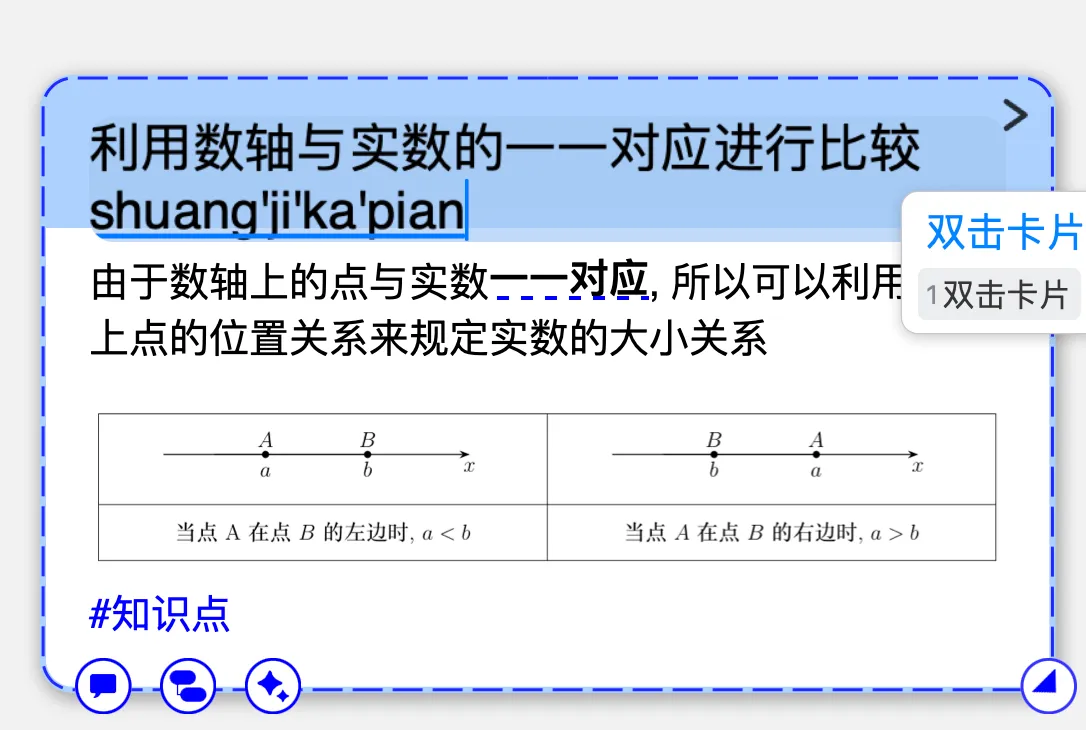
Double-click a card's title / excerpt / comment to quickly enter the corresponding edit mode.
3.1.2 Change color and tags
Click a card to bring up its pop-up menu, where you can change the card's color and tags on the Basic tab.
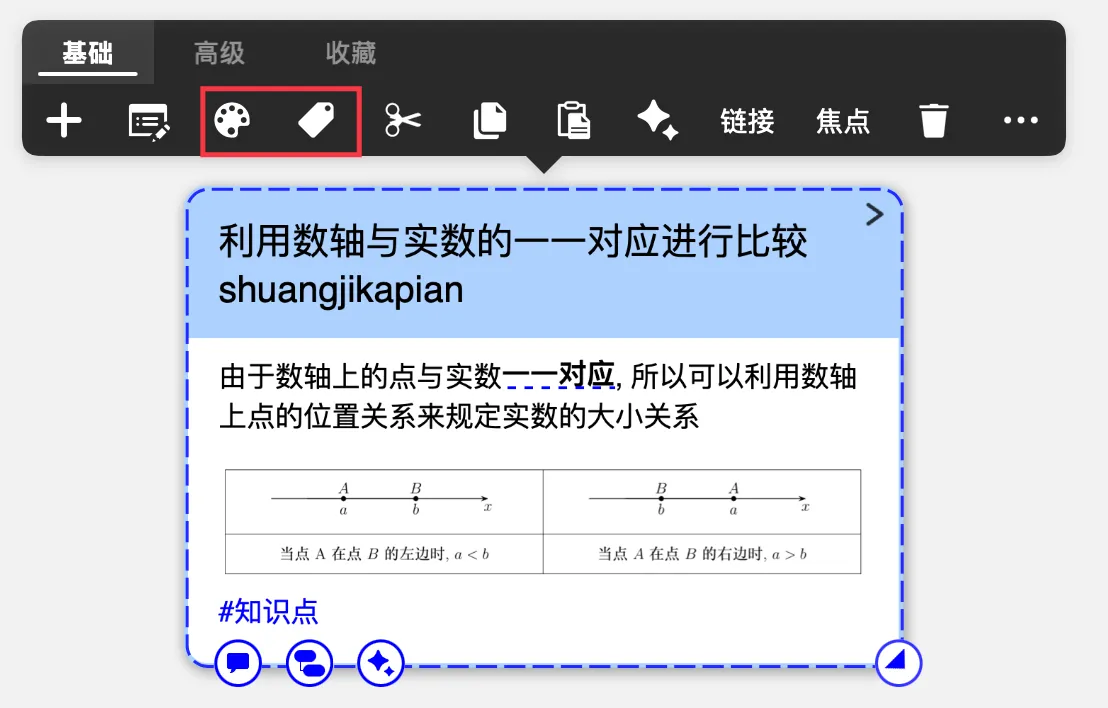
For more on the card pop-up menu, see: The card pop-up menu and its customization.
3.2 Bulk-editing multiple cards
3.2.1 Dragging rect / selection tool: bulk-edit multiple adjacent cards
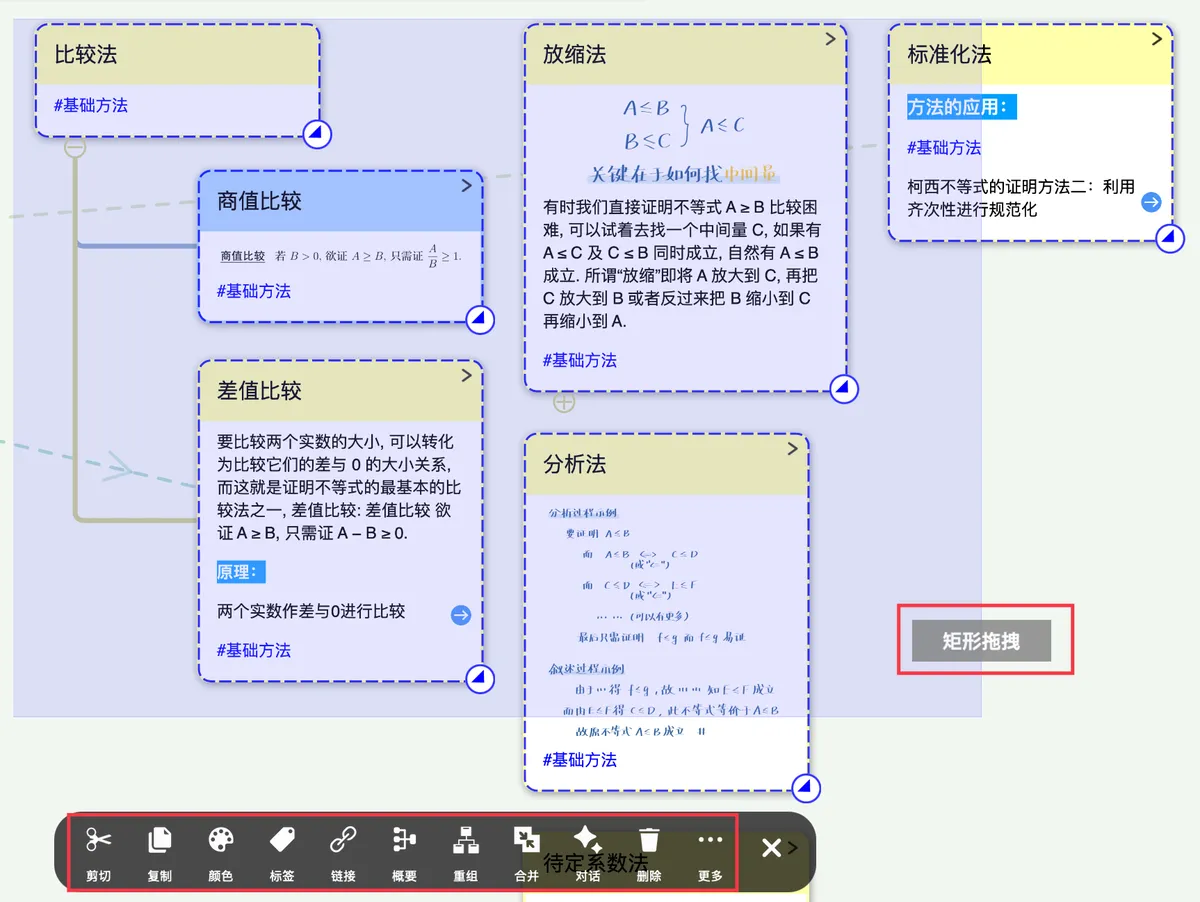
Long-press and drag on an empty area of the mind map to enclose the target cards; then use the bottom menu bar to bulk-edit them.
Common actions:
- Cut / Copy: copy cards to the clipboard
- Color / Tags: change the cards' color and tags
- Link: get the cards' bidirectional links
- Delete: delete the selected cards
- Chat: open the AI chat window
Advanced actions: see the mind map bottom toolbar
3.2.2 Select Branch: bulk-edit every card in a branch
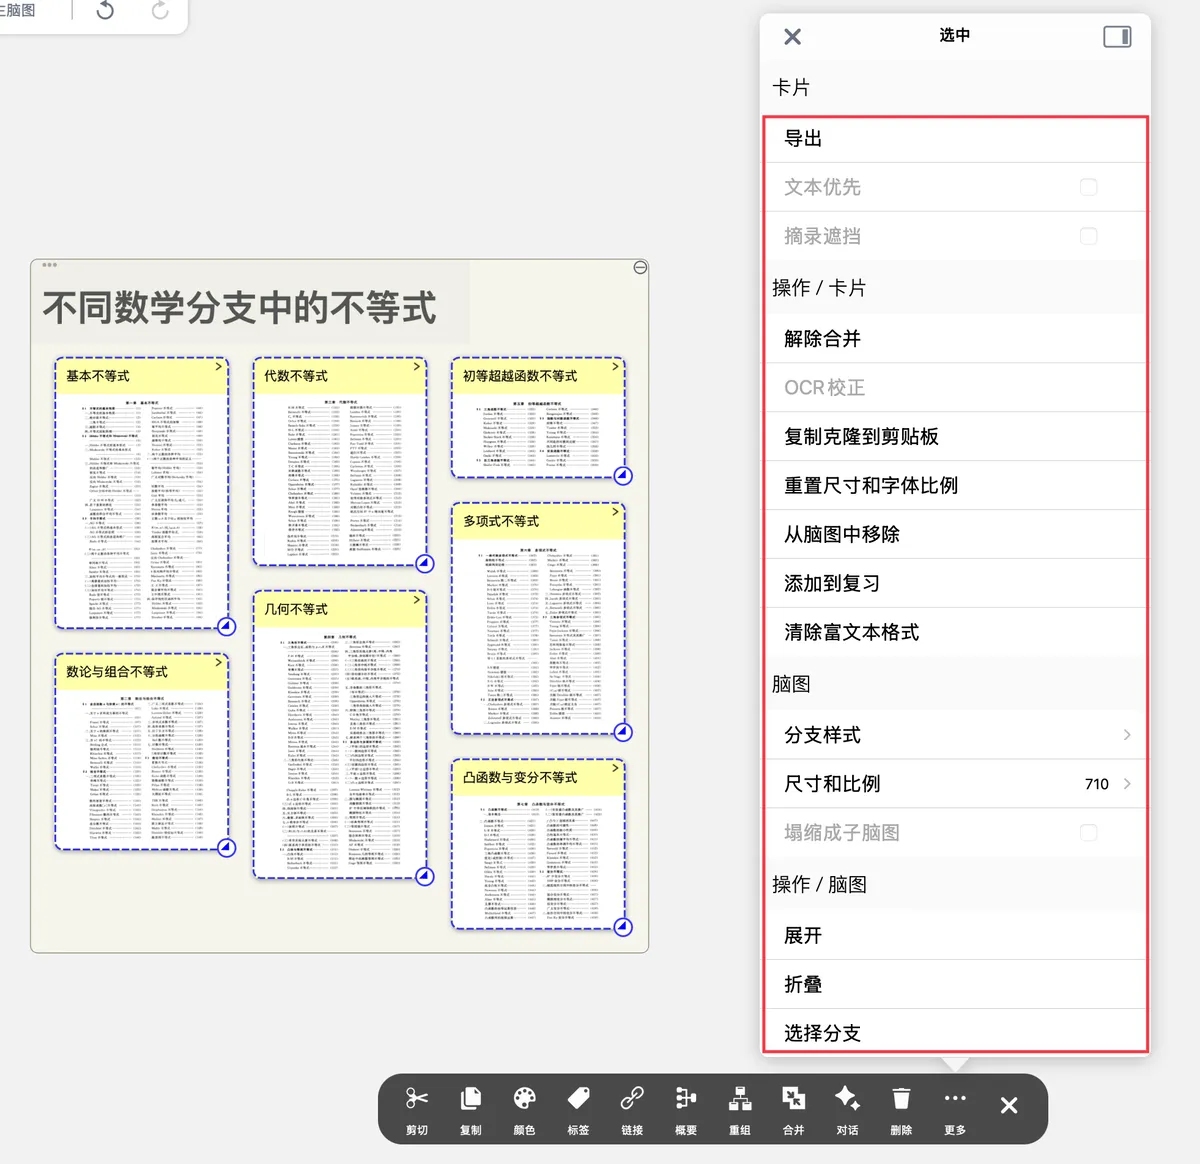
When a card branch is too long to select entirely with a drag rectangle, use the Select Branch feature to select the whole branch at once.
Steps:
- Select the target card
- Tap
Moreon the bottom menu bar - Choose
Select Branch - The card and all of its descendant nodes are selected
💡When to use: send an entire branch to the AI, bulk-add to review, bulk-change colors, and so on.
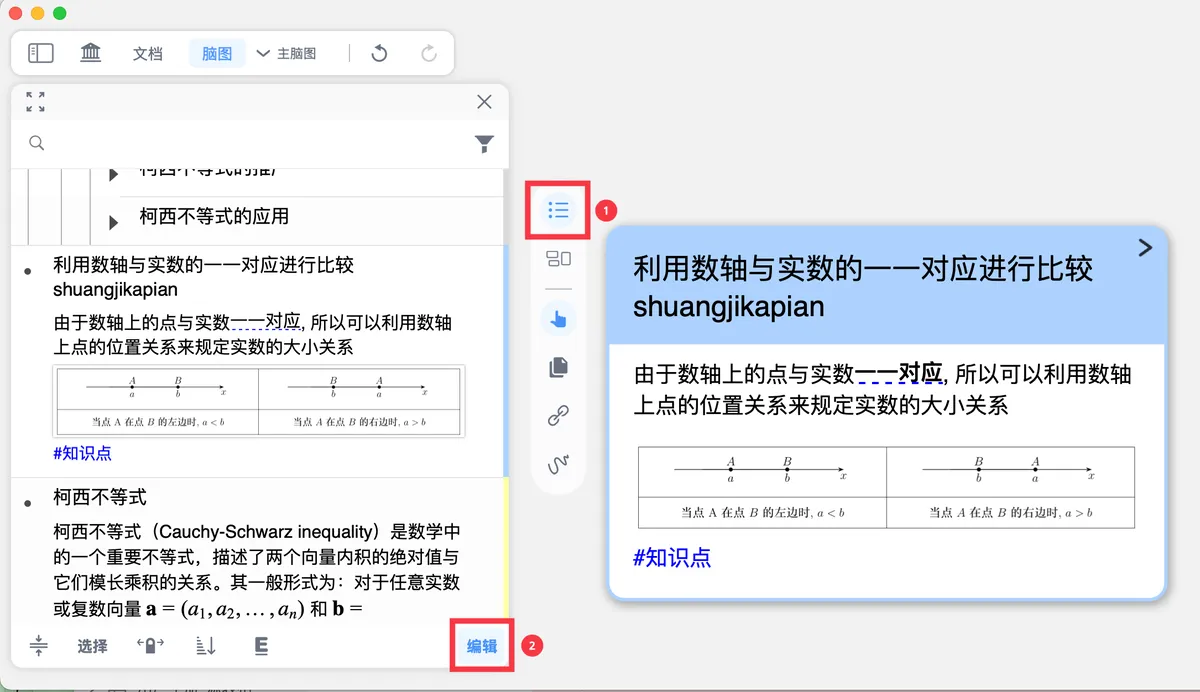
3.3 Quick editing with the outline
🖼️ image.
💡The outline view is especially good for editing a card's title and content fields, much like editing text in Word.
For more on outline editing, see: Outline editing and indentation.
4 In-depth editing with the card editor
The card editor is a standalone editing window for in-depth editing and management of a single card, with support for rich-text formats such as Markdown, LaTeX, and code blocks.
💡When should you use the card editor?
- When you need to add complex content (code, formulas, audio, images, etc.)
- When you need to fine-tune a card's multiple comments
- When you need to set the front and back of a flashcard (review card mode)
4.1 How to open the card editor
Card editor
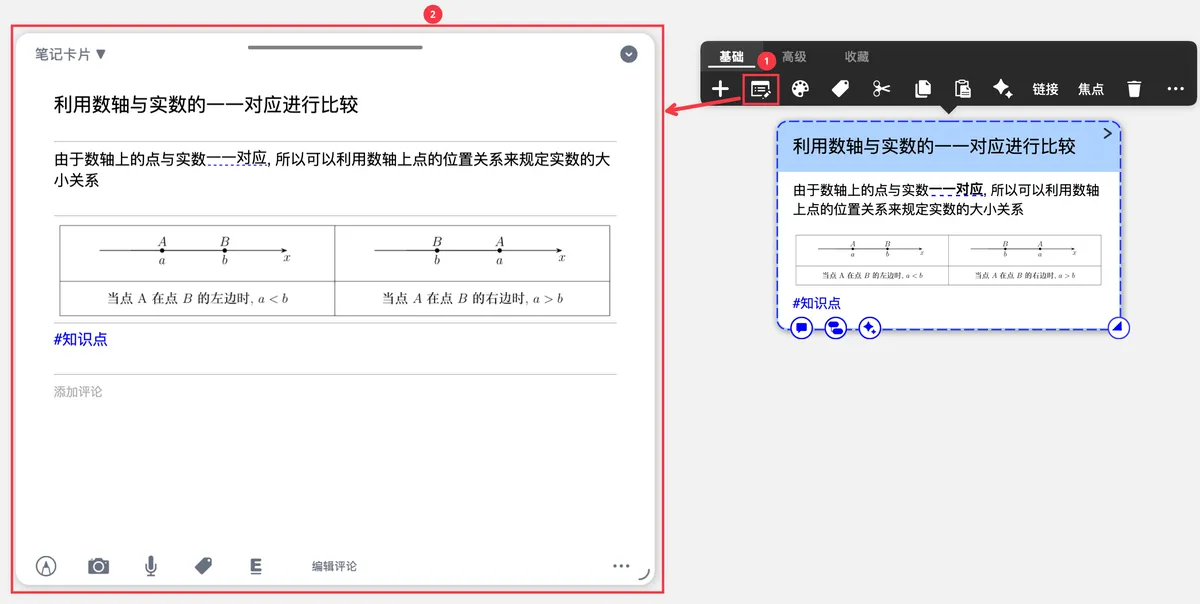
Click a card in the mind map and tap the editor icon (shown above) in the pop-up menu to open the card editor.
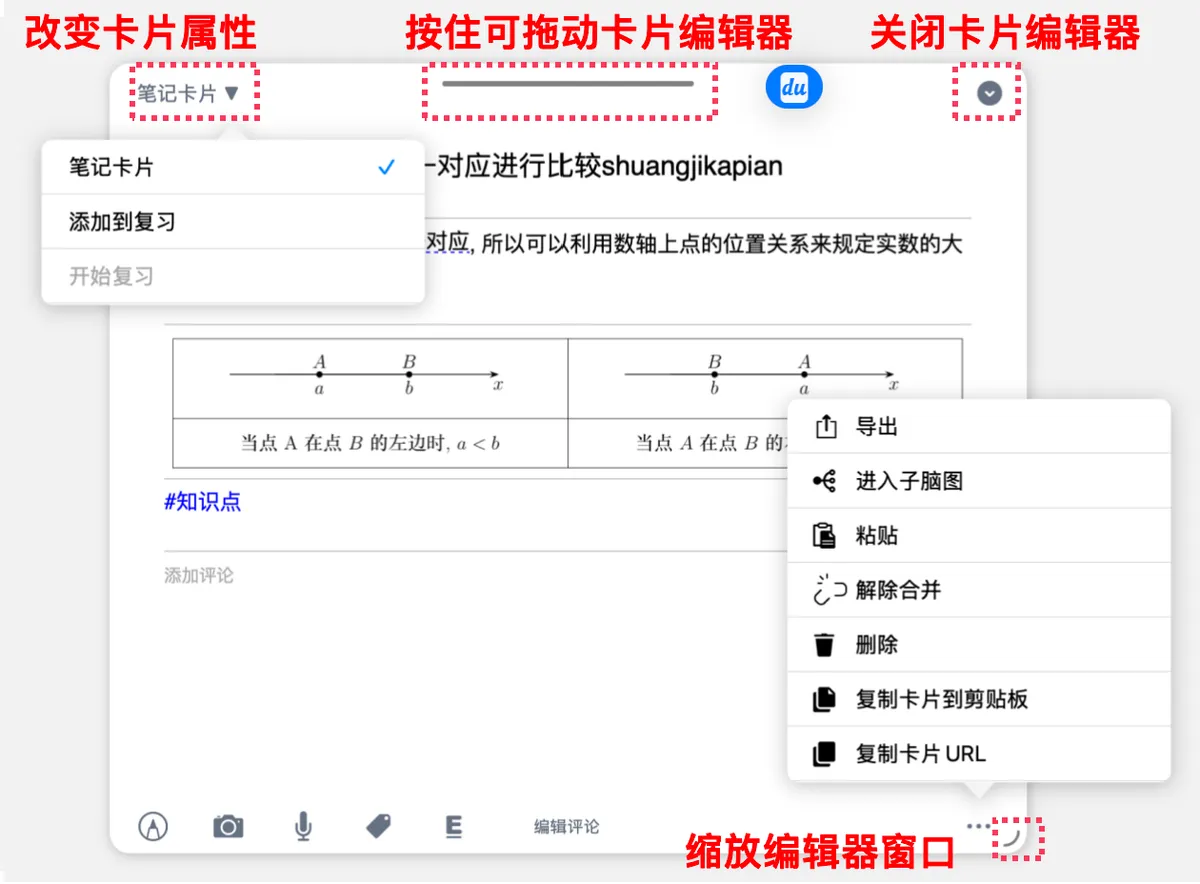
4.2 Editor window overview
-
Top-left: switch the card type
Note Card: the study card you see in documents and mind maps-
Review Card: the flashcard, split into a front (the question) and a back (all the card's content)- You must
Add to Reviewfirst before you can switch to the review card
- You must
-
Top-right: close the card editor
- Top bar: press and drag to move the editor
- Bottom-right: press and drag to resize the editor window
4.3 Edit text styles (Markdown supported):

You can change the font and font size, emphasize text, and change font shading and font color.
⚠️Note: Card titles don't support Markdown; only comments support Markdown formatting.
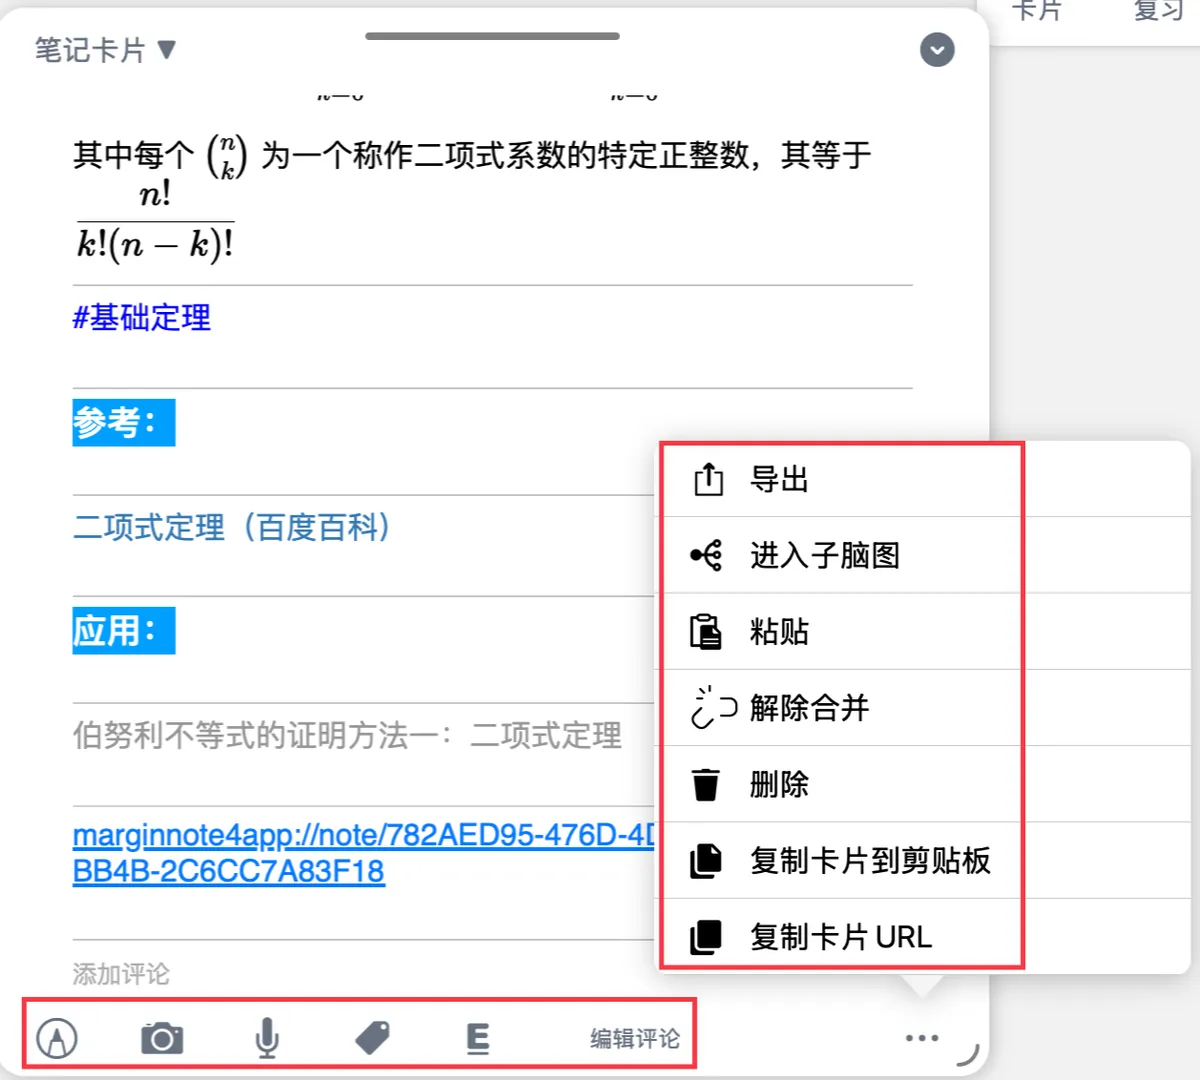
4.4 Common functions in the editor's bottom toolbar
💡The following covers only the editor functions for note cards. For editing review cards (flashcards), see: Flashcard creation ③: Set the front and back of a flashcard
From left to right:
-
Apple Pencil Doodle Mode- Draw and mark on images inside the card
- Draw in the comment area (the blank space below) for working through calculations, analysis, and so on
-
Camera / Photo LibraryCamera
Add photos to the card in two ways: take a photo with the camera or pick an image from the photo library.
💡When to use:
- Quickly photograph the slides during a lecture and add them to your notes
- For content that's hard to copy, such as wrong-answer problems from other web pages or printed material, take a screenshot and add it directly to a knowledge point in the mind map
- Taking photos with the camera supports flash, shape recognition, auto shutter, and more. See: Camera
-
Audio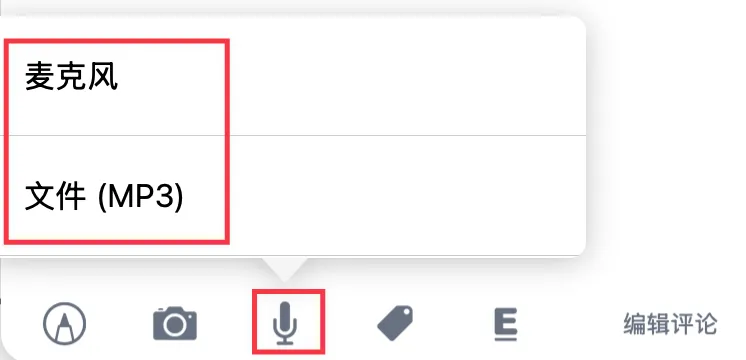
Create a new recording, or choose audio from the system Files app. For how to make a recording, see: Microphone
💡Useful for recording classroom explanations, or for personal speaking practice, talking through the logic of a concept, and so on
-
TagsCreate a new tag for the card, or add an existing tag.
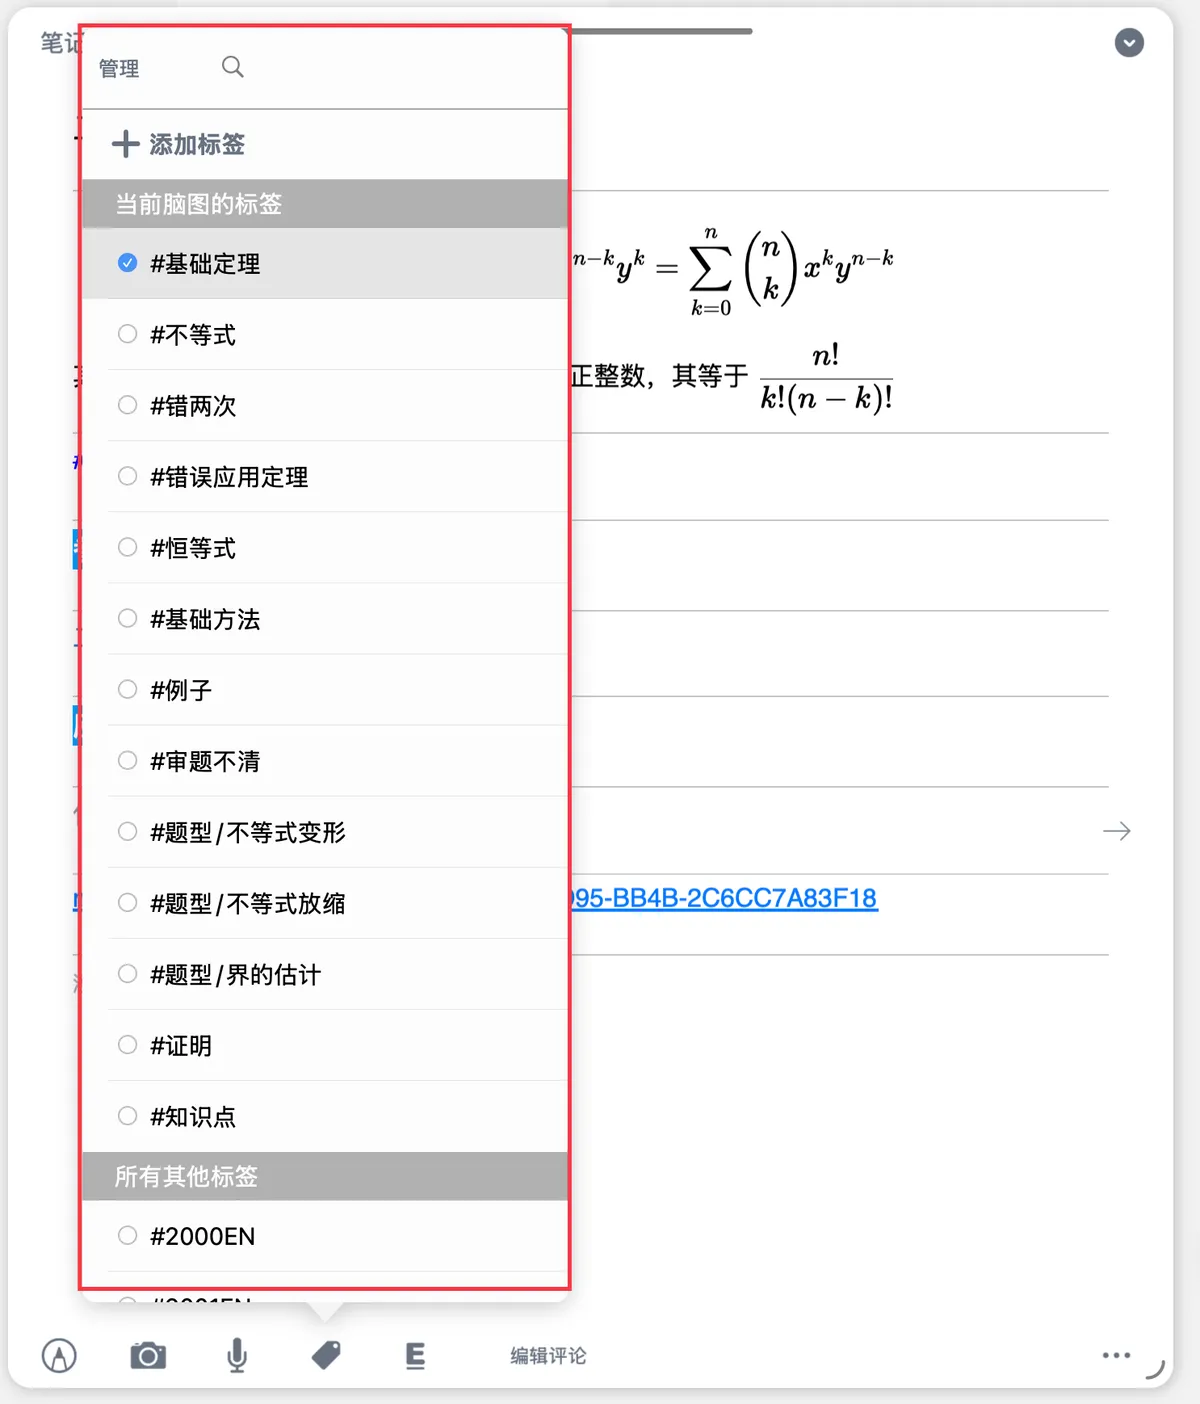
-
Emphasize- Apply the emphasize (cloze) format to a block of characters in a card's comment.
- Once you turn on recall mode or add the card to a review card deck, the emphasized parts are hidden—useful for review and recall. See: Document review: cloze occlusion and recall mode, and Flashcard creation ②: Add cards to a review card deck.
💡Note: comments in Markdown format don't yet support the emphasize feature.
-
Edit CommentsReorder how comments are displayed, or delete comments
💡If you can't find the
Edit Commentsfunction, try widening the editor window. -
MoreSee: Card editor
5 Frequently asked questions
Q1: What's the difference between the title, excerpt, and comment?
A: The title is the card's name, the excerpt is the original content from the document, and the comment is the note you add yourself.
Q2: When creating a card, when do I enter the title and when do I enter the body?
A: By default you enter the body. If you'd rather enter the title first, turn on Title First for New Cards in the hand tool settings.
Q3: What's the difference between excerpting from a document and creating from blank?
A: A card excerpted from a document keeps its link to the document, so you can jump back to the original text; a card created from blank is standalone, with no document link.
Q4: How do I quickly edit a card's title?
A: Double-click the card title to quickly enter edit mode.
Q5: What's the difference between the card editor and outline editing?
A: The card editor is best for in-depth editing of complex content on a single card; outline editing is best for quickly editing the titles and text of multiple cards.
6 📌 Next steps
Congratulations—you've mastered the basics of creating and editing mind map cards!
Next, learn how to organize and manage large numbers of mind map cards and build a structured knowledge system:
→ Continue learning: Mind Map Card ②: Card organization and management