Manually & Automatically Generating a Document Table of Contents
💡 Use cases for the table of contents:
Build a clear chapter hierarchy for your PDF documents, making it easy to quickly locate target content, jump between pages, and improve reading and retrieval efficiency.
Organize your mind map structure by the document's table of contents, so that excerpt notes are automatically grouped by the table of contents, helping you build a systematic knowledge structure.
Reorganize content by the table of contents to fit your personalized learning logic, aligning page order and note management more closely with your needs
Simplify the review workflow: indent or outdent items and combine them with note cards to retrace knowledge points precisely.
💡 The table of contents you create and adjust in MarginNote 4 is a virtual table of contents; it does not modify the source file's TOC data. Reset TOC
1 Opening the Table of Contents
Page Finder
Table of Contents
Tap the Page Finder button in the document navigation bar (icon 1 in the image above), then select Table of Contents (icon 2 in the image above) to display the Table of Contents view.
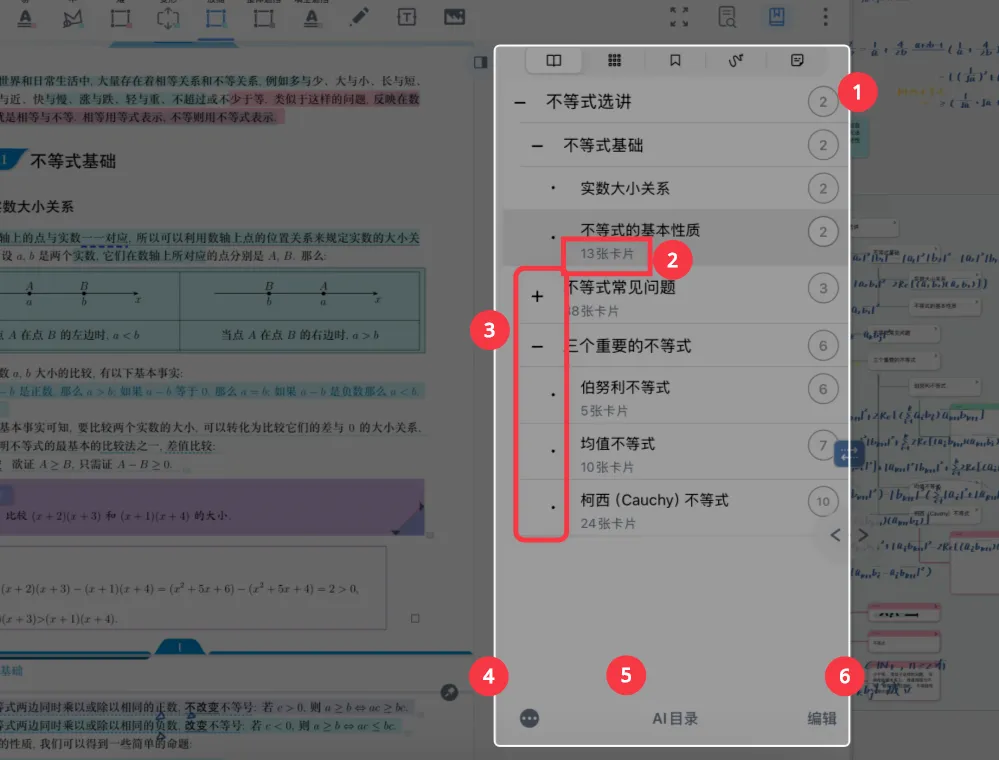
As shown in the figure:
- The number on the right side of the
Table of Contents viewis the starting page number of that chapter. Tap the chapter to jump to the corresponding page. - If the document contains note cards such as excerpts or extend notes, the number of cards in that chapter is shown beneath the TOC entry name.
💡 You can use the card count of each TOC chapter to gauge the key points and difficulties of the entire document.
- The table of contents can display multiple indent levels. Tap the
+or-symbol in front of a TOC entry name to expand or collapse its sub-entries. - Tap the ··· icon to perform further actions such as folding pages by the TOC, converting the TOC into a mind map, and resetting the TOC.
- Tap
Editto select multiple TOC chapters for batch processing. For details, see: Adjusting Multiple TOC Entries.
2 Creating a Table of Contents
There are three ways to generate a table of contents: built-in (from the document), manual creation, and AI generation.
2.1 Built-in Document Table of Contents
💡 Some documents (PDF, epub) come with a built-in table of contents. MarginNote 4 can recognize its content and structure and display it in the Table of Contents view.
If you feel the built-in table of contents is not comprehensive enough, you can fill it out using manual creation, with entries sorted according to page order.
If the document's built-in table of contents consists of large amounts of useless numbers such as "1, 2, 3…", you can delete them in batch. For specific steps, see: Adjusting Multiple TOC Entries.
2.2 Creating Manually
💡 Advantages:
- Full control: You have the highest degree of autonomy and can precisely design the hierarchy, entry titles, and order of the table of contents based on the document's specific content, logical structure, and your own needs, making it best fit the document's intent.
- High flexibility: Unconstrained by software or algorithm rules, you can create unconventional structures or a table of contents containing special notes.
- Deeper understanding: During creation, you need to understand the document content deeply, which helps you organize your thinking and ensure the accuracy of the table of contents.
2.2.1 Creating a TOC from a Selection
💡 No need to type a title in the dialog—you want text from the page to serve directly as the TOC entry title.
Hand Tool - Document

Using the hand tool in the document navigation bar (as shown above), long-press to select text or a rectangular area, then choose "Insert into TOC" from the pop-up menu.
Selecting text: the new TOC entry's name matches the content of the selected text.
Selecting a rectangular area with recognizable text: the new TOC entry's name matches the OCR text of the selected area.
Selecting unrecognizable text: a dialog still pops up asking you to enter a title for the new TOC entry; you can check whether OCR is turned on and whether the correct language is selected.
2.2.2 Creating a TOC from a Page
💡 Suitable for when a page has no text, or when you need to place a TOC entry within a specific area (a particular point or line).
Hand Tool - Document
-
Using the hand tool in the

document navigation bar(as shown above), long-press anywhere on the document page, then choose Insert into TOC from the pop-up menu.💡 If you can't find
Insert into TOC, you may not be using the hand tool, or the TOC option may be hidden in thehand tool menu bar. For details, see The Hand Tool Pop-up Menu and Its Customization -
Enter the title of the TOC entry in the dialog that appears.
- Tap OK to create the new TOC entry.
2.3 AI-Generated Table of Contents
💡 Advantages:
- Highly automated: AI can quickly analyze document content (usually text content), automatically identify topics, key points, and potential structure, and generate a preliminary TOC outline, greatly improving efficiency and being especially suitable for processing massive documents.
- Provides inspiration/a starting point: For users with unclear thinking or documents with complex structure, an AI-generated table of contents can serve as a good starting point or source of inspiration, helping users organize the content.
- Potential for handling complex text: Advanced AI models may be able to identify implicit logical relationships in the text and generate a table of contents that better reflects the substance of the content.
If manually adding many TOC entries takes too much time and effort, you can use AI to generate the table of contents automatically. For details, see: AI One-Tap TOC Generation.
3 Adjusting the Table of Contents
After building the table of contents, you can further adjust it in the Table of Contents view to optimize its navigation capability, making it convenient to build a mind map based on the TOC.
💡 Only PDF-format documents support adjusting the table of contents.
3.1 Adjusting a Single TOC Entry
Long-press a TOC entry, then choose the adjustment you want to make to it from the pop-up menu.
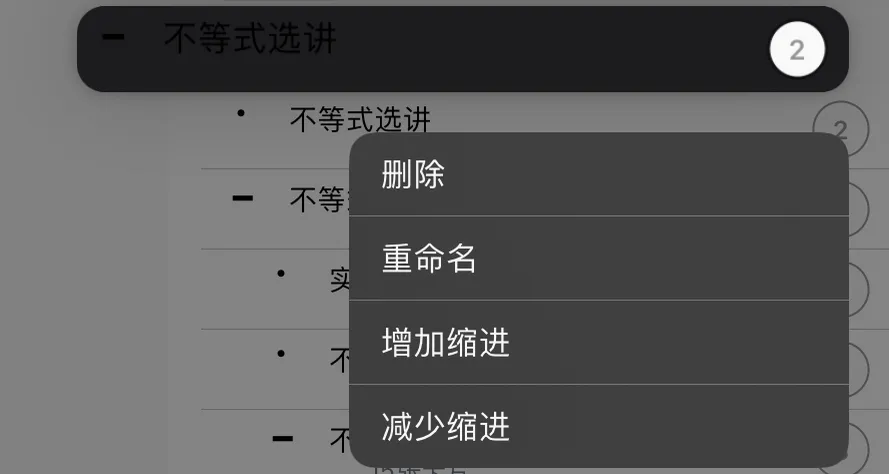
Delete: removes unnecessary TOC entries.Rename: changes the name of a TOC entry.IndentandOutdent: change the TOC hierarchy to create a clearly organized table of contents.
3.2 Adjusting Multiple TOC Entries
3.2.1 Selecting Multiple TOC Entries



Tap the Edit icon in the lower-left corner of the Table of Contents view to adjust multiple TOC entries in batch.

- Tap the hollow circles that appear in front of the TOC entries to select the multiple entries you want to adjust.
- Tap a parent TOC entry to automatically select its child entries.
- Tap the
Allicon at the bottom of the Table of Contents view to automatically select all TOC entries.
3.2.2 Adjusting Multiple TOC Entries
3.2.2.1 Delete
Delete
Tap the trash can icon (as shown above) to delete the selected TOC entries in batch.

💡 Tip: If you delete a TOC entry by mistake, you can tap the undo button in the upper-left corner of the screen to restore it.
3.2.2.2 Indent / Outdent
Indent
Outdent
Tap the indent icon (as shown above) to change the indentation of the TOC entries in batch.
3.3 Resetting the Table of Contents
💡 The
Reset TOCfeature helps you reset an adjusted table of contents to its original state—that is, the state it was in when the document was imported into MarginNote 4.
- Tap the
···button in the lower-left corner of the Table of Contents view. - In the dialog, tap
Reset TOC.

💡 You can tap the "Undo" icon in the mind map navigation bar to cancel the Reset TOC operation.
4 Converting the Document Table of Contents into a Mind Map
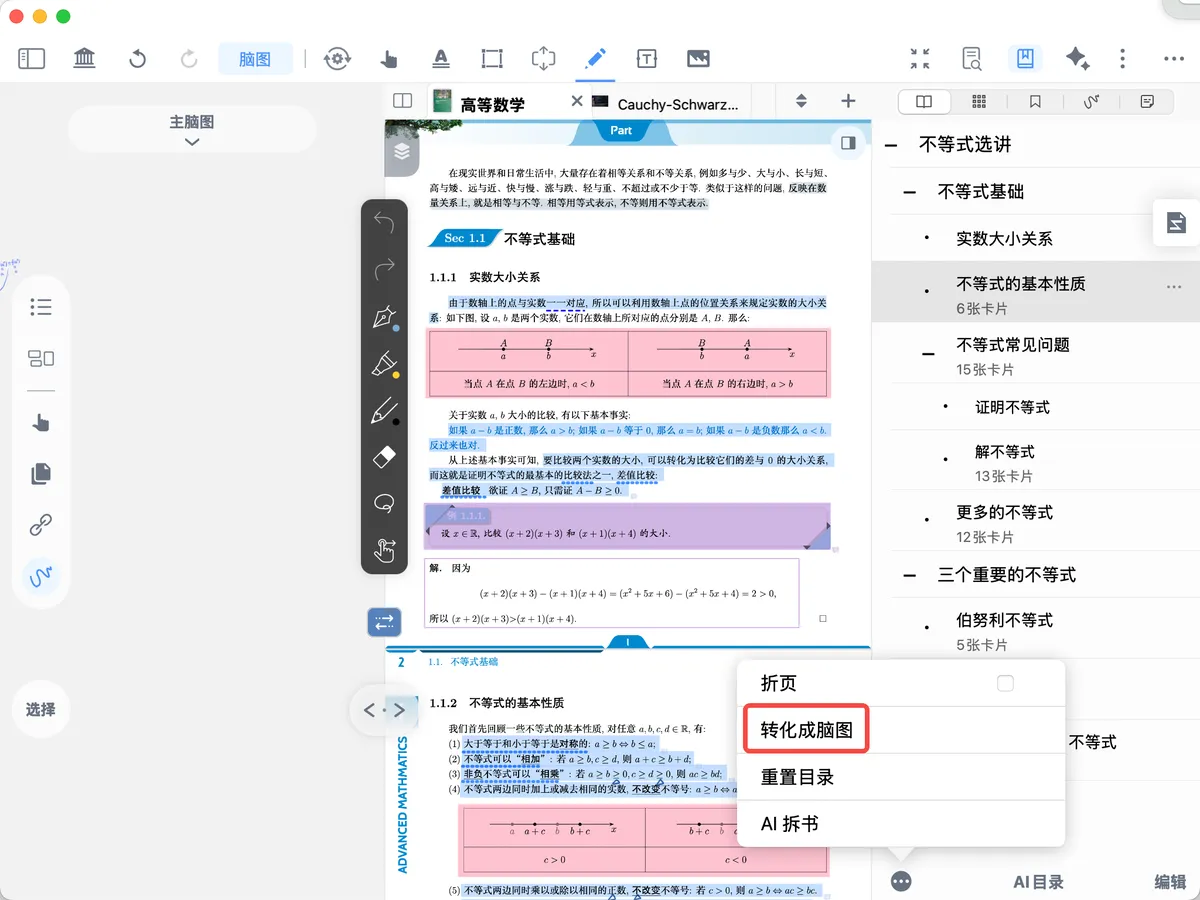

After creating the table of contents, you can also convert it into a TOC mind map with one tap. The TOC mind map is the "trunk" of the book; it helps learners clarify the knowledge framework and saves the process of building it manually.
Steps: Tap ··· in the lower-left corner of the Table of Contents view and select Convert to Mind Map.
Related use: In Excerpt Tool Settings > Mind Map Insertion Position, change the option to By Document Table of Contents. After that, cards excerpted from the document are automatically inserted under the corresponding chapter branch of the TOC mind map.