Page Reorganization
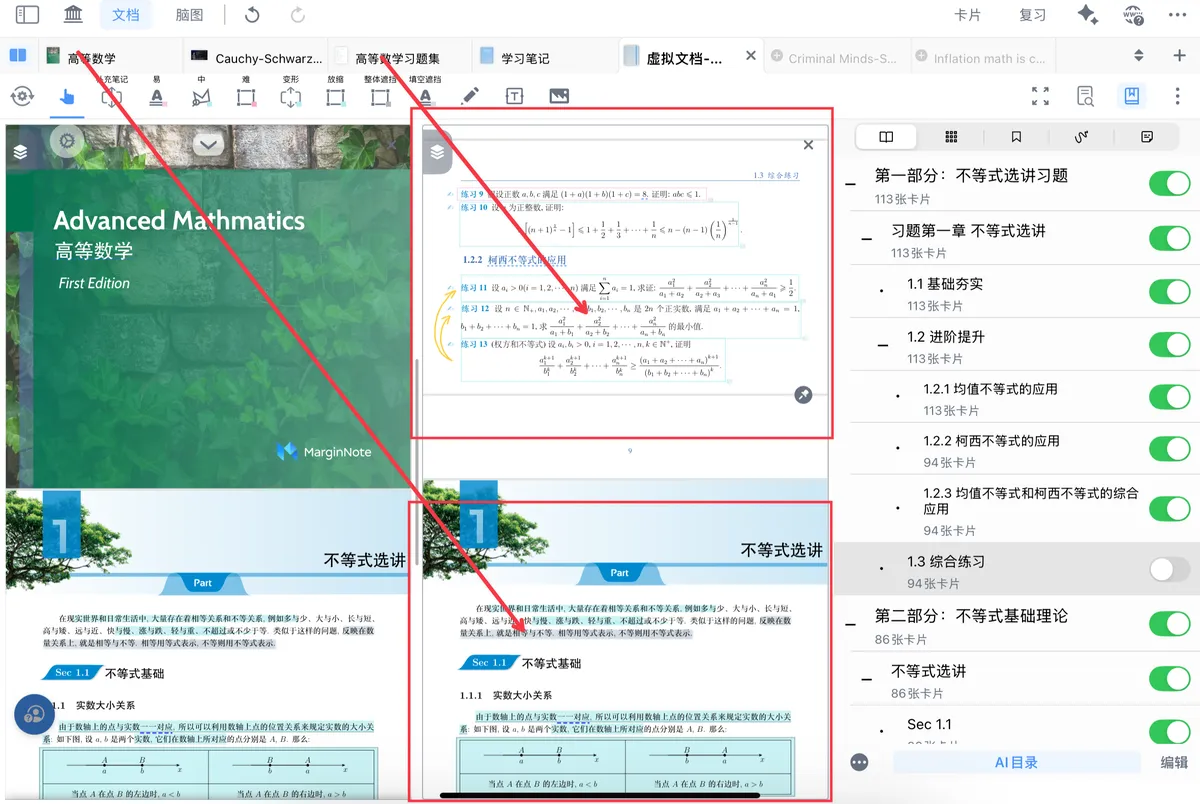
💡MarginNote lets you move document content into a virtual document with a drag gesture, enabling page-level "splitting and reorganization" of your documents.
With a few simple drags, you can gather pages from multiple books into a single document and export it as review material.
You can also collect a single problem type from years of exam papers into one document for review.
1 Virtual Documents and Page Reorganization
A virtual document does not change the storage location or content of the original files; it is simply a collection that brings together content from different sources and different pages. You can think of it as a "virtual bookshelf" holding the pages or content you have selected from various documents. These items are not physically moved in storage, yet in MarginNote they can be used as a single, unified whole.
In MN, every newly created document is a virtual document, including page-reorganization documents, newly created blank notebooks, auxiliary notebooks, and so on. They are managed in the same way as imported documents; see Importing Documents and Document Management
💡Page reorganization does not copy files; instead it "references" the pages of the original file, so you must keep the original file.
As long as you do not delete the original document, neither of the two virtual page-reorganization methods (append / create new) will affect the source document or its note data.
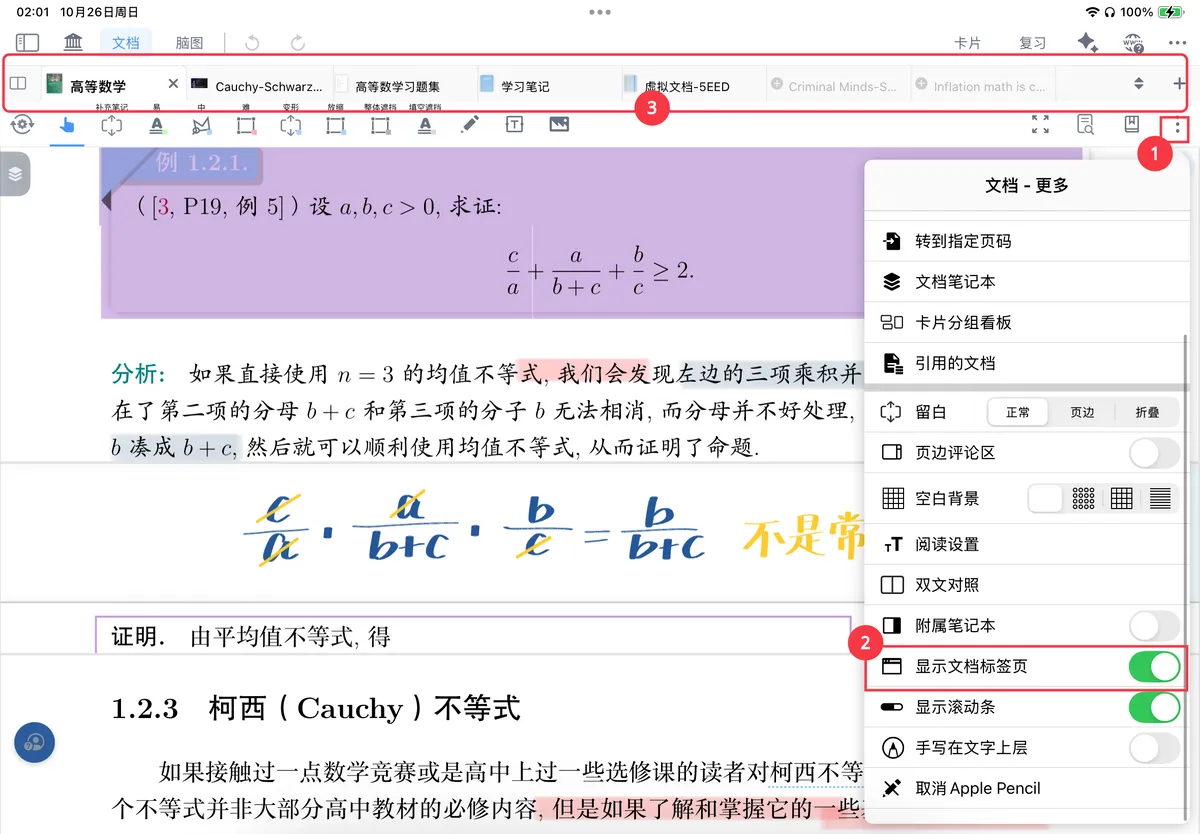
1.1 Preparation: Enabling the Tab Bar
Document - More
Show Document Tabs
- Tap
Document - More(1) - Turn on
Show Document Tabs, or use the keyboard shortcut↑+H(2) - Open the
tab barat the top of the document interface (3).
1.2 Content That Can Be Added to a Virtual Document
In MarginNote 4, both The Hand Tool Pop-up Menu Bar and Its Customization (such as text and images) and Retrieval ②: Viewing the Document's Table of Contents / Thumbnails / Bookmarks / Handwritten Annotations / Cards (such as the table of contents, thumbnails, bookmarks, annotations, and cards) can be reorganized into a "virtual document", and changes to the original content can be synced into that document.
2 Ways to Reorganize Pages
2.1 Reorganizing by Table of Contents
2.1.1 Create New: Creating a New Virtual Document
💡A newly created virtual document does not include the excerpts and annotations from the original document; for details, see: Content Synchronization Comparison Before and After Reorganization
Page Search
Table of Contents

- Open the Table of Contents view (as shown by the icon above), then long-press and drag the table of contents item you want; a blue
New buttonappears on the right side of the documenttab bar. - Drag the table of contents item onto the blue
New buttonin the tab bar and release to automatically create a new virtual document.
💡In the Table of Contents view, if you only long-press without dragging, only the
Edit Table of Contents menupops up and theNew buttondoes not appear.
2.1.2 Append: Adding Pages to the End of a Target Document
Page Search
Table of Contents

- Open the
Table of Contentsand long-press to select a table of contents item - Drag the content onto another document in the
tab barand release to add all the pages contained in that table of contents item directly to that document
💡An appended virtual document includes the excerpts and annotations from the original document but does not include collapses or extend notes.
Its excerpts are displayed in sync across both documents, but annotations are not synced.
For details, see: Content Synchronization Comparison Before and After Reorganization
2.1.3 Batch-Adding Multiple Table of Contents Items to a Virtual Document
💡Multi-selection and dragging are only available in the full-screen
Table of Contentswindow of the document interface.
- Tap the
Edit buttonat the bottom right of theTable of Contents viewand select multiple table of contents items at once - Batch-drag them onto the blue
New buttonor adocument tabin thetab bar
2.2 Reorganizing by Thumbnails / Bookmarks / Annotations
Thumbnails
Bookmarks
Annotations
- In the
Thumbnails / Bookmarks / Annotations view(as shown above), long-press the page you want to reorganize - Drag it onto another document or the
New buttonin thetab bar

2.3 Reorganizing by Hand Tool Selection
Hand Tool - Document
- Use the
hand toolto select the text or area you want on a document page - Drag it to the
tab barto reorganize the pages (append / create new)

2.4 Reorganizing Between Documents
If you want to virtually merge documents, you can drag a document tab directly onto another document tab; this appends all pages of Document A to the end of Document B.
3 Content Synchronization Comparison Before and After Reorganization
| Type | New virtual document from Table of Contents | Append to virtual document from Table of Contents | New virtual document from selection | Append to virtual document from selection |
|---|---|---|---|---|
| Original pages | ✓ | ✓ | ✓ | ✓ |
| Excerpts | ✗ | ✓ | ✓ | ✓ |
| Annotations | ✗ | ✓ | ✓ | ✓ |
| Collapse | ✗ | ✗ | ✓ | ✓ |
| Extend note | ✗ | ✗ | ✓ | ✓ |