Manually Generate a Mind Map from Excerpts
💡Completing your excerpts is only the first step. Many learners run into this kind of confusion: they have excerpted a lot of content, but the cards are scattered across the mind map with no clear way to organize them; or they want to organize the notes from a textbook into a clear framework but don't know where to start. MarginNote 4 offers three paths for turning document excerpts directly into a structured mind map. Whether you take notes as you read, have already accumulated a large number of excerpts, or are working with a textbook that has a clear table of contents, there is a matching approach:
My situation Recommended path Reading a document and building a mind map at the same time Path 1: Excerpt and generate the mind map at the same time Already have excerpts and want to organize them into a mind map Path 2: Convert existing excerpts into a mind map The document has a table of contents and you want to quickly build a framework Path 3: Generate a mind map from the document's table of contents in one click
1 Preparation
Before you start, complete two settings to make sure your excerpts appear smoothly in the mind map.
1.1 Create a study set and add documents
💡A
study setis the basic unit for organizing documents and mind maps in MarginNote 4. Only when a document is added to a study set can its excerpts be linked to the mind map.
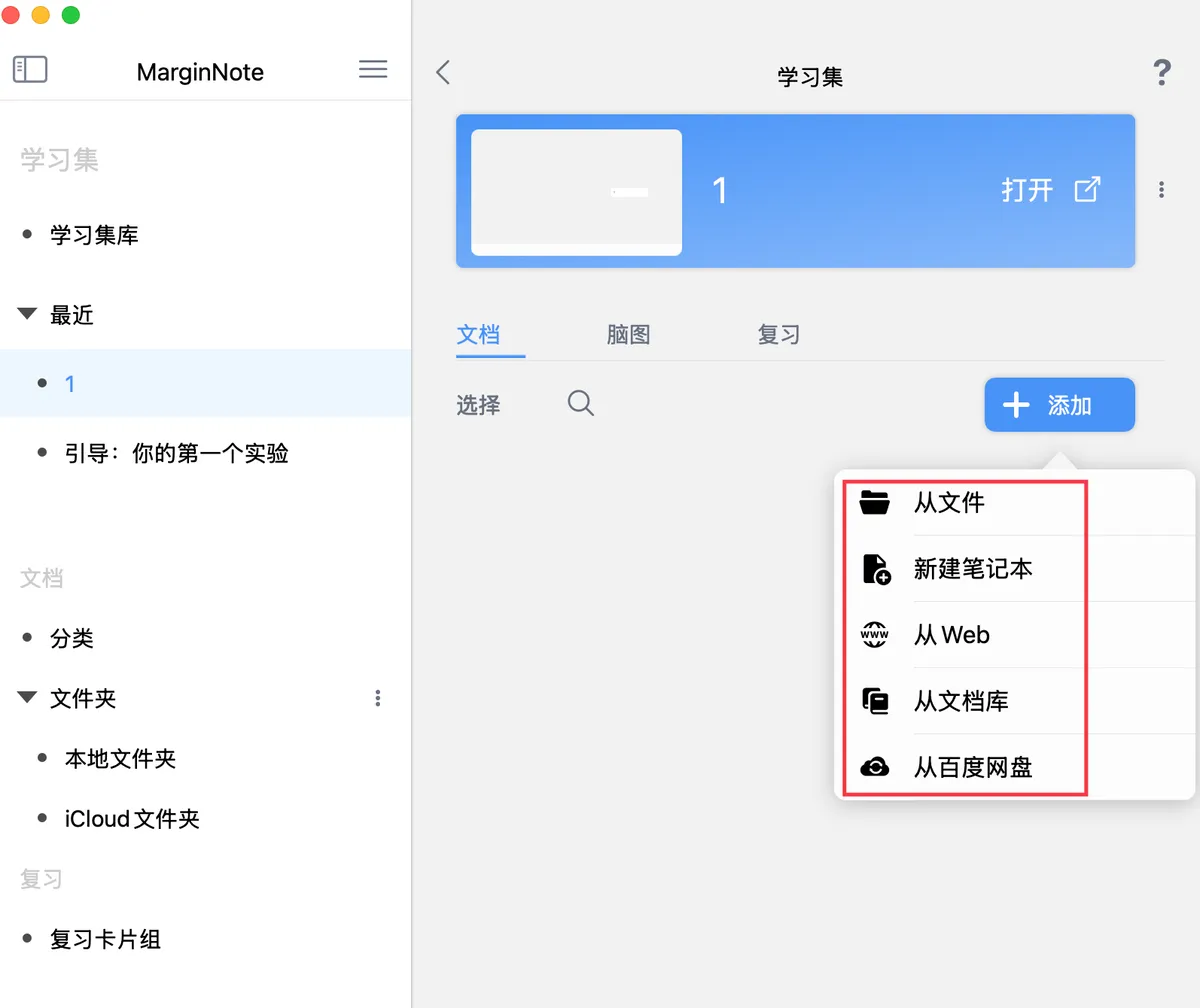
To create a study set and add documents, follow these steps:

- On the home page, click the
➕ Newbutton in the top-right corner, choose to create a new study set, and give it a name - On the study set home page, click
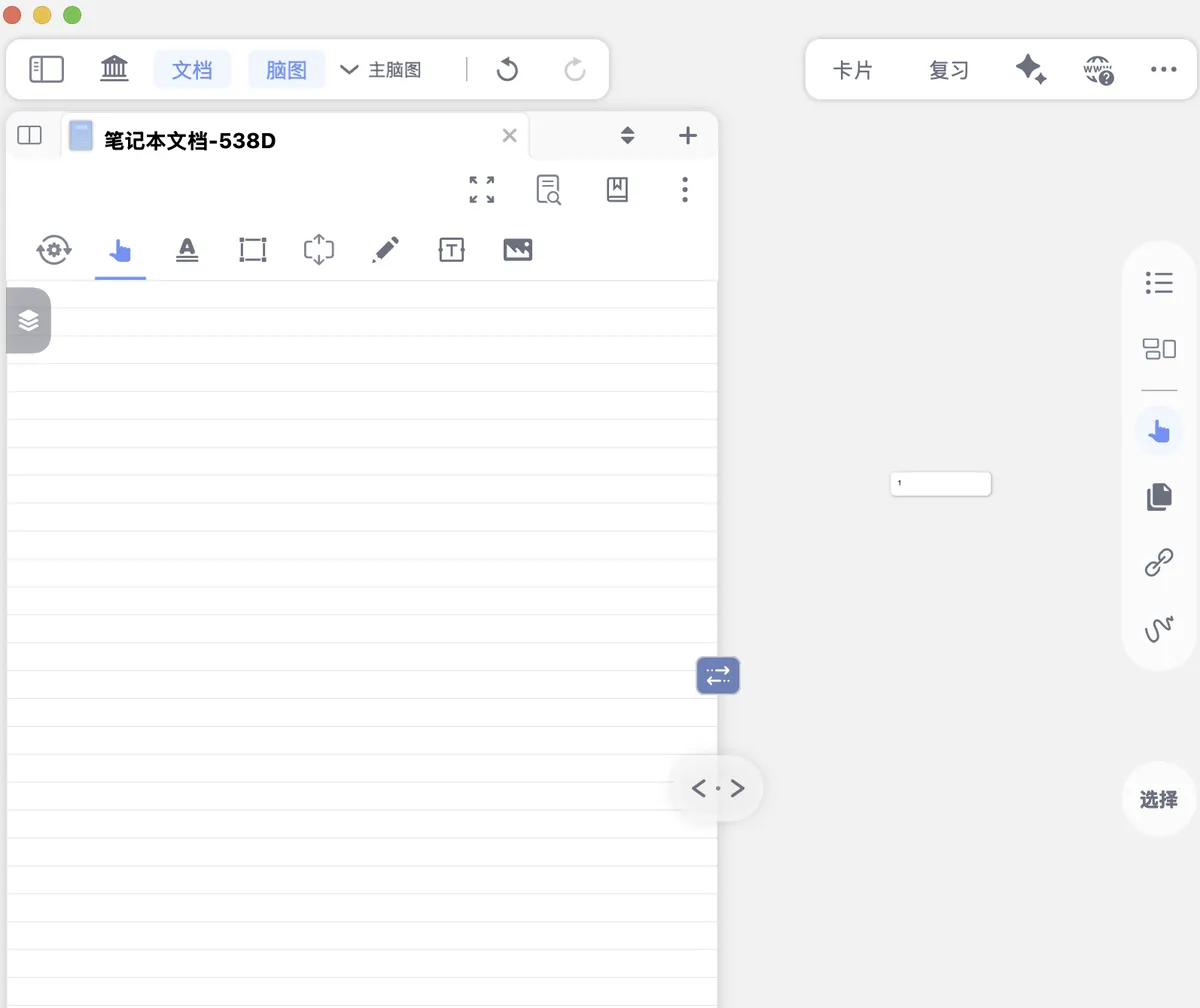
➕ Addand import the documents you want to study (for details, see Create a study set: start theme-based learning) - Once the documents are added, click to enter the study set and you will see the linked document and mind map interface
1.2 Adjust the mind map and document linked view


After entering the study set, it's a good idea to first set up the display layout of the document and mind map, so you can watch the mind map change while you excerpt.
-
Layout adjustment:
-
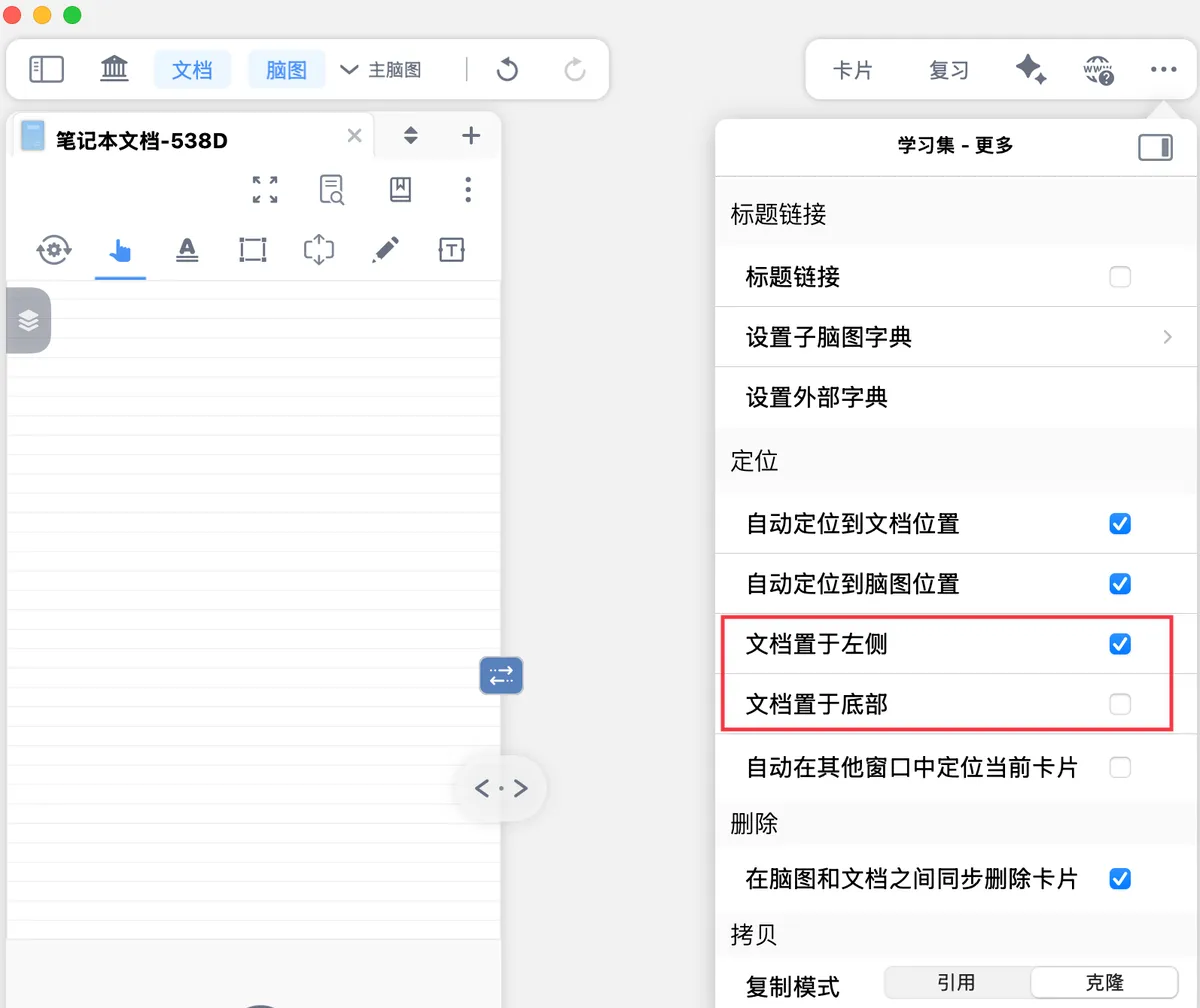
Click the "..." button in the top-right corner to open
Study Set - More, then check the document position that suits your habits:Document on the LeftDocument on the Right(default)Document at the Bottom
-
You can also drag the document area directly to the left, right, or bottom.
-
-
Display ratio adjustment: drag the
view adjustmentbutton between the document and the mind map to change how much space the document takes up.
For more settings related to the linked view (such as horizontal/vertical layout, displaying multiple documents, and so on), see Mind map and document linked view.
2 Path 1: Excerpt and generate the mind map at the same time
If you've just opened a new PDF and are about to start studying from scratch, you can follow Path 1 to excerpt and build the mind map at the same time.
💡This is the most common way to work: as you read the document, your excerpts are automatically added to the mind map, building your knowledge framework in real time.
2.1 Configure excerpt settings
Before you start excerpting, complete two key settings to make sure your excerpts appear automatically in the mind map.
Excerpt tool settings
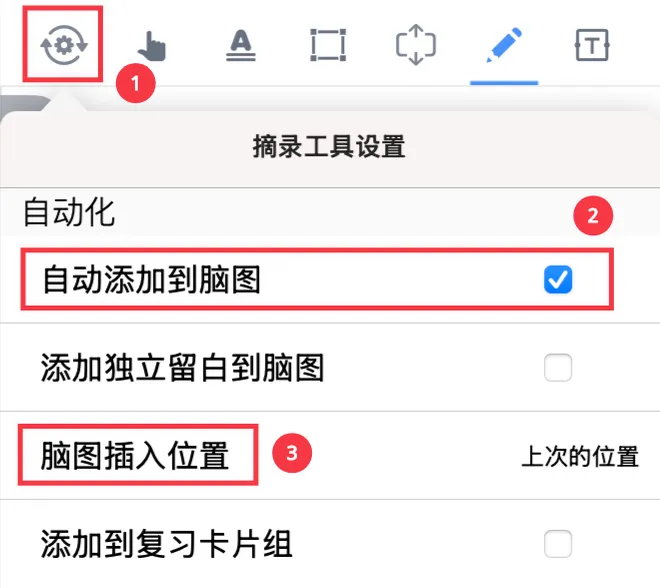
- Click the excerpt tool settings in the top-left corner of the document toolbar (shown by the icon above)
- Check
Auto Add to MindMap -
Click
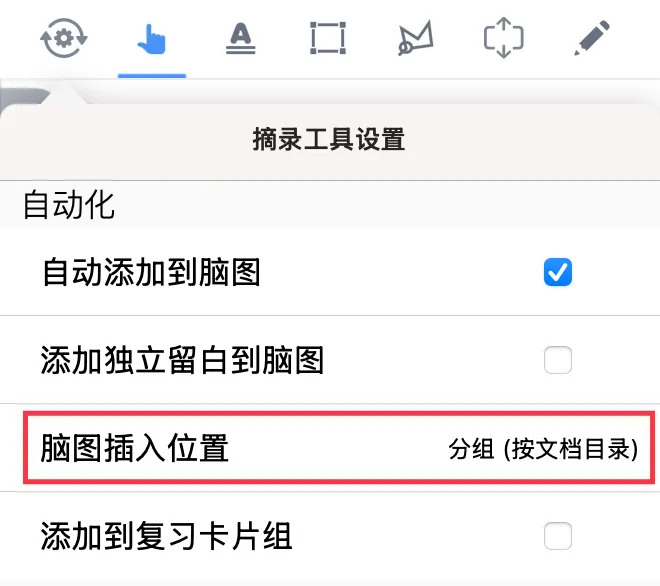
MindMap Insertion Positionand choose how cards are grouped according to your needsInsertion position When to use Group (by document table of contents)Intensive textbook study; cards are automatically grouped by chapter according to the table of contents Group (by document)Reading multiple documents; cards are automatically grouped by document Last PositionBuilding freely; cards are added near the position of your last excerpt For detailed usage and scenario examples of the three insertion methods, see Excerpt tools and their automation.


Take Group (by document table of contents) as an example: once the setup is complete, start excerpting in the document, and the excerpt cards will be automatically sorted into the corresponding table-of-contents sections while the mind map framework is generated in sync.
2.2 Choose an excerpt tool and start excerpting
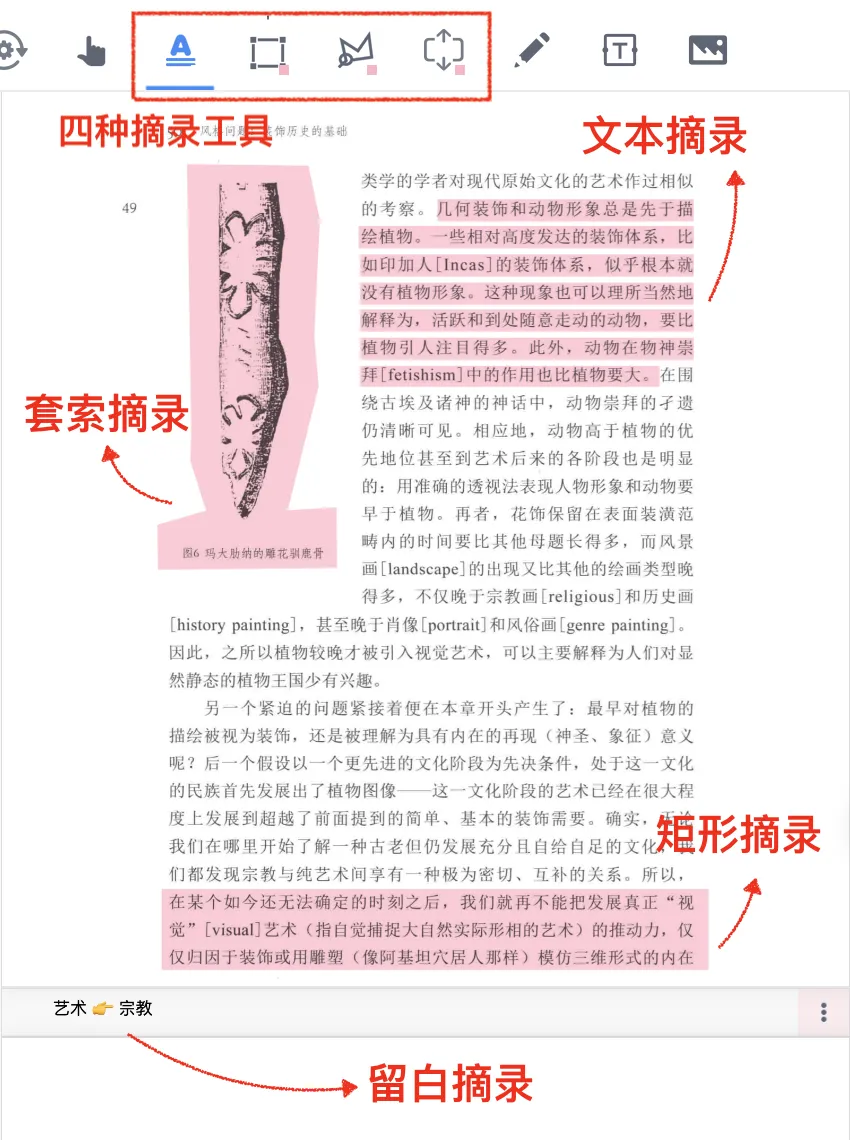
After finishing the setup, choose a suitable excerpt tool to excerpt content in the document, and the cards will be added to the mind map automatically in the way you configured. MarginNote 4 offers four excerpt tools for different types of content:
| Tool | When to use |
|---|---|
| Text excerpt | Text content such as paragraphs and sentences |
| Box-select excerpt | Areas such as images, formulas, and tables |
| Lasso excerpt | Irregularly shaped areas |
| Extend-note excerpt | Creates an editable extend-note area inside or beside the document; comes in three excerpt forms |
For detailed steps for each tool, see Excerpting: capture the key points of the text. Excerpt tools can also be configured with automation, so that as you excerpt you can simultaneously set tags, colors, and more; for details, see Excerpt tools and their automation.
3 Path 2: Convert existing excerpts into a mind map
If you have been studying a document for a while and have built up a batch of excerpt cards, you can add them to the mind map in the following two ways.
3.1 Convert a single excerpt
💡Suitable when you only need to add a few individual excerpts to the mind map.

Follow these steps:
- In the document, click the excerpt you want to convert
- In the pop-up menu, click
Add to MindMap - The excerpt card will immediately appear in the mind map
3.2 Batch-convert multiple excerpts
💡Suitable when you need to organize all the excerpts of a document at once.

Follow these steps:
-
Click
Card Grouping Boardin the mind map's side toolbar (shown by the icon below)Card Grouping Board
-
Click the
Card Sourcedrop-down menu at the top and, under theDocumentscategory, select the document you want to organize; at the same time, setGroupingtoMindMap Status, and the board will filter out all the excerpt cards of that document by whether or not they have been added to the mind map - In the board, find the cards that are
Not in MindMap, batch-select the cards you want to add to the mind map, and add them (same steps as in 3.1)
4 Path 3: Generate a mind map from the document's table of contents in one click
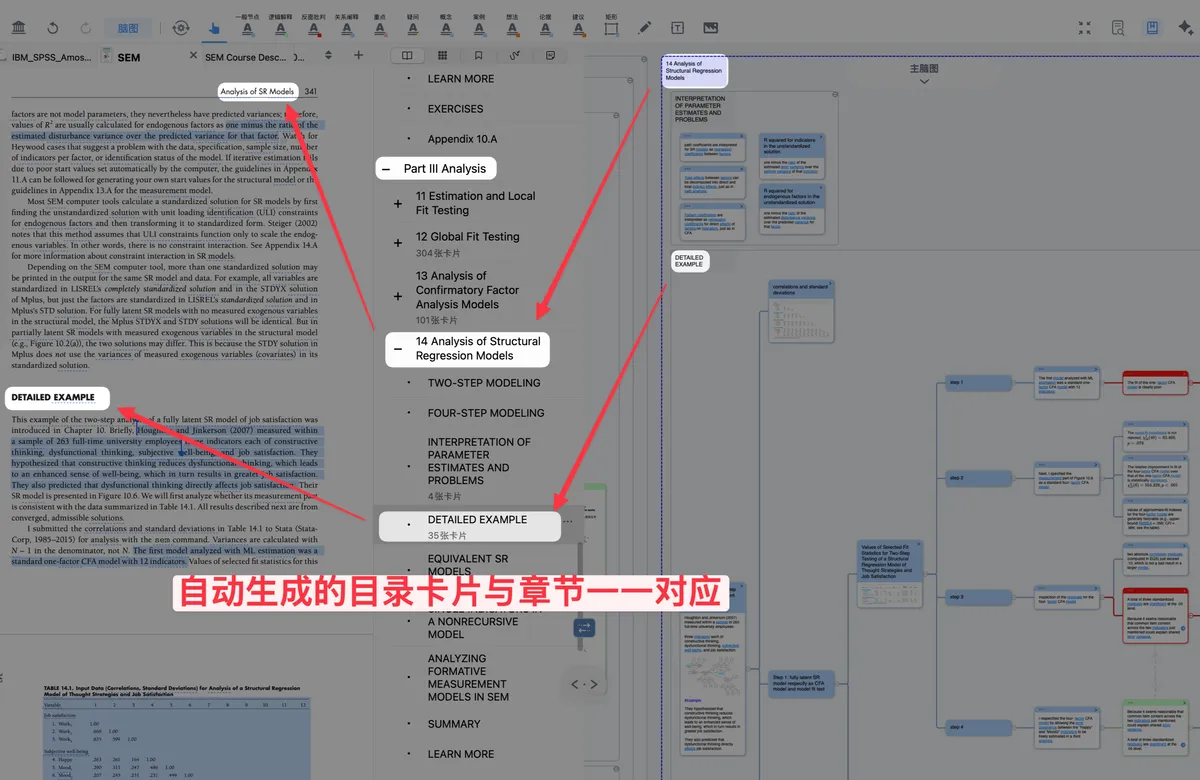
💡For documents with a clear table-of-contents structure (such as textbooks and reports), you can turn the table of contents directly into a mind map framework, and your excerpts will be automatically sorted into the corresponding chapter branches of the table-of-contents mind map.
For example, when you excerpt text from Chapter 1, MarginNote automatically creates a card named after Chapter 1 and inserts the newly created excerpt card into that card as its child node.
4.1 Confirm the document's table of contents
Page Finder
Click the Page Finder button in the top-right corner of the document (shown by the icon above) to open the Table of Contents view and confirm that the document has a table of contents.
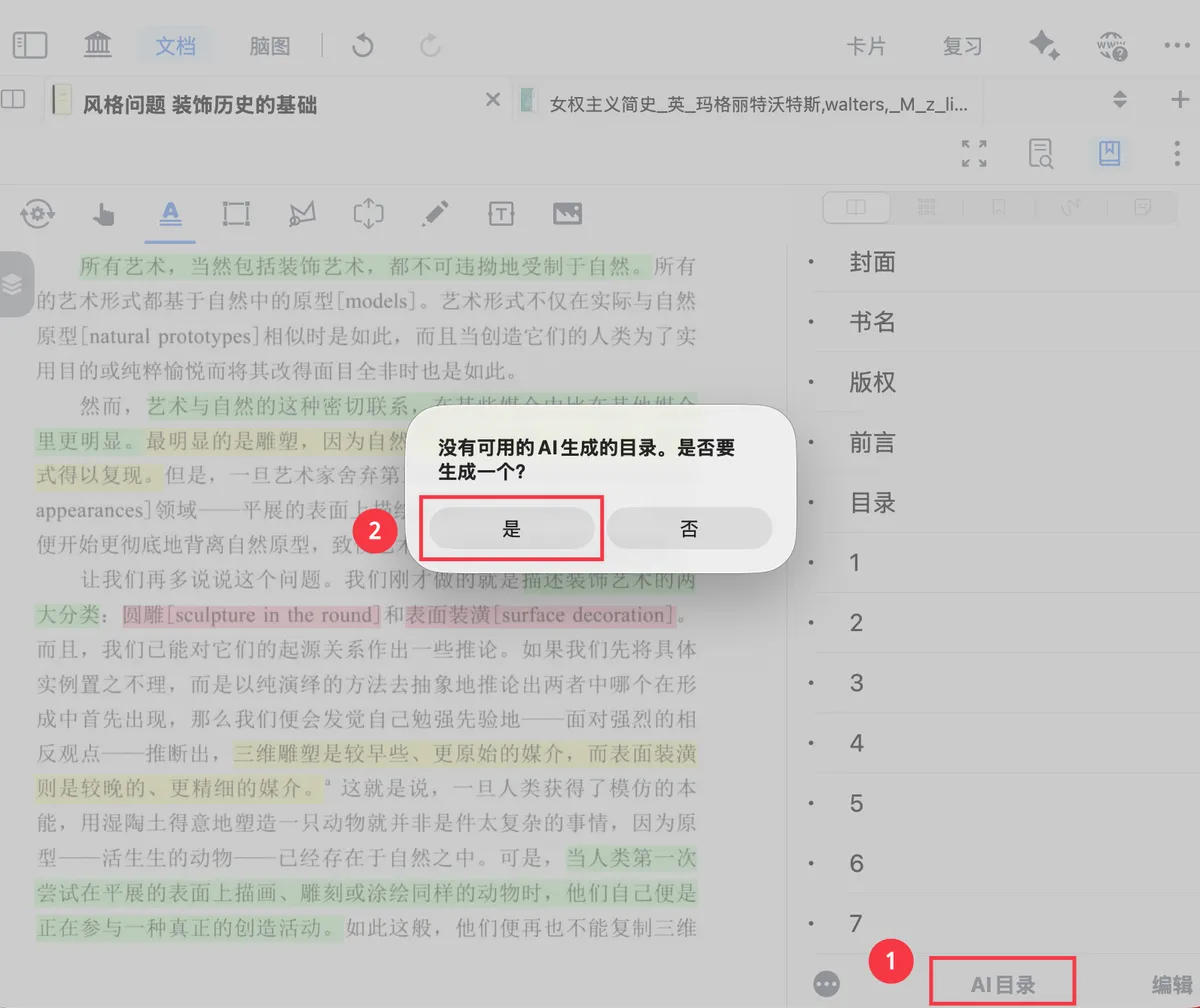
💡Tip: If the document has no table of contents, you can create one manually, or click the
AI TOCbutton at the bottom to let AI generate the table of contents automatically. For details, see Manually & automatically generate a document table of contents.

4.2 Convert the table of contents into a mind map
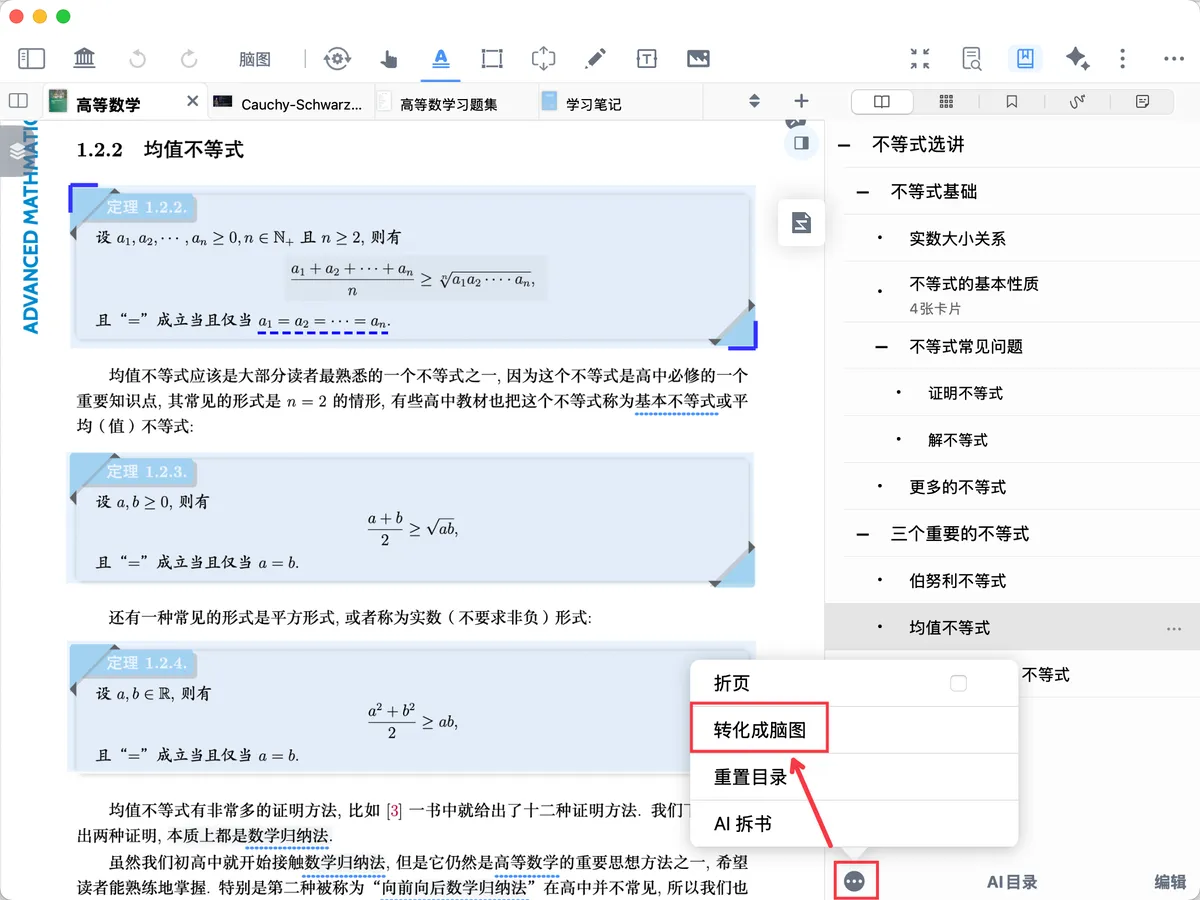
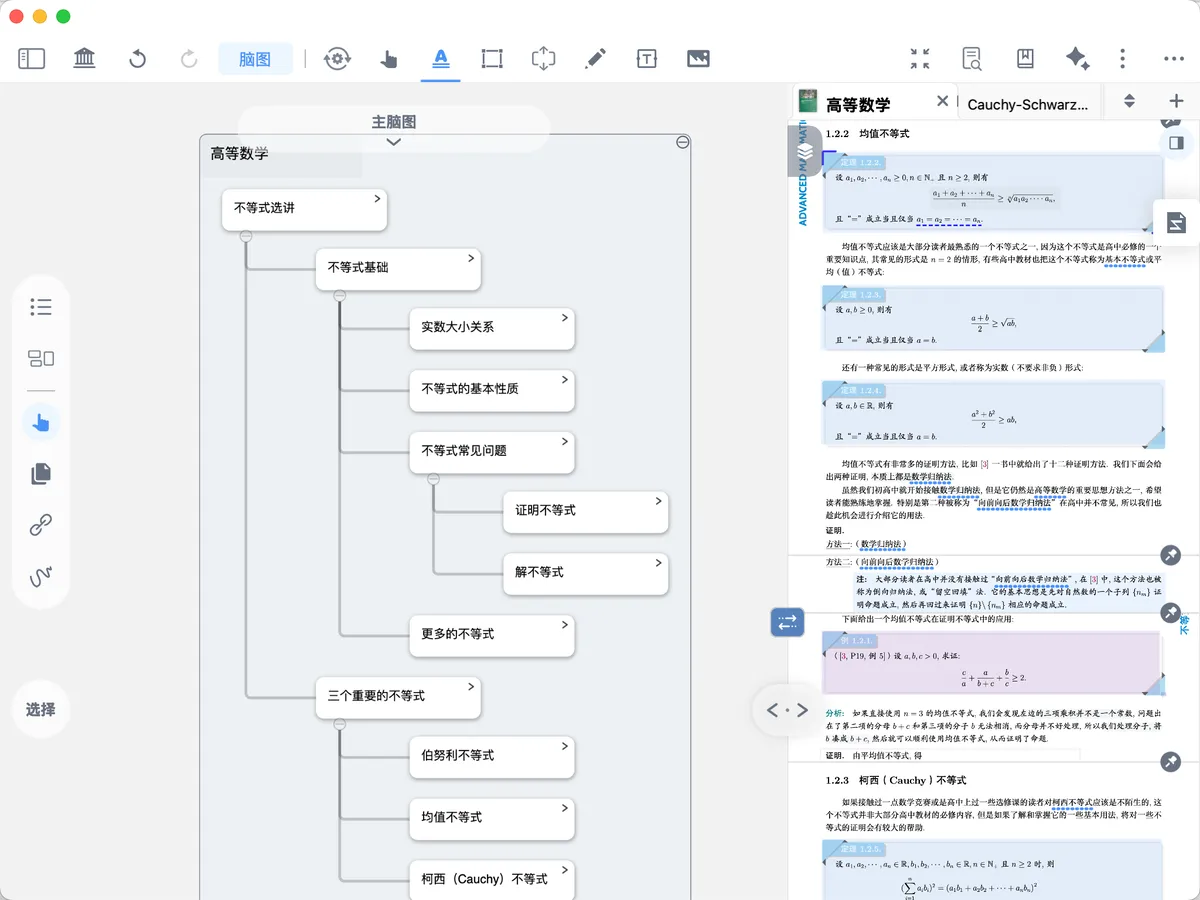
Click ... in the bottom-left corner of the Table of Contents view → Convert to MindMap, and the table of contents will be converted into a mind map card tree.

If you set the MindMap insertion position to Group (by document table of contents) (see 2.1 Configure excerpt settings), subsequent excerpts in the document will be inserted automatically into the table-of-contents mind map tree. This way, the card structure in the mind map is as clear as the document's table of contents, and even without opening the document you can easily locate the cards for a target chapter in the mind map.
5 How to use the mind map effectively once it's generated?
Once the mind map is generated, you can go further by viewing it side by side with the document, tidying up its layout, and using it to review.
5.1 View side by side with the document
💡Navigate back and forth between the mind map and the document: click a card to jump to the original text in the document, and click an excerpt in the document to locate the corresponding card.
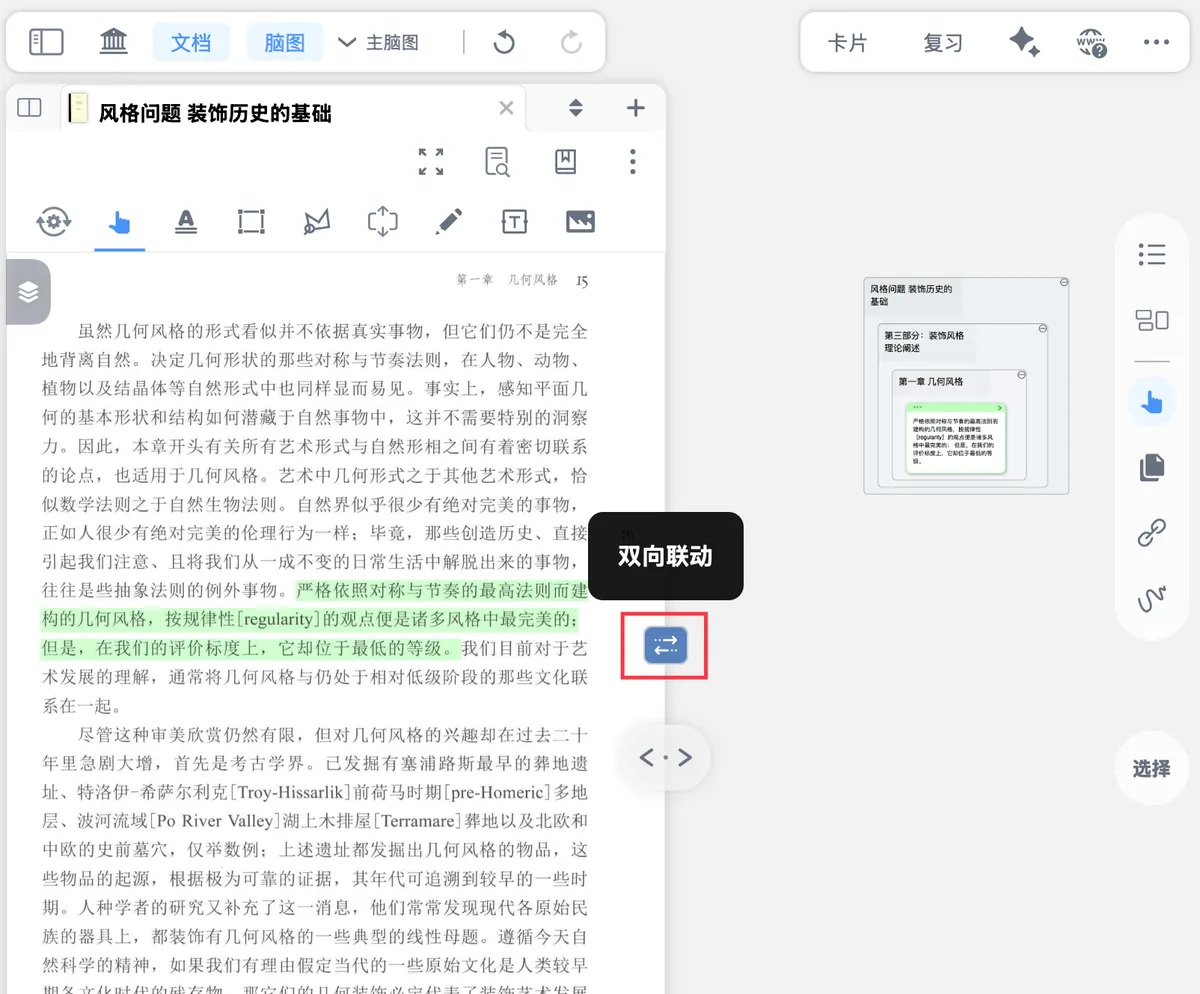
Link Control
Click the Link Control button (shown by the icon above) to switch to Two-Way Linking mode
- In the document, click an excerpt highlight or an extend note, and the mind map will automatically jump to the location of the corresponding excerpt card
- Click an excerpt card in the mind map, or click the "
>" button in the top-right corner of the card and thenDocument Position, and the document will automatically jump to the page where the excerpt is, highlighting or box-selecting the excerpt's location
For detailed usage of mind map and document linking, see Mind map and document linked view.



5.2 Organizing and laying out the mind map
After you finish excerpting, you can rearrange, zoom, expand and collapse levels, or adjust the branch styles of the mind map to make its structure clearer and easier to read. For details, see mind map rearranging, zooming, tree expansion/collapse, and 10 branch styles & sub-mind-map collapse
5.3 Review with the mind map
A mind map is not just notes — it's also a review tool. You can test how well you've mastered the material through active recall and self-testing, and you can use backlink positioning to quickly find the original text within the mind map context. For details, see Mind map review ①: active recall and self-testing methods and Mind map review ②: mind map context (backlink positioning)