Excerpt Tools and Their Automation
💡 When using the excerpt feature, there are certain recurring operations — for example, running OCR on image excerpts, setting the mind map insertion position for all excerpts, or assigning tags and colors to excerpt cards. These repetitive workflows can be automated through the
Excerpt Tool Settingsin the document navigation bar.
1 Excerpt Tool Settings (Global Default)
Excerpt Tool Settings
Tap the gear icon in the document navigation bar (shown above) to open the Excerpt Tool Settings screen. Settings made here apply to all excerpt tools in the study set.
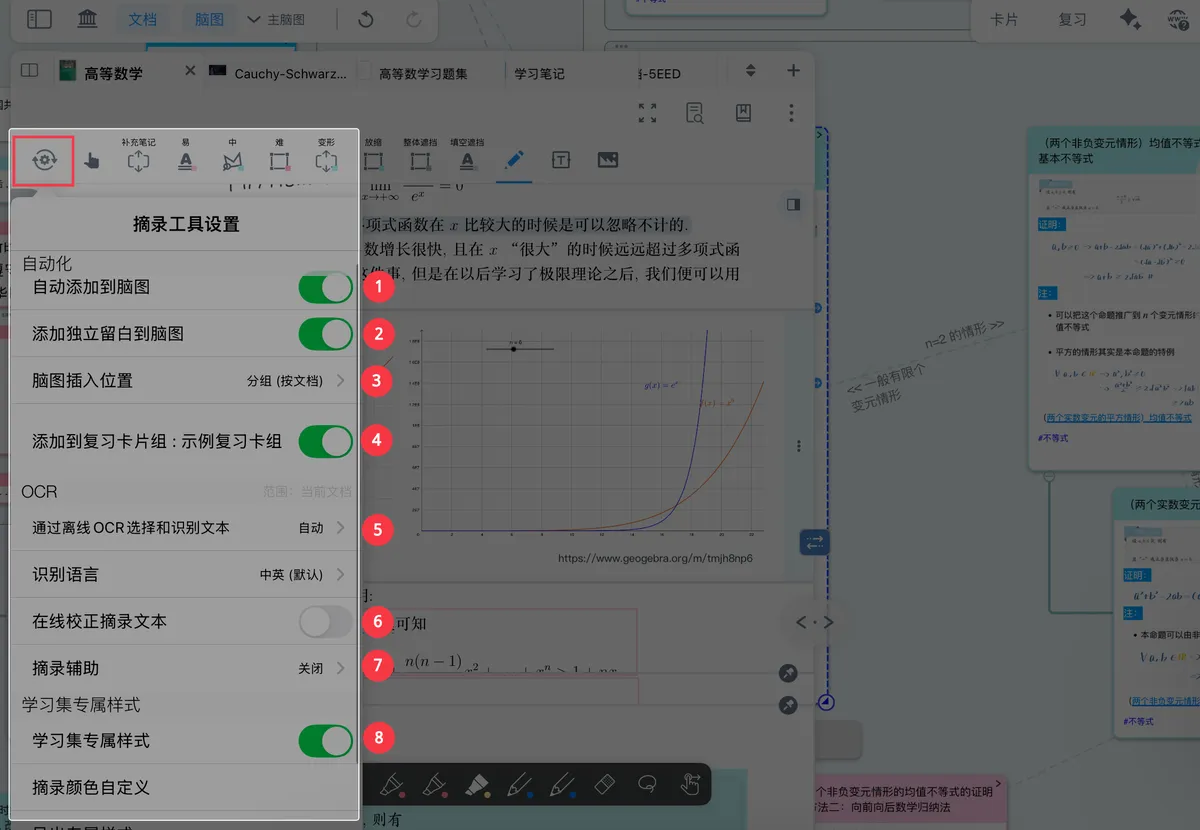
- Auto add to mind map
- Add standalone extend notes to mind map
- Mind map insertion position
- Add to review card deck
- Select and recognize text with offline OCR
1.1 Automation Settings
1.1.1 Auto Add to Mind Map
When this toggle is on, text excerpts, image excerpts, and extend notes are all automatically added to the mind map.
💡 Cards that have not been added to the mind map are collected in the card box view, where you can search for them.
1.1.2 Add Standalone Extend Notes to Mind Map
When this toggle is on, the [[standalone extend notes created in the document are automatically added to the mind map.
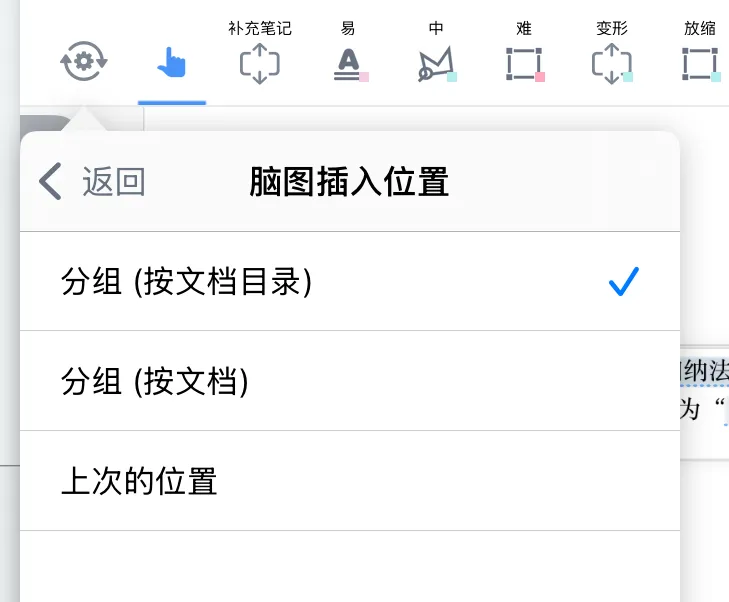
1.1.3 Mind Map Insertion Position
Once Auto Add to Mind Map is enabled, the new cards generated from excerpts are automatically arranged at a specific position within the mind map structure.
1.1.3.1 Group (by Table of Contents)
💡 Use case: the document has a detailed table of contents and you want to organize the mind map structure according to it.
When the document has a table of contents, you can choose Group (by Table of Contents) to insert new cards. (If there is no table of contents, you can also manually & automatically generate a document table of contents.) New excerpt cards are then automatically inserted as child cards under the corresponding table-of-contents node in the mind map.
1.1.3.2 Group (by Document)
💡 Use case: automatically organize excerpt cards by document source to quickly build an initial, well-structured mind map framework.
- Choose
Group (by Document)to insert new cards. - The new cards are automatically arranged as child cards under that document source.
1.1.3.3 Last Position
💡 Use case: when you want a more loosely structured mind map, or need to collect excerpts from different documents onto a single branch.
- Choose
Last Positionto insert new cards. - The new card is automatically arranged as a sibling card of the previous excerpt card (or the selected card).
1.1.4 Add to Review Card Deck
When the Add to Review Card Deck toggle is on, excerpt cards are automatically added to the selected review card deck.
On the Flashcard Review ①: Scientific Review Based on the FSRS Anti-Forgetting Algorithm screen, you can select that card deck for targeted review.
For more on the review feature, see: Flashcard Review ①: Scientific Review Based on the FSRS Anti-Forgetting Algorithm
1.2 OCR
For details, see: Search ①: Full-Text OCR + Search Positioning — Enjoy Reading Even Scanned Books
💡 The OCR feature converts text in images and PDFs from image form into text form.
1.2.1 Select and Recognize Text with Offline OCR
Offline OCR has three modes:
Auto: recognizes text as appropriate; you can then excerpt and otherwise work with the recognized text.Off: does not perform text recognition on the PDF, making it easier to userectangular excerpt.Always: always performs text recognition; suitable for documents whose pages contain hard-to-recognize text.
1.2.2 Select Recognition Language
This setting adjusts the OCR language.
OCR supports the following languages: Chinese & English (default), English, Portuguese, French, German, Italian, Spanish, Japanese, and Korean.
💡 The recognition language affects not only excerpt recognition results but also other features that need to extract page text, such as AI-generated tables of contents.
For example, if the document language is Chinese but the OCR language is set to Japanese, using AI to generate a table of contents for the document may produce garbled text.
1.2.3 Correct Excerpt Text Online
When enabled, after MarginNote 4 recognizes the text, it uses another engine to correct the recognition results.
💡 An AI OCR feature is now available; we recommend using AI OCR, which is more powerful and accurate. For details, see: AI OCR: Excerpt → Recognize → Structure Knowledge, All in One Step.
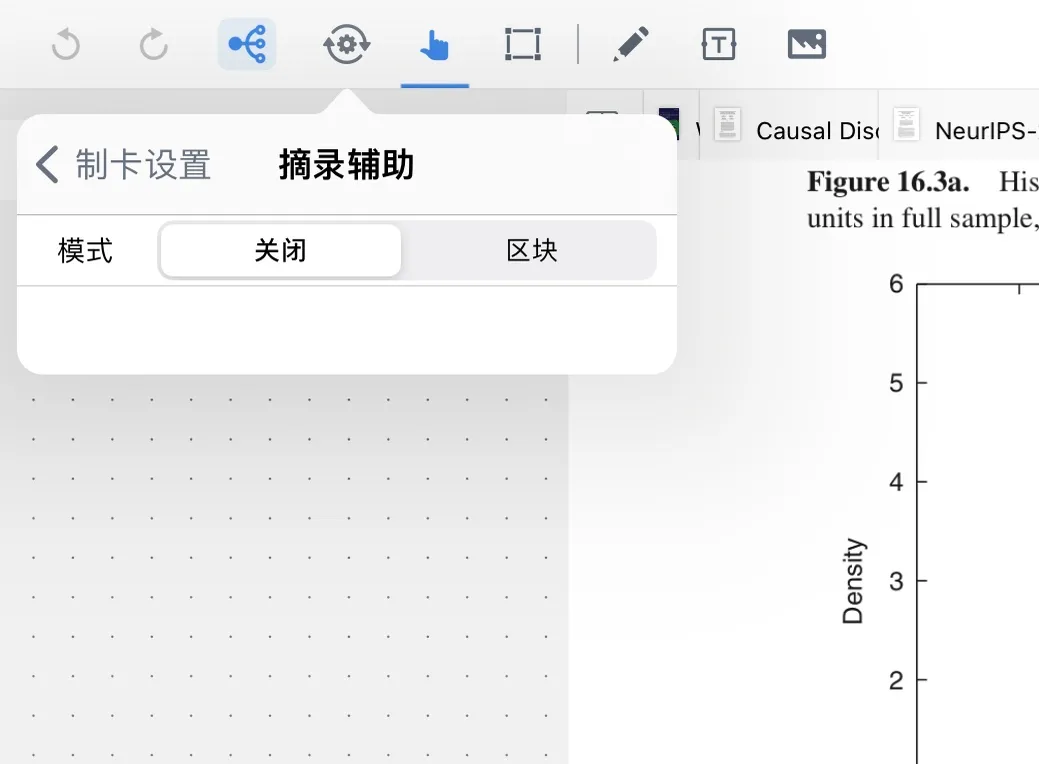
1.2.4 Assistive Excerpt
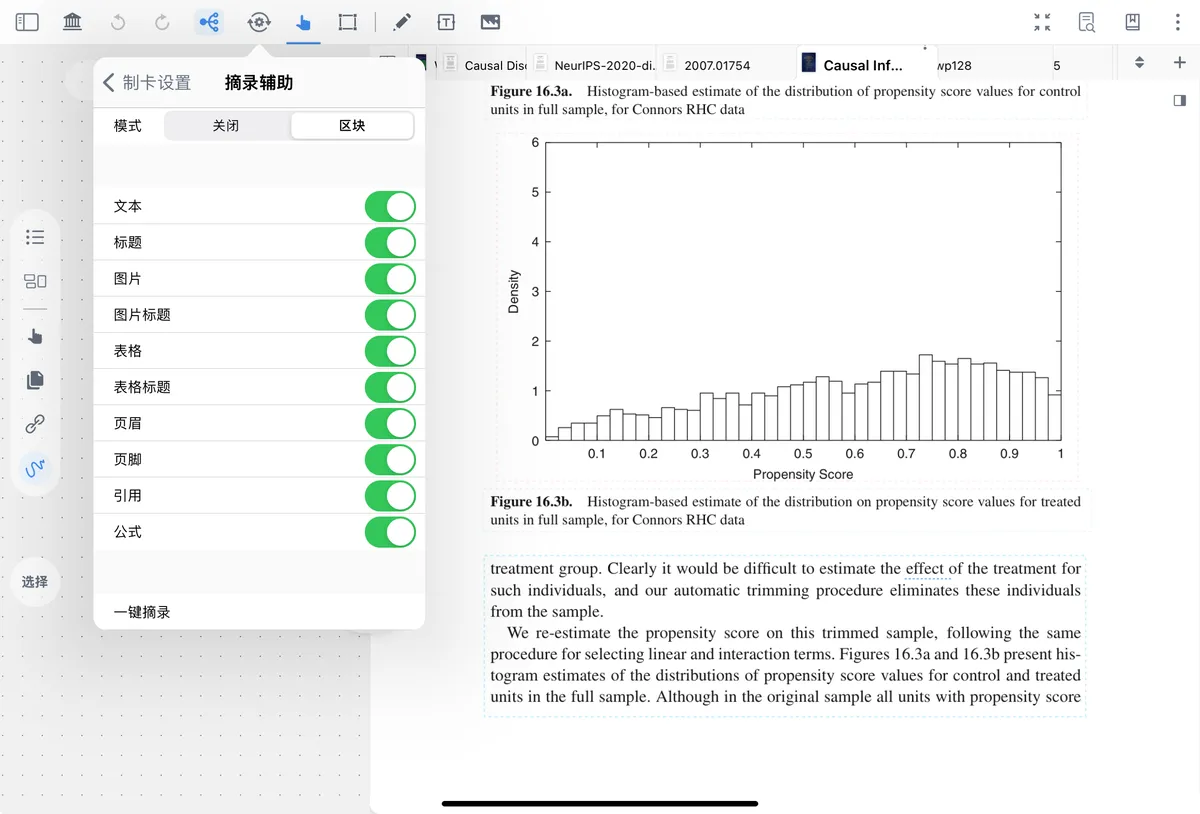
By default, all elements after the 🖼️ image are recognized, and you can see thin dashed boxes in different colors in the document.
🖼️ image
Tap the toggle for an element to turn off that assistive excerpt element. Its corresponding thin dashed box also disappears from the document view.
The One-Tap Excerpt feature within assistive excerpt lets you excerpt in bulk.
For detailed usage of assistive excerpt, see: Auto-Generate Mind Map ①: One-Tap Excerpt Using AI Models.

1.3 StudySet-Specific Styles
Enable StudySet-Specific Styles to create a custom styling configuration for each study set. You can save, export, and import these configurations to reuse styles, switch between them quickly, and share them across users, making your learning space more personalized.
For detailed steps, see: StudySet-Specific Styles: Build Your Own Learning Space
2 Card Excerpt Tool Settings (Personalized)
Once you are comfortable with the app and need to create many excerpts with the same or similar settings, you can configure your own personalized excerpt tools. This lets you categorize cards for different purposes and sections according to your own preferences as you excerpt, saving you the tedious work of sorting them later.
2.1 Opening Card Excerpt Tool Settings
Card Excerpt Settings
Tap an excerpt tool in the document toolbar, then tap the Card Excerpt Settings icon below it (shown above) to open the settings screen.
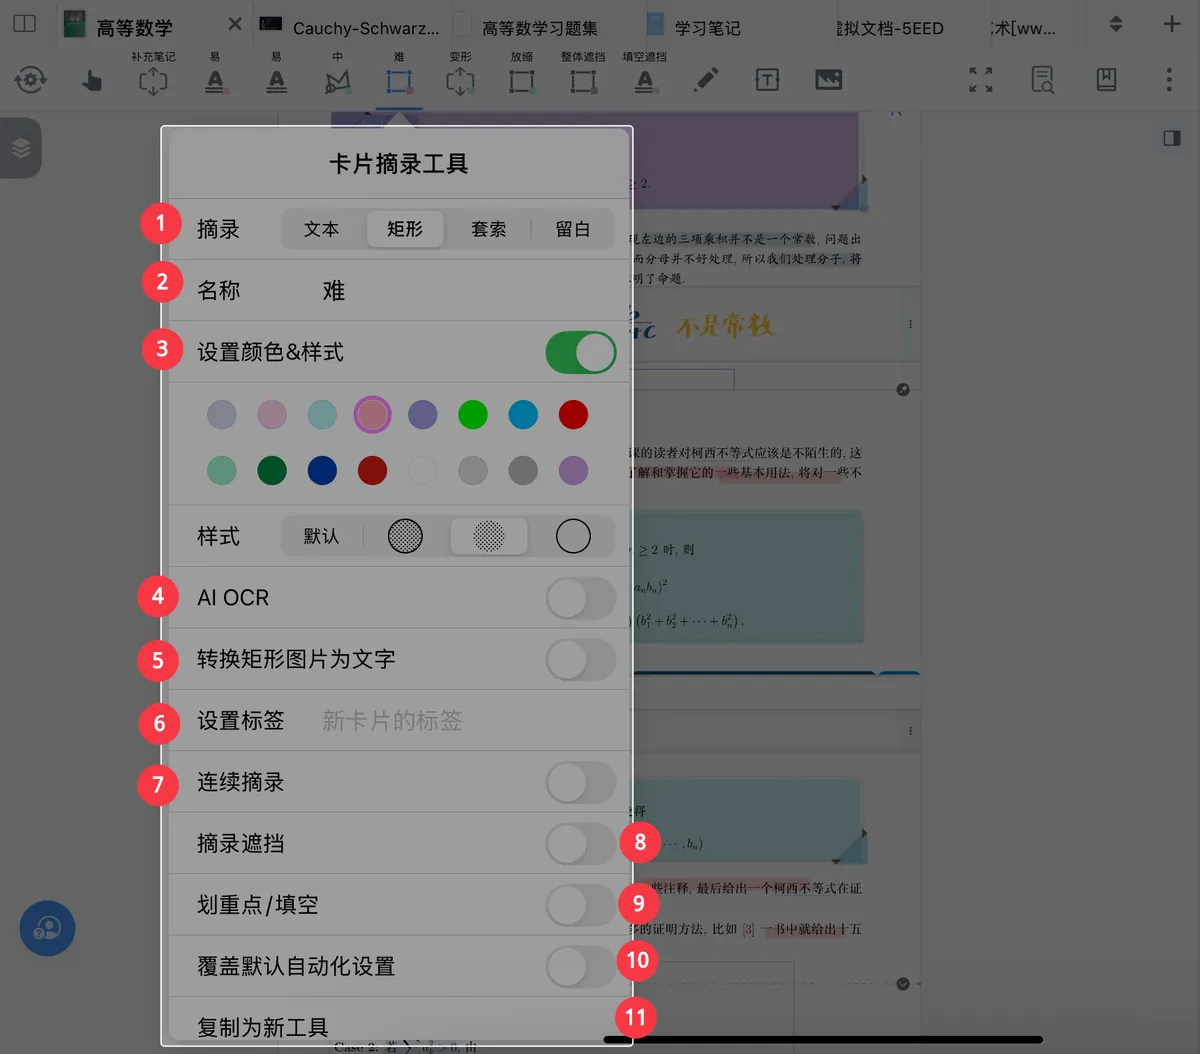

- Choose the excerpt tool type
- Name the excerpt tool
- Set color and style
- AI OCR
- Convert rectangular image to text (exclusive to non-text excerpts)
- Set tags
- Continuous excerpt
- Excerpt occlusion
- Choose emphasize and cloze
- Choose to override default automation settings
- Clone as new tool & delete
- Text to title (exclusive to text excerpts)
2.1.1 Choose the Excerpt Tool Type
Tap this field to switch the excerpt tool among four types.
For a detailed comparison of the four tools, see: Excerpt: Capture the Key Points.
2.1.2 Name the Excerpt Tool
You can customize the name an excerpt tool shows in the toolbar to indicate what the tool is for.
💡 For example, in a math study set you might name tools "Formula," "Easy Problems," "Hard Problems," and so on, so you can switch between them quickly.
2.1.3 Set Color and Style
You can customize an excerpt tool's color and fill style to distinguish different types of excerpt content.
💡 For example, set a blue + fill style for "Formula" excerpts and a yellow style for "Problem" excerpts, so you don't have to switch colors manually every time you excerpt.
- Open settings
Turn off the Set Color & Style toggle and the tool will have no default configuration; it will reuse the last selected configuration when used.
Turn on the Set Color & Style toggle to perform the style settings described below.
- Choose a style
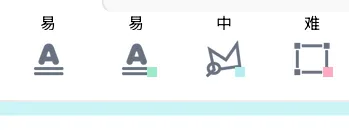
Tap 🖼️ image to choose the default color for this excerpt tool; the color appears on 🖼️ image.
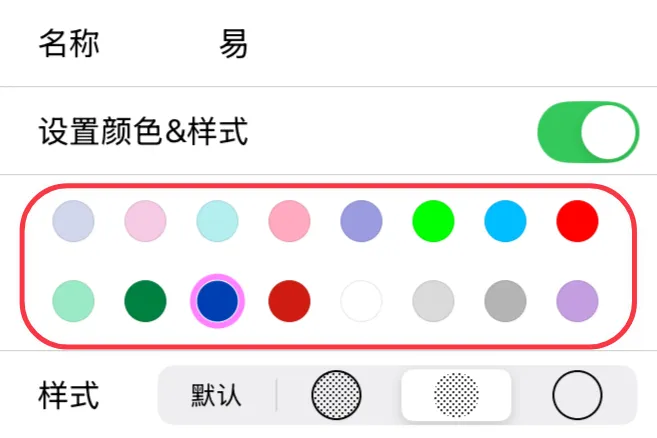
Tap a style option to choose how excerpts appear in the document, such as "fill" or "outline."



💡 You can choose a highlighting style based on your use case. For example, if you don't want the excerpt style to be too conspicuous and interfere with your highlighter markups in the document, you can choose the "outline" only mode.
2.1.4 AI OCR
The AI OCR feature accurately recognizes many content formats, including tables, vertical-text books, handwriting, and minority languages. Using preset or custom prompts, it supports deep knowledge processing such as translation, summarization, and card creation.
For details, see: AI OCR: Excerpt → Recognize → Structure Knowledge, All in One Step.
2.1.5 Convert Rectangular Image to Text
Except for the text excerpt tool, every excerpt tool has a Convert Rectangular Image to Text toggle.
When this toggle is on, the text in the excerpted area is automatically recognized by OCR and presented as text on the card.
💡 This feature is useful for handling multi-line text or text with special formatting.
If you want the excerpted content to appear as an image, turn this feature off.
2.1.6 Text to Title
On a card, the title summarizes the content and creates title links; showing only titles in the mind map also makes the mind map more compact.
But manually entering a title for every card, or converting titles in bulk, is tedious. Instead, you can turn on the Text to Title toggle in a chosen text excerpt tool. Once enabled, everything excerpted with that tool is converted into the card title, leaving the card body empty.
💡 Use case: when learning English, turn on Text to Title while excerpting new words. The word then shows a blue dashed underline in the document, and tapping it jumps to the word's card, building your own "new-word dictionary."
2.1.7 Set Tags
If you want to generate cards with specific tags in bulk to make later organizing, filtering, and searching easier, tap the blank area next to Set Tags.
A pop-up showing your existing tags appears; scroll up and down through it and tap a tag to select it. If the tag you need isn't in the pop-up, simply type a new tag name, and the system automatically creates and saves it.
💡 For example, add tags such as "Level 1 New Words," "Level 2 New Words," and "Essay Material" to the excerpt cards in an English study set to make later classification and searching easier.
For more on using tags, see: Card Grouping Board ①: Precisely Filter From a Sea of Cards.
2.1.8 Continuous Excerpt
When the Continuous Excerpt toggle is on, using this excerpt tool automatically triggers the continuous excerpt feature: everything from the first excerpt until you stop excerpting is collected onto a single card, eliminating the need to repeatedly merge excerpts from different locations afterward.
To stop continuous excerpt: tap the black Done box at the top of the document, or double-tap a blank area of the document view.
2.1.8.1 Deleting Excerpts During Continuous Excerpt
During continuous excerpt, excerpting new content or tapping already-excerpted content brings up a Delete button; tap the Delete button to delete that excerpt.
2.1.8.2 Locating Excerpts During Continuous Excerpt
After you enable continuous excerpt and finish excerpting, the content is gathered onto a single card. Tap the shaded area below the toolbar to end continuous excerpt, or tap the button to the right of the shaded area to quickly jump to where the excerpt is located in the document.
2.1.9 Excerpt Occlusion
When the Excerpt Occlusion toggle is on, content excerpted with this tool is shown as a colored block that hides the content until your next excerpt action.
After excerpting, tapping the content in that area shows it as a colored block again, helping with review and recall.
💡 Tap to see the difference between emphasize occlusion and excerpt occlusion.
2.1.10 Choose Emphasize and Cloze
Turn on Emphasize mode to create cloze deletions on notes you've already excerpted.
- When
Recall modeis off, emphasized text only shows a blue dashed underline, and emphasized box selections get a darker background. - When
Recall modeis on, emphasized areas become blank, which lets you turn the document into fill-in-the-blank questions to aid review and recall. Tap a blank to restore the original text and check whether your recall was correct.
💡
Emphasize modeandRecall modecannot be on at the same time.Only PDF supports continuous emphasizing.
2.1.11 Choose to Override Default Automation Settings
Override Default Automation Settings
When using an excerpt tool, you can manually change the behaviors preset by the excerpt tool settings under "Excerpt Default Settings" — such as "Mind Map Insertion Position," "Auto Add to Mind Map," and "Add to Review" — to meet temporary needs in specific situations.
The core of this feature is "flexibility": it lets you make personalized, temporary adjustments while still following the automated workflow.
💡 For example, if the default setting is "
Group by Table of Contents" but a particular excerpt needs its content gathered onto a single mind map node, you can use this feature to temporarily change the insertion position.
2.1.12 Clone as New Tool & Delete
In the document toolbar you can clone an excerpt tool to create a new one. Max users can create 12 custom excerpt tools (Pro users can create 8).
💡 Use cases: When different subjects need similar but slightly different excerpt configurations, clone a base tool and fine-tune it — for example, clone the "English Word Excerpt" tool and change its tags to make an "English Phrase Excerpt" tool. When different chapters of the same document need different excerpt styles, clone the tool and adjust settings like color and tags instead of creating one from scratch.