Data Sync, Backup & Restore
💡Recommended setup for new users:
- How to enable iCloud Sync
- Enable To learn about the sync status indicators, see "Check whether Cloud Sync is enabled for documents and study sets"
💡Must-read note: "iCloud Sync" vs "Backup"
- iCloud Sync only synchronizes note data across multiple devices; it provides no backup capability whatsoever! (There is latency, and an incorrect sync status display can leave the note data in iCloud incomplete.)
- A backup fully preserves the complete database as it was at the time of backup (including brush settings, excerpt tool settings, etc.). Please be sure to back up your data during daily use and before uninstalling the software.
💡If you still experience sync problems after configuring things as described in this article, first check: FAQ: iCloud Sync Guide
1 iCloud Sync
1.1 How to Enable iCloud Sync
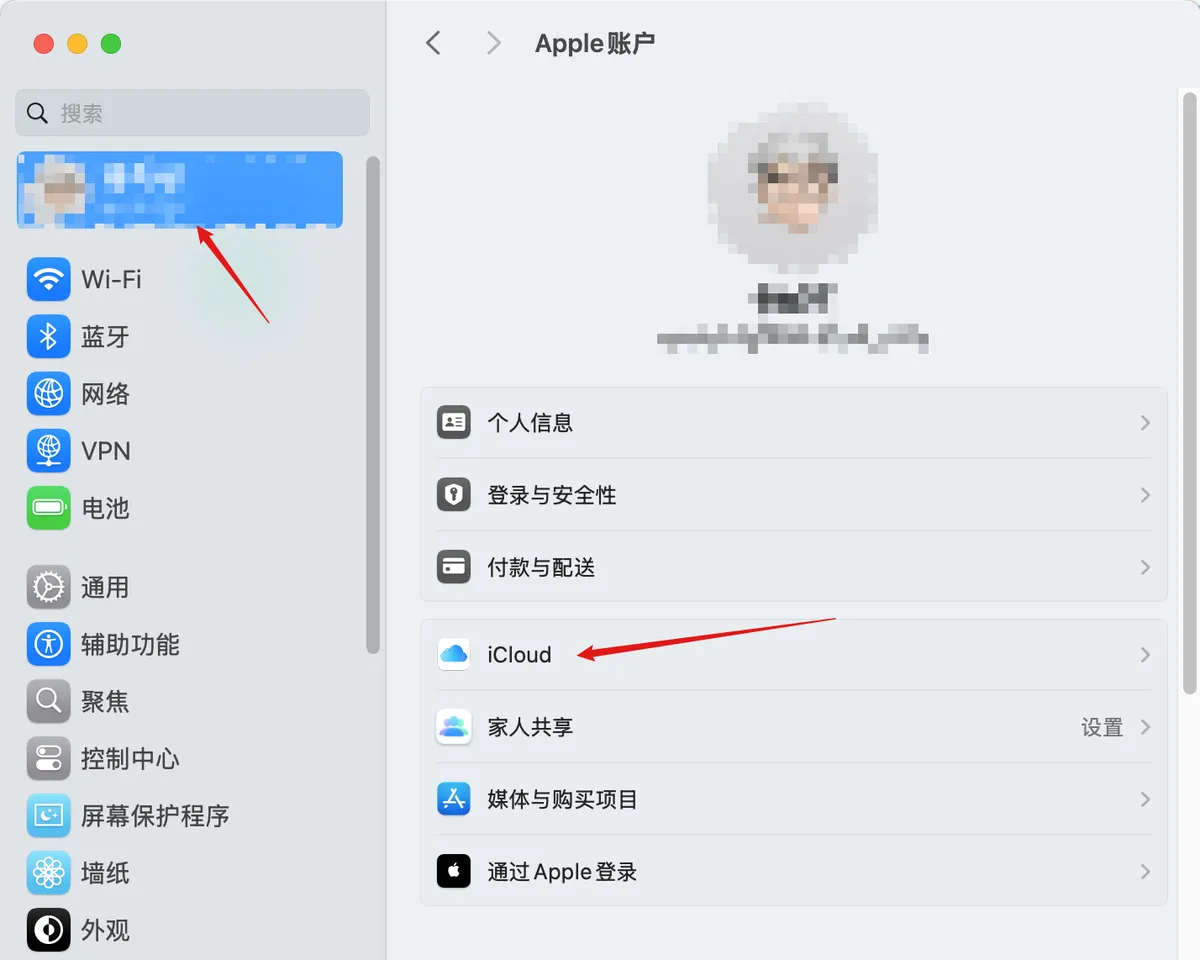
- Make sure iCloud is signed in and MarginNote sync is enabled
- Open System Settings, tap your profile picture, then select "iCloud".
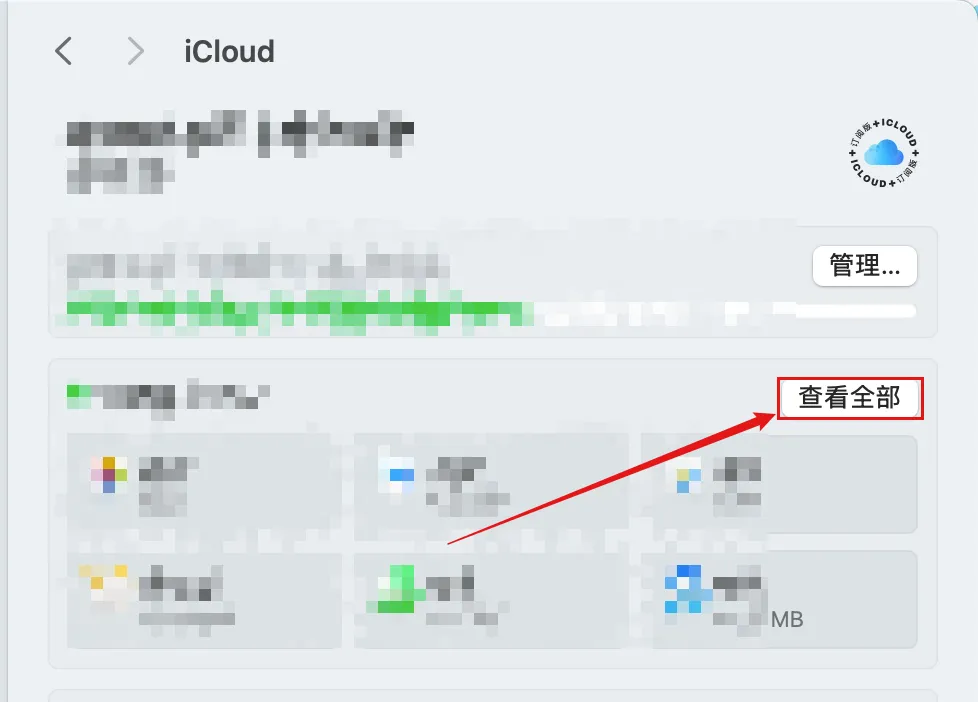
- Tap See All
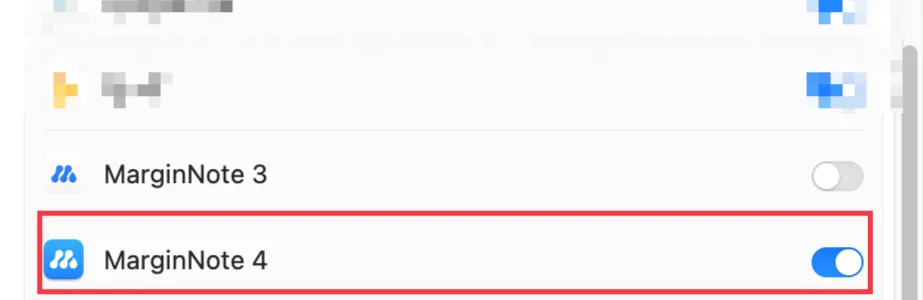
- Make sure MarginNote4 is checked and enabled
2. Configure the iCloud sync options in MarginNote settings
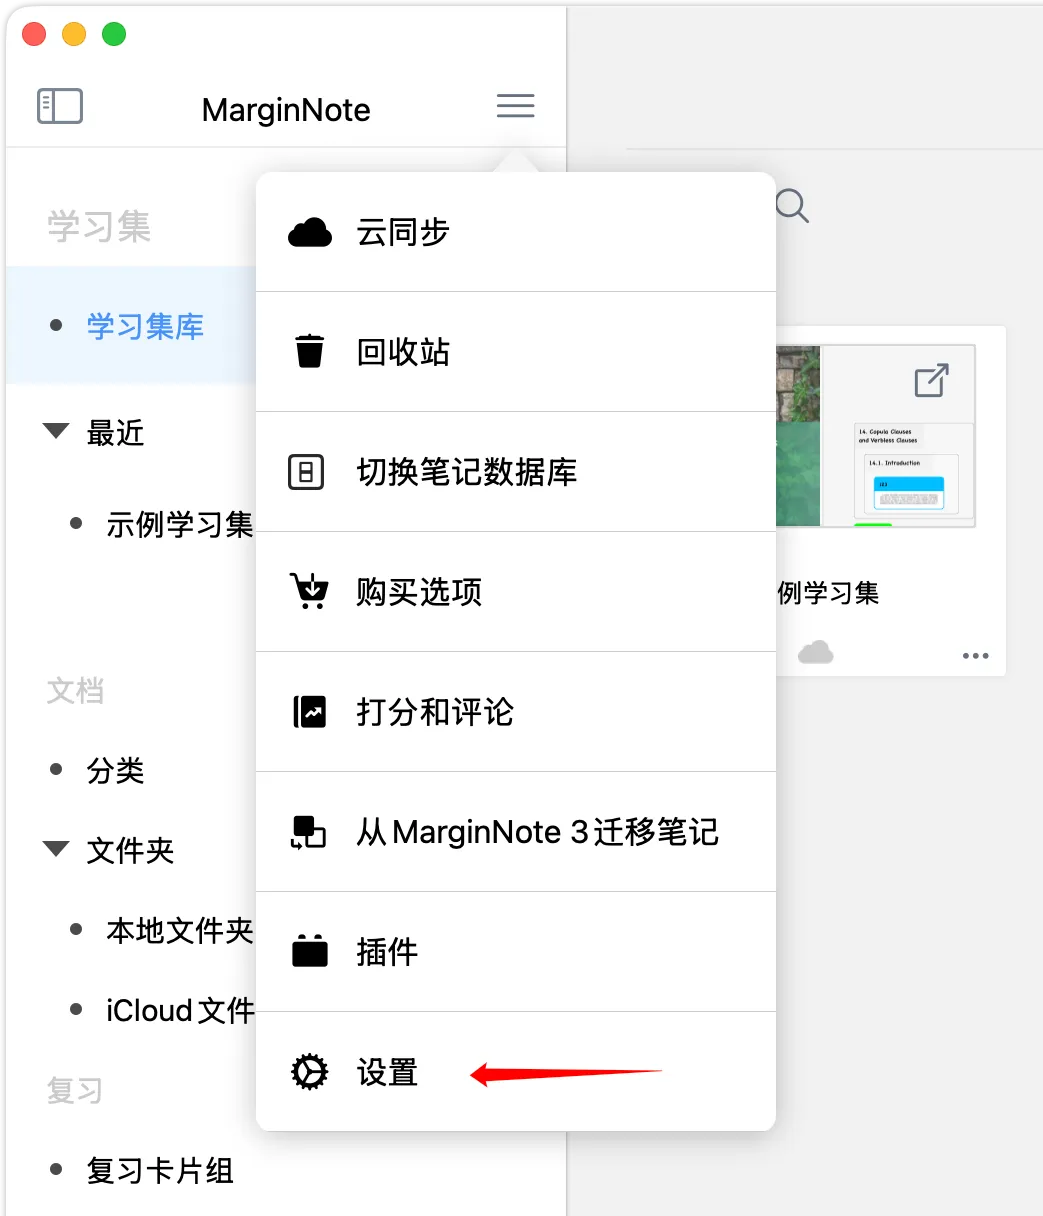
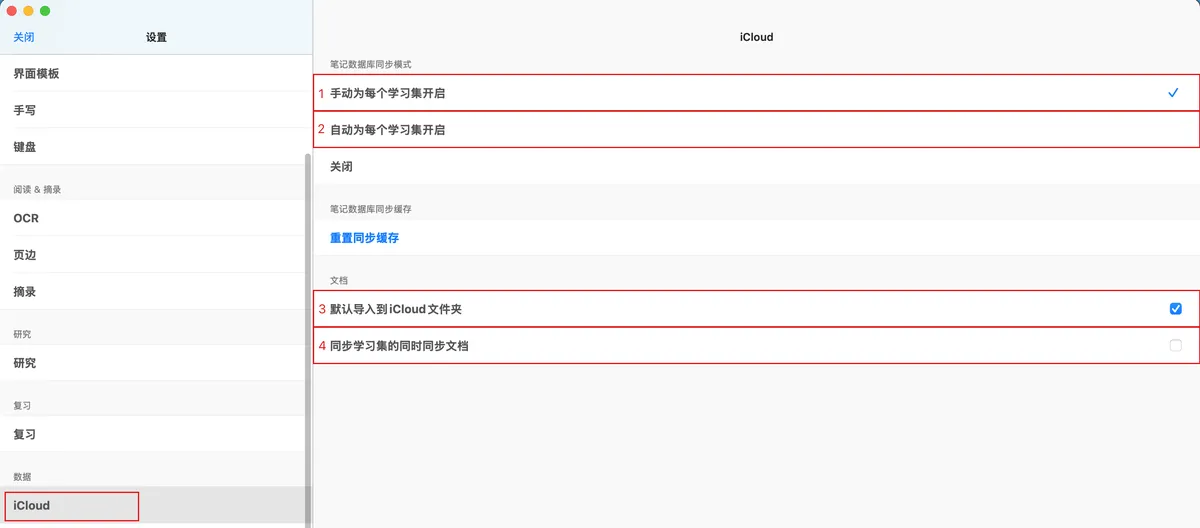
Tap MN Settings - Cloud Sync; the following options are available:
💡We recommend that users with sufficient iCloud and device storage enable the following settings: Enable Automatically for Each StudySet, Import to iCloud Folder by default, and Sync Documents while Sync StudySets
Note database sync mode: Enable Manually for Each StudySet1 / Enable Automatically for Each StudySet2 / Disable3
💡Note database: includes all your note content and settings, such as excerpts, mind maps, document notebooks, handwriting layers, and studyset-specific styles—it does not include the source PDF.
Note database sync buffer: Reset Sync Buffer4
- Document: Import to iCloud Folder by default5 / Sync Documents while Sync StudySets6
1.2 Check Whether Cloud Sync Is Enabled for Documents and Study Sets
1.2.1 Check Whether the Study Set Sync Toggle Is On
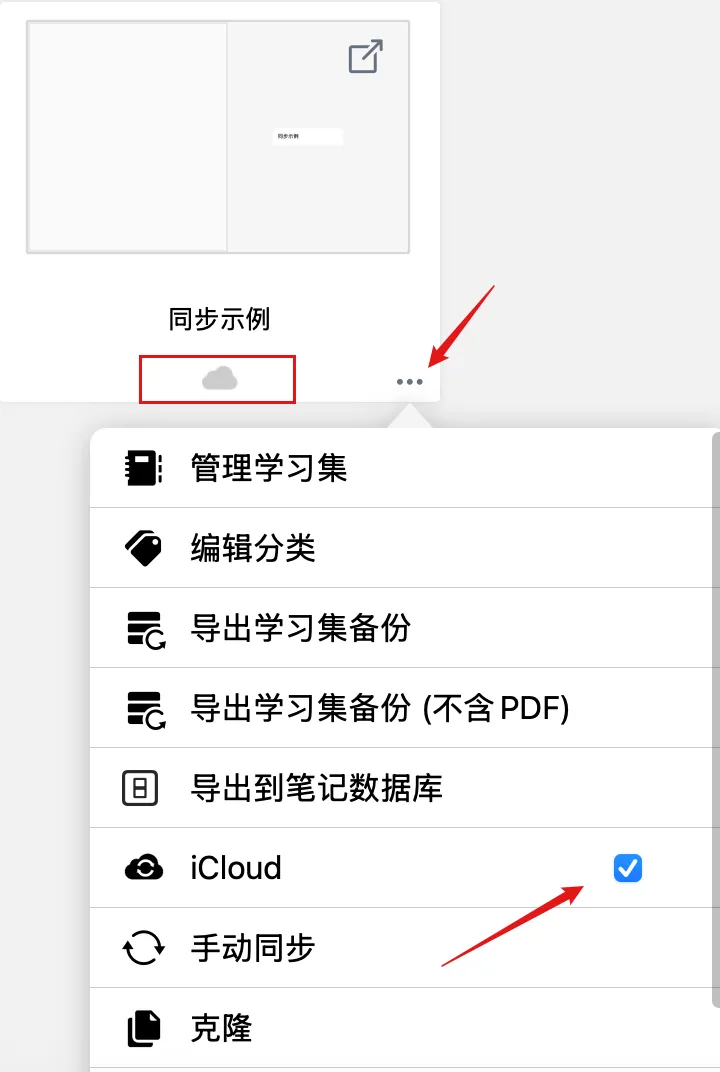
💡 Study sets without the red-box marker shown in the image will not be synced. You can manually turn on the iCloud sync toggle from the "..." More options menu in the bottom-right corner of a study set.
1.2.2 Check Whether the Document Sync Toggle Is On
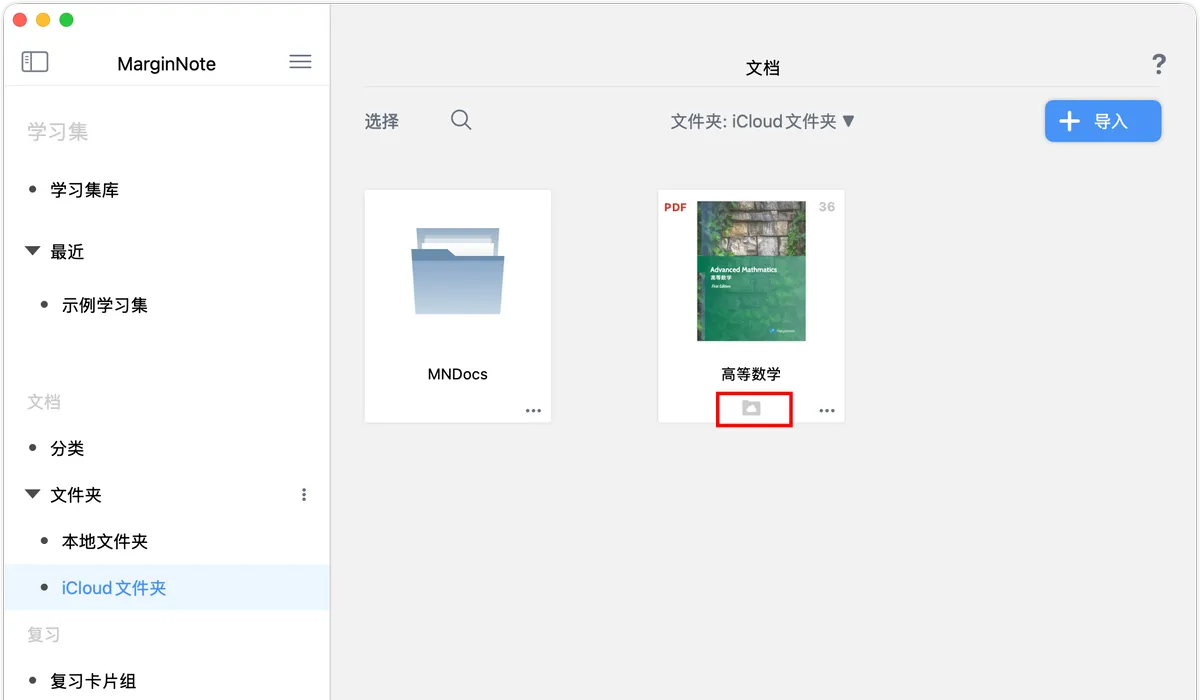

💡 Documents without the red-box marker shown in the image will not be synced. You can manually move the file into the iCloud folder, or use Document: Import to iCloud Folder by default5 / Sync Documents while Sync StudySets 6 (once this toggle is on and the document has new notes added, the document will be synced).
View Note Sync Status
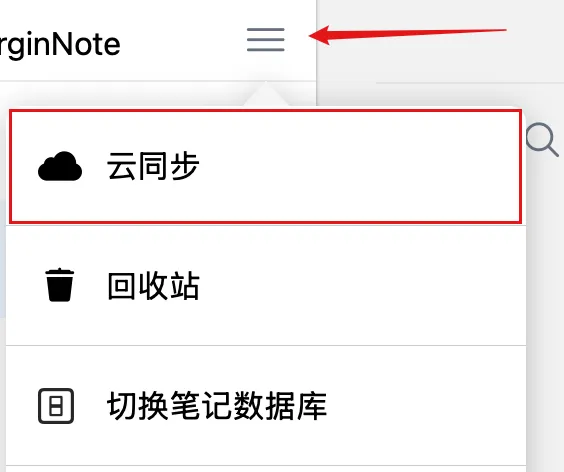
After completing the settings above, you can open the Cloud Sync screen to check sync progress.
- If some study sets haven't been downloaded, tap the "···" after the study set name and choose
Download from iCloudfrom the pop-up menu; wait for the download to finish to obtain the study set data from the cloud. - When all data has been fully uploaded/downloaded, the screen will display Database synced (if the database is large, this may take a while).

2 Manual Data Backup
💡You can store the manually exported backup file in "Files", save it to a cloud drive (it's best to compress the backup file before uploading to reduce the risk of data corruption), or AirDrop it to a target device. If you do not perform a save operation, a cache will be left behind.
2.1 Back Up an Individual Study Set/Document
💡A study set backup can be created from the home page or inside the study set; it includes the notes and mind maps of all documents in the study set. A document backup is created from the home page; it includes only the notes of the current document.
2.1.1 Study Set Backup
💡When the device you're sharing with already has the documents you need, you can choose
Export Study Set Backup (without PDF), which is smaller (it does not contain version history and cannot restore historical versions).
-

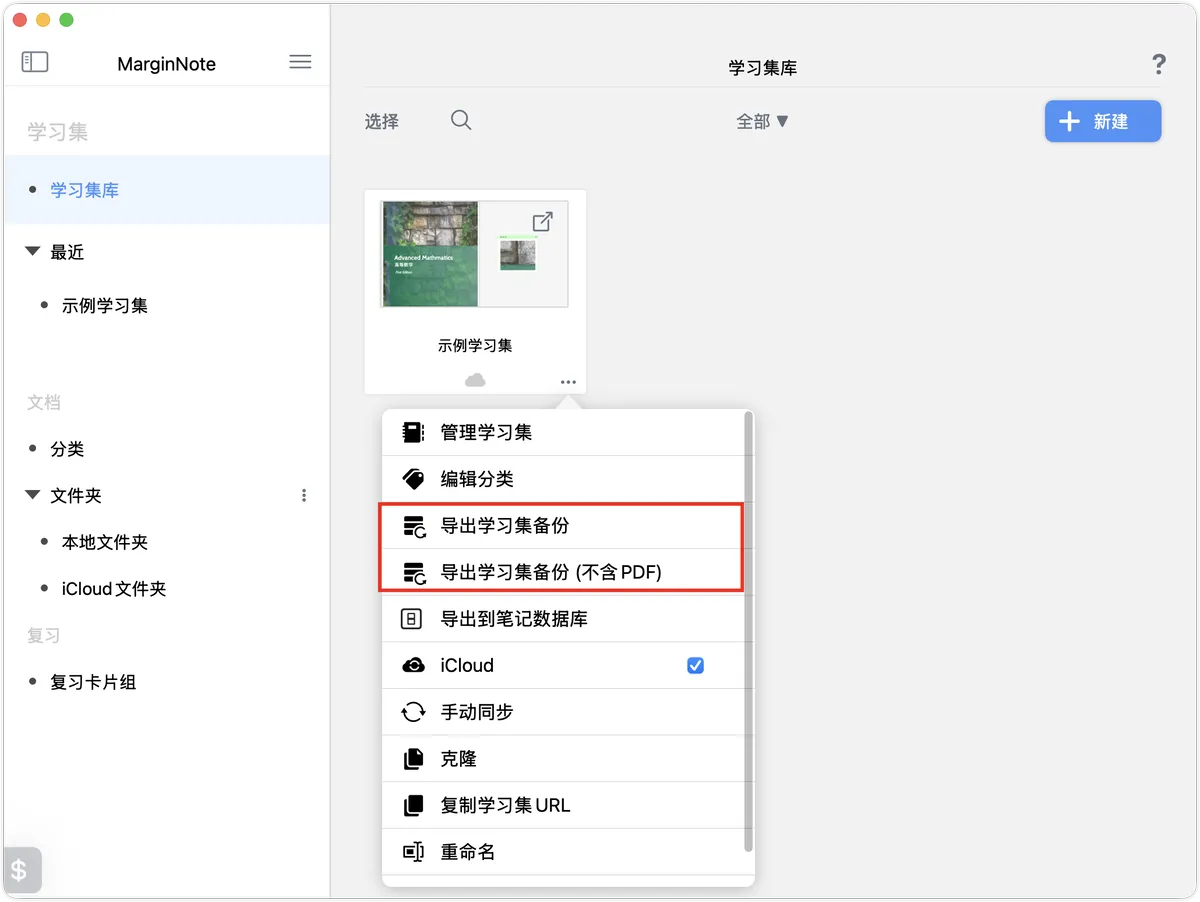
There are two ways to export a study set backup. First, on the MN home page, find the target study set you want to export and tap the
...in its bottom-right corner:Export Study Set Backup: the backup file includes the note data in the study set (including version history) and the source documents.-
Export Study Set Backup (without PDF): the backup file contains only the note data, not the source documents.💡MN's note data is not stored inside the document files.
-
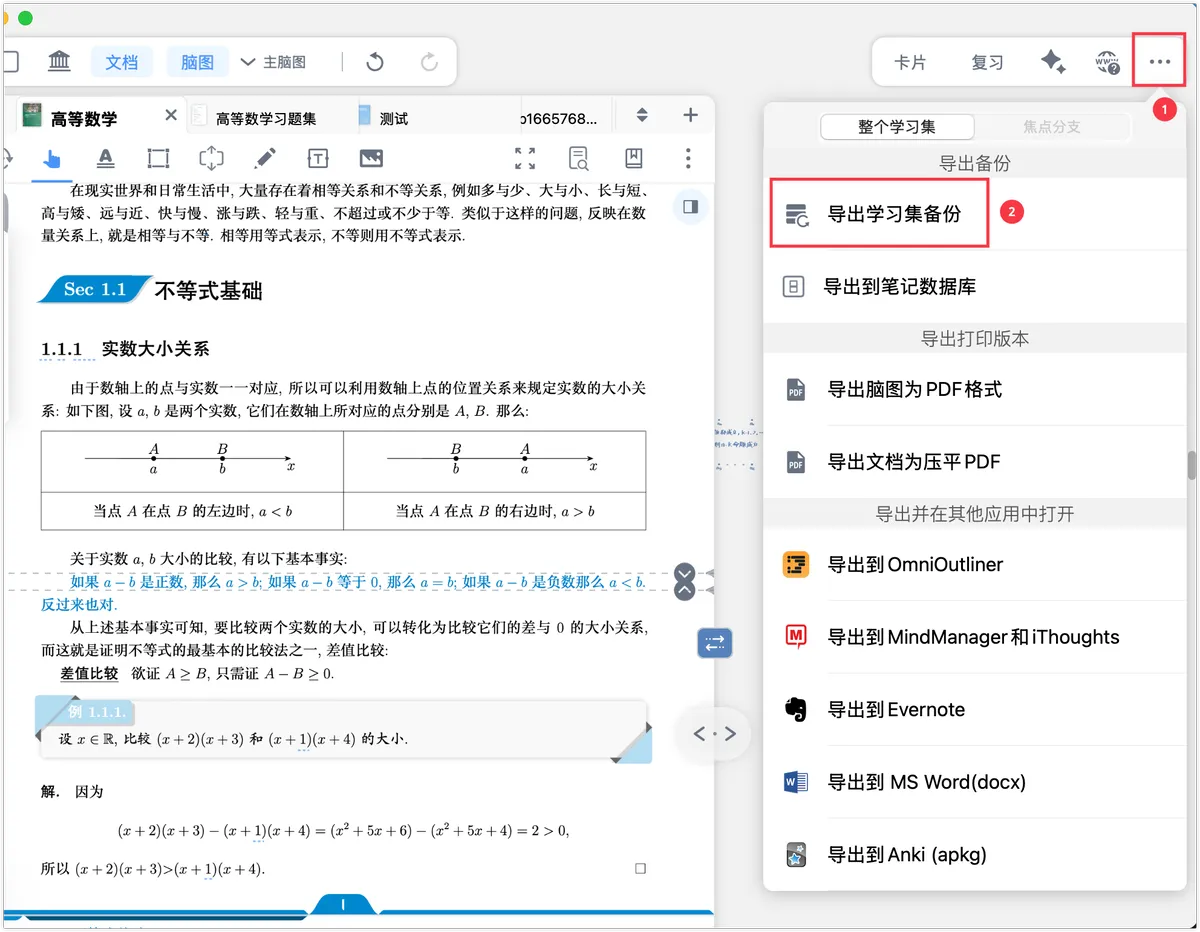
In the study set view, tap
...in the top-right corner, thenExport Study Set Backup, to export the current study set backup (with version history).💡If the mind map view is currently showing a "sub-mind map" or "focus branch", you can export the content of the current sub-mind map or focus branch.
2.1.2 Document (Folder) Backup
On the document management page, the "..." More button in the bottom-right corner of a folder or document lets you back up and export documents.
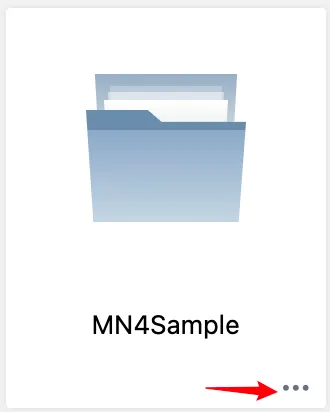
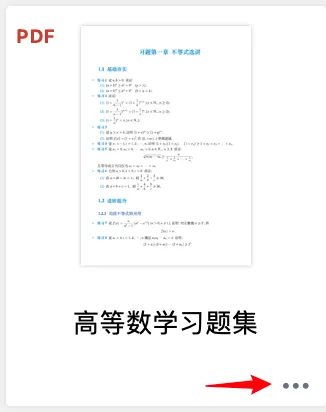
After tapping the "..." More button in the bottom-right corner of a document/folder, tap Export Backup / Export Document Backup in the submenu that appears to export a ".marginpkg" backup file for that folder or document.
💡This file includes the source document and the notes made on it (notes on the document such as card excerpts, text boxes, handwriting, and images; it does not include the mind map structure).
2.2 Back Up All Data
💡
Full Exportis a "snapshot" of all your current data, suitable for the following scenarios:
- Sharing with others: You can send the exported file directly to someone else. They don't need to sign in to your account to import it—quick and convenient.
- Archiving materials: You can package and archive all of your study materials from a particular period. If you ever need to go back, simply restoring that file will return the entire database to its state at the time of saving.
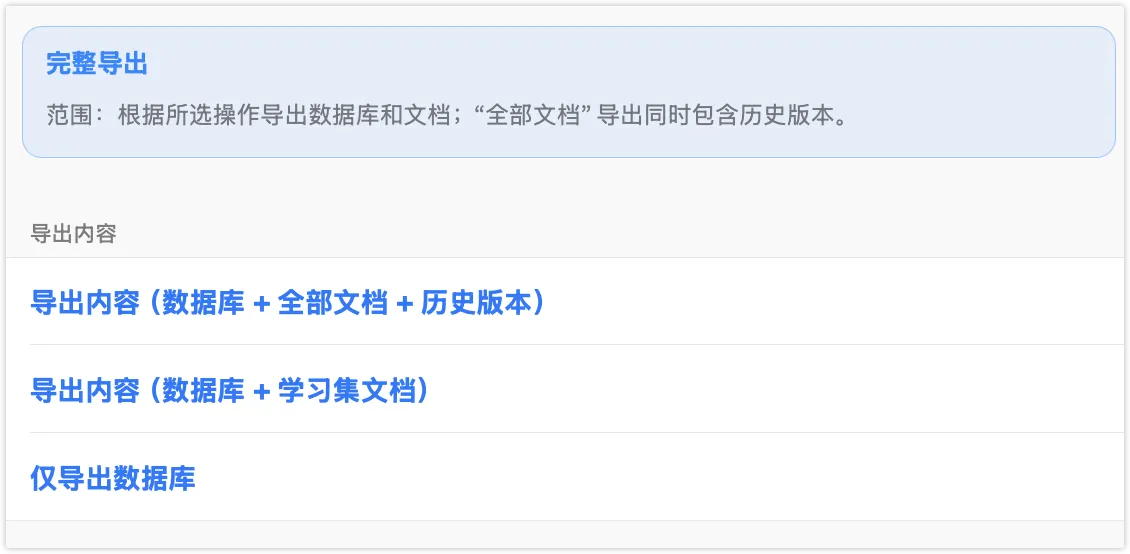
Full Export has three options:
Export Content (Database + All Documents + Version History): includes all notes, all documents in the database, and the version history of study sets.Export Content (Database + StudySet Documents): includes the documents and all note data from all folders that have been added to study sets (local folders, iCloud folders, external folders). It does not include version history.-
Export Database Only: note data only, no source documents.💡 Note that MN's note data is not stored inside the source document files.
Tap one of these to generate the corresponding backup package, which you can send to Files or another app to save or share.
💡Recommended scenarios for Full Export
Option Storage Usage Suitable Scenario Export Content (Database + All Documents + Version History)High Plenty of local storage, you need to keep the complete database, and you don't want to back up documents manually (i.e., all the documents in the database are ones you need) Export Content (Database + StudySet Documents)Medium You don't need version history, or you only need to back up the documents already added to study sets (e.g., some documents in the database don't need to be read right now and you don't want to back them up) Export Database OnlyLow You already have backups of all your documents and don't need version history; this option can greatly reduce the size of the backup file
3 Automatic Data Backup
Tap Settings - Backup & Restore on the home page; there are two backup methods: Full Export (manual) and Auto Backup (automatic).
💡We recommend that all users enable this to keep their data safe.
Auto Backup is designed to protect your data to the greatest extent possible. By continuously recording the version history of your data, it ensures that even if you make a mistake or data errors occur, your notes can be fully restored.
-
Step 1: Choose a backup location
- On the home page, tap
Settingsand go toBackup & Restore - Choose the Auto Backup save location
- Supported:
WebDAV Server,Local Folder,Baidu NetDisk,Google Drive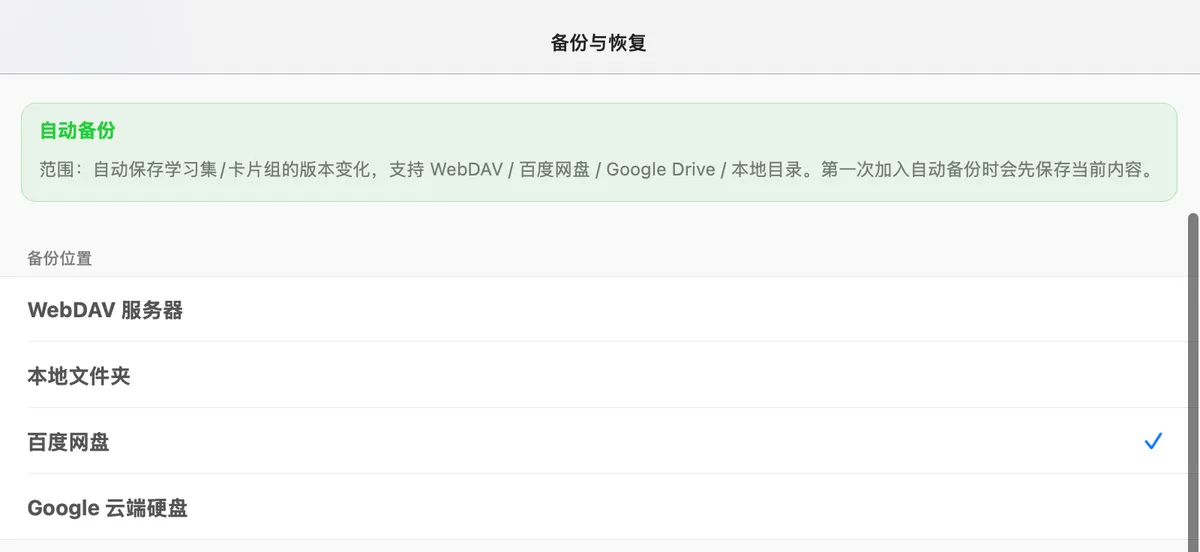
💡Storage locations explained
Storage Location Speed Note Safety If Device Is Damaged WebDAV Server Upload and speed depend on your WebDAV provider. For a local NAS using WebDAV, speed depends on your NAS disk speed and LAN bandwidth High Local Folder Fastest; depends on disk speed Low Baidu NetDisk Upload and download speed depend on your membership status High Google Drive Available only to overseas users; depends on network bandwidth High - On the home page, tap
-
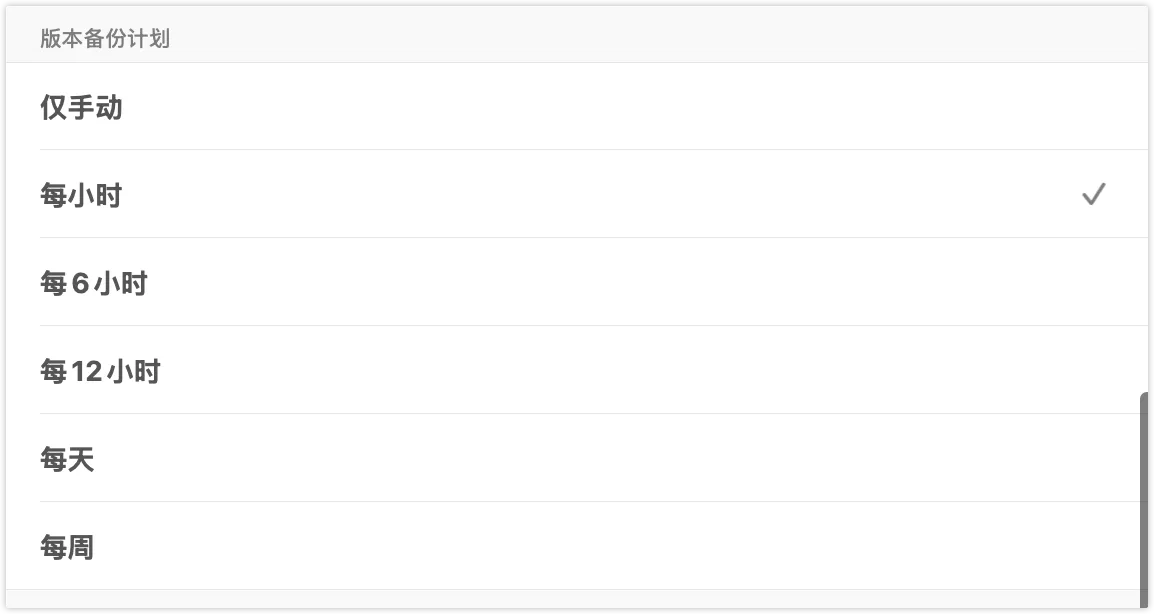
Step 2: Set the backup frequency
Available frequencies: Manual Only / Every Hour / Every 6 Hours / Every 12 Hours / Daily / Weekly
💡We recommend setting it to Every Hour
-
Step 3: Configure notifications
Notify on auto-backup failure: When enabled, you'll be notified whenever a backup fails, so you can spot problems promptly.Notify on auto-backup success: When enabled, you'll also be notified each time a backup succeeds.
💡Scheduled auto-backups send notifications only when the App is not running. The results of manual backups and restores are shown directly on this page.
-
Step 4: Whether to include original documents (PDF/video)
You can choose whether the auto-backup content includes original documents (PDF/video).
- On (default): The backup also includes the original document files.
- Off: The auto-backup saves only version data and note objects. When restoring on a new device, the original PDF/video files must already exist or be re-imported.
-
Step 5: Run the backup
-
Tap
Start Auto Backup Now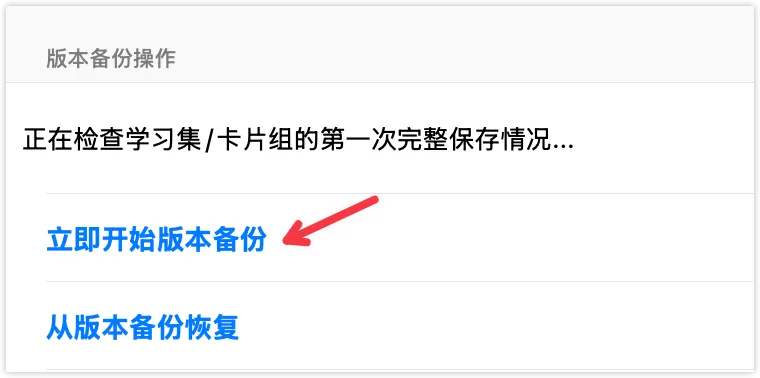
-
If this is your first backup, or the backup location has no backups yet, you'll see a prompt
💡Here we recommend choosing
Complete the First Full SaveOtherwise, only the backups in this device's
Version Librarywill be backed up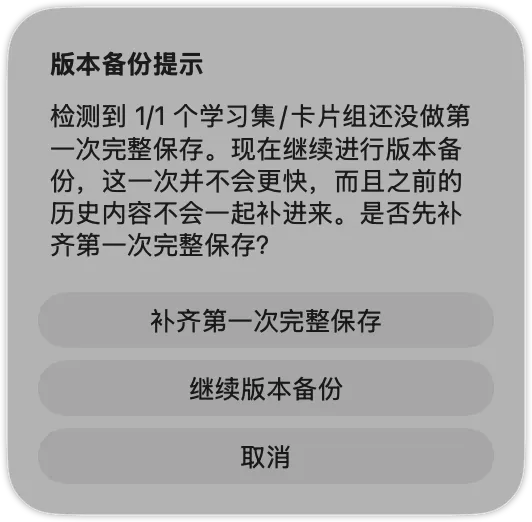 The bottom of the page shows the last backup time and status (success/failure), so you can confirm at any time whether backups are running properly.
-
4 Restore Data from Backup
4.1 Restore from a Full Export File
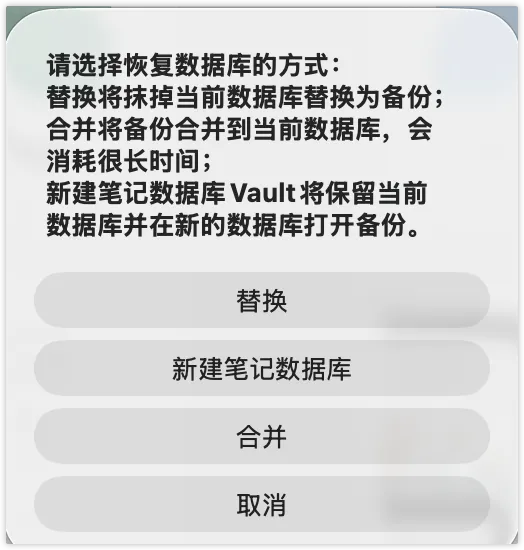
When you need to restore previously backed-up notes, open the full export file with MarginNote to restore the data.
Replace: replaces the current database.New Note Database: MAX users can create a new note database to open the backup file.-
Merge: merges the current database with the database being imported.💡 Both identical and differing notes in the databases are kept (identical notes will appear twice); the same applies to study set and document backups.
4.2 Restore from Auto Backup
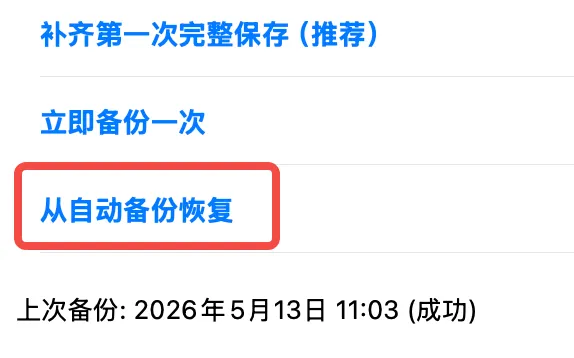
Go to Settings - Backup & Restore, tap Restore from Auto Backup, and select the version to restore.
4.3 Other Backup Methods
4.3.1 Back Up by Connecting to a Computer
-
Learners who have a Mac or PC can quickly back up and restore all their note data through Finder or iTunes.
- Connect the iPad to the computer using the included USB cable.
- Tap "Trust" and enter the device passcode.
- In Finder, locate and click your device.
- Under Files, find and click "MarginNote4".
- Inside "MarginNote4", find a folder named "MN4NotebookDatabase".
-
Backup: drag the folder out; it contains all your note data. (No PDF)
- Restore: drag the folder out, then put the splite and other files from this folder back in one by one to replace the existing ones.
4.3.2 System Backup
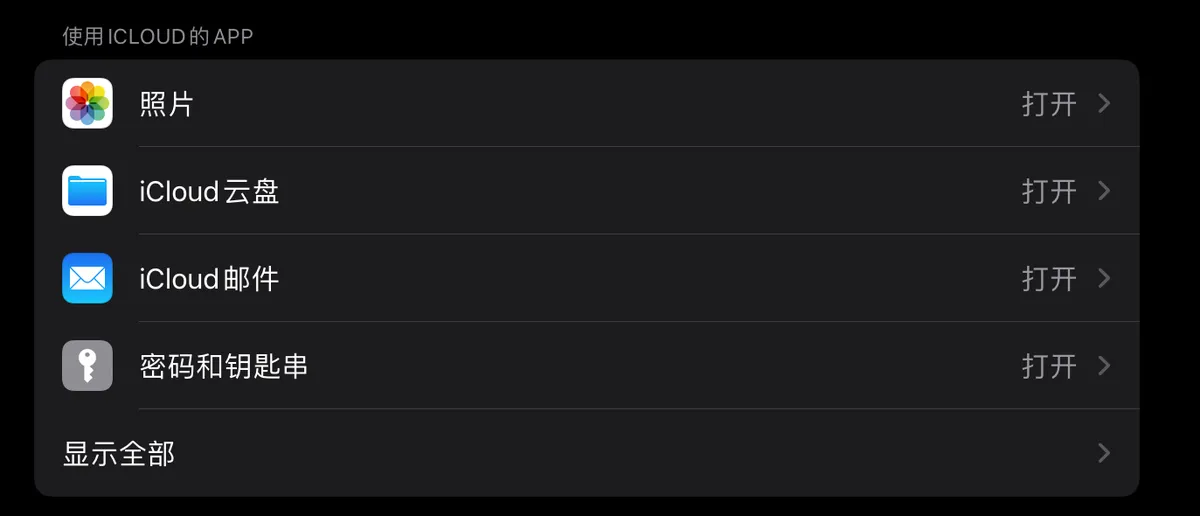
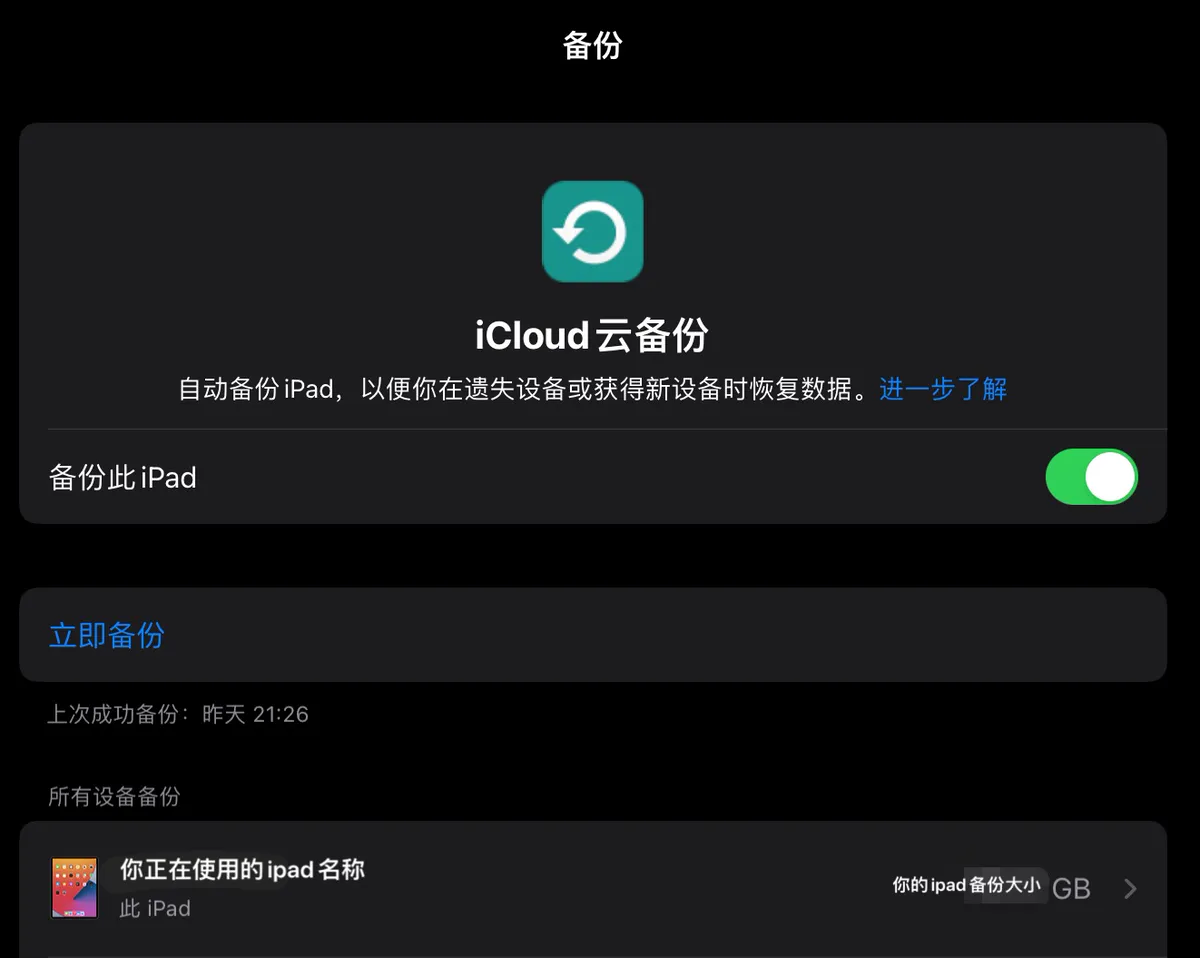
Apple's iCloud feature can back up the data of various apps on your device. If you have enough iCloud storage, you can open the Settings app, tap your Apple ID, tap "iCloud", and manage which apps use iCloud.
- In the "Apps Using iCloud" section, tap "Show All", then scroll down to find MarginNote4 and turn on its toggle.
- In the "Device Backups" section, tap "iCloud Backup"; in the "All Device Backups" section, find "This iPad" (if it's not there, turn on the "Back Up This iPad" toggle on the same page). After the app list finishes loading, turn on the app backup toggle for MarginNote4.
5 Version Library and Version History
5.1 Introduction to the Version Library
💡Digital notes are easy to delete by accident, so a note-recovery feature is the essential "undo pill" of any study app. Besides Auto Backup, you should also master the
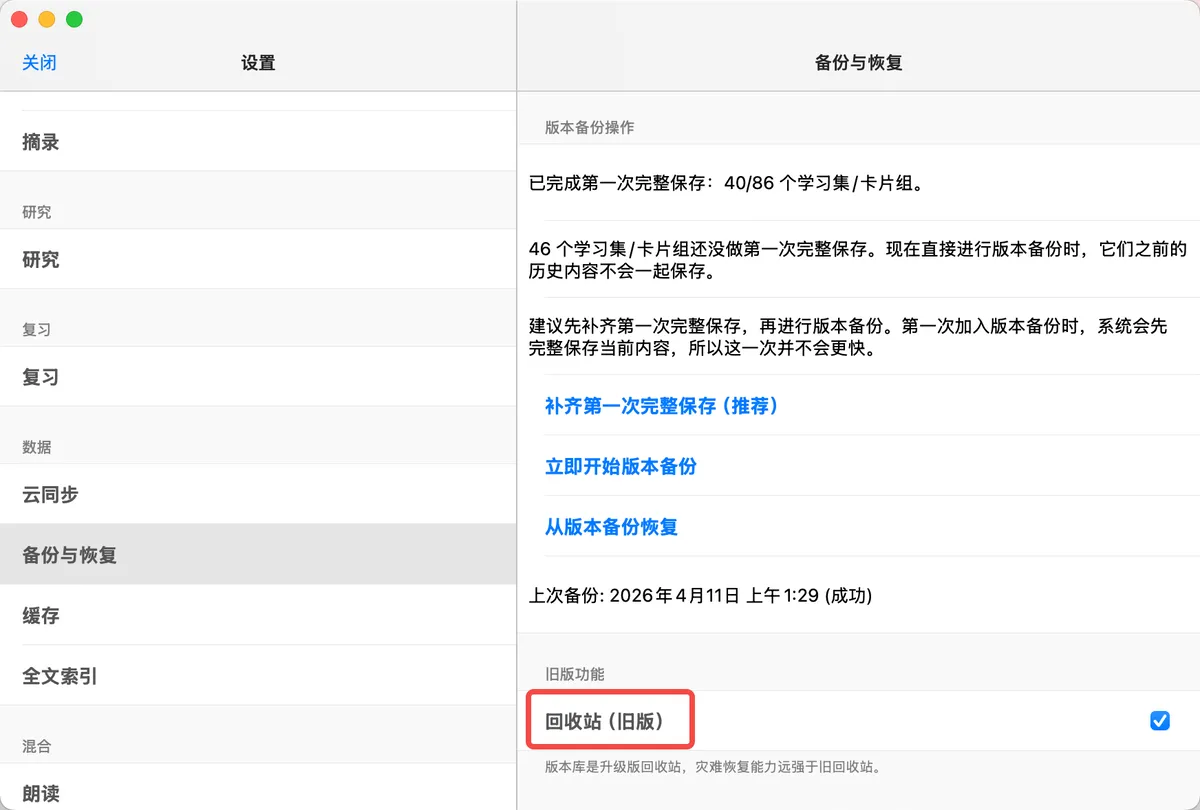
Version Libraryfeature. Because the Version Library's recovery capability is far stronger than the Trash, the Trash is currently disabled by default; if you need to turn it on, go to the very bottom of theSettings-Backup & Restorepage and enableTrash (Legacy).
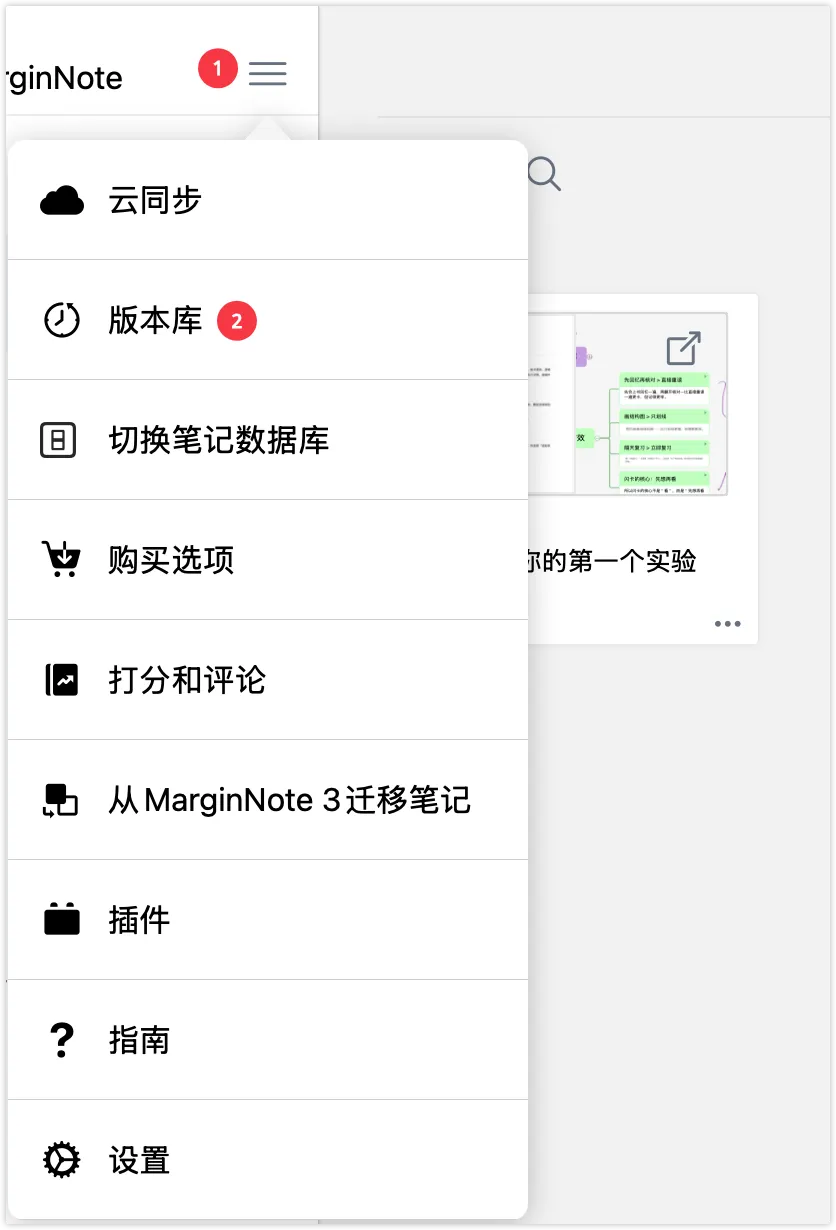
- Tap the sidebar menu on the home page and choose
Version Libraryto open the Version Library page
- The Version Library stores the version history of all study sets and document notebooks; tap to view the saved historical versions
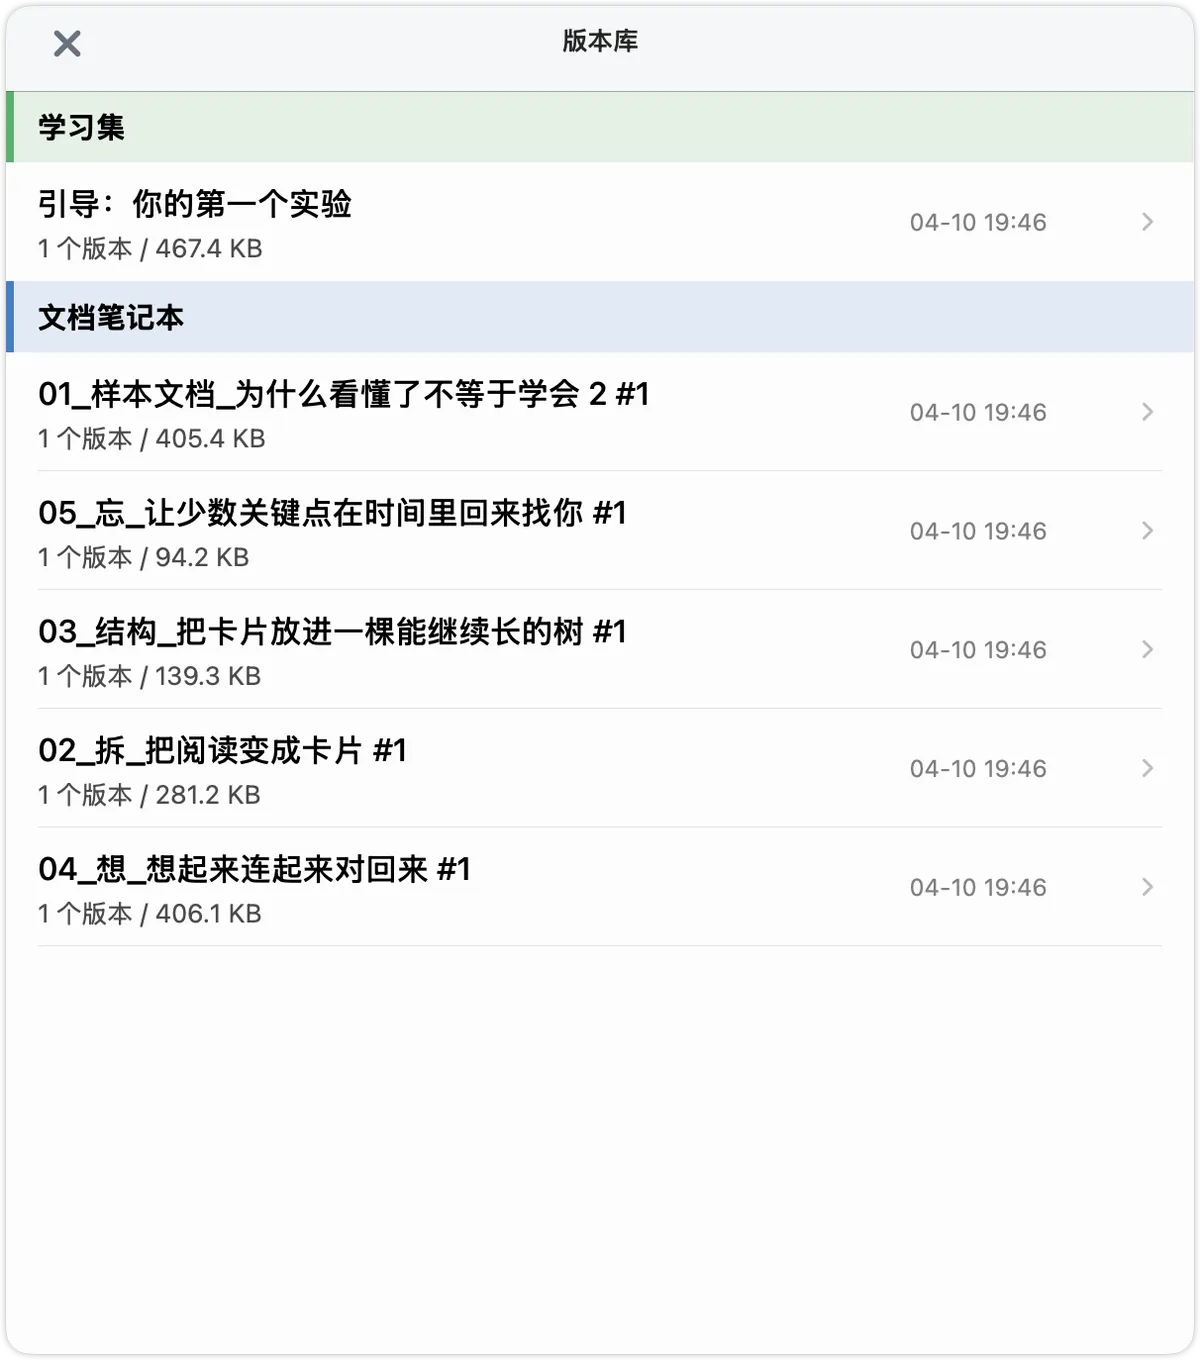
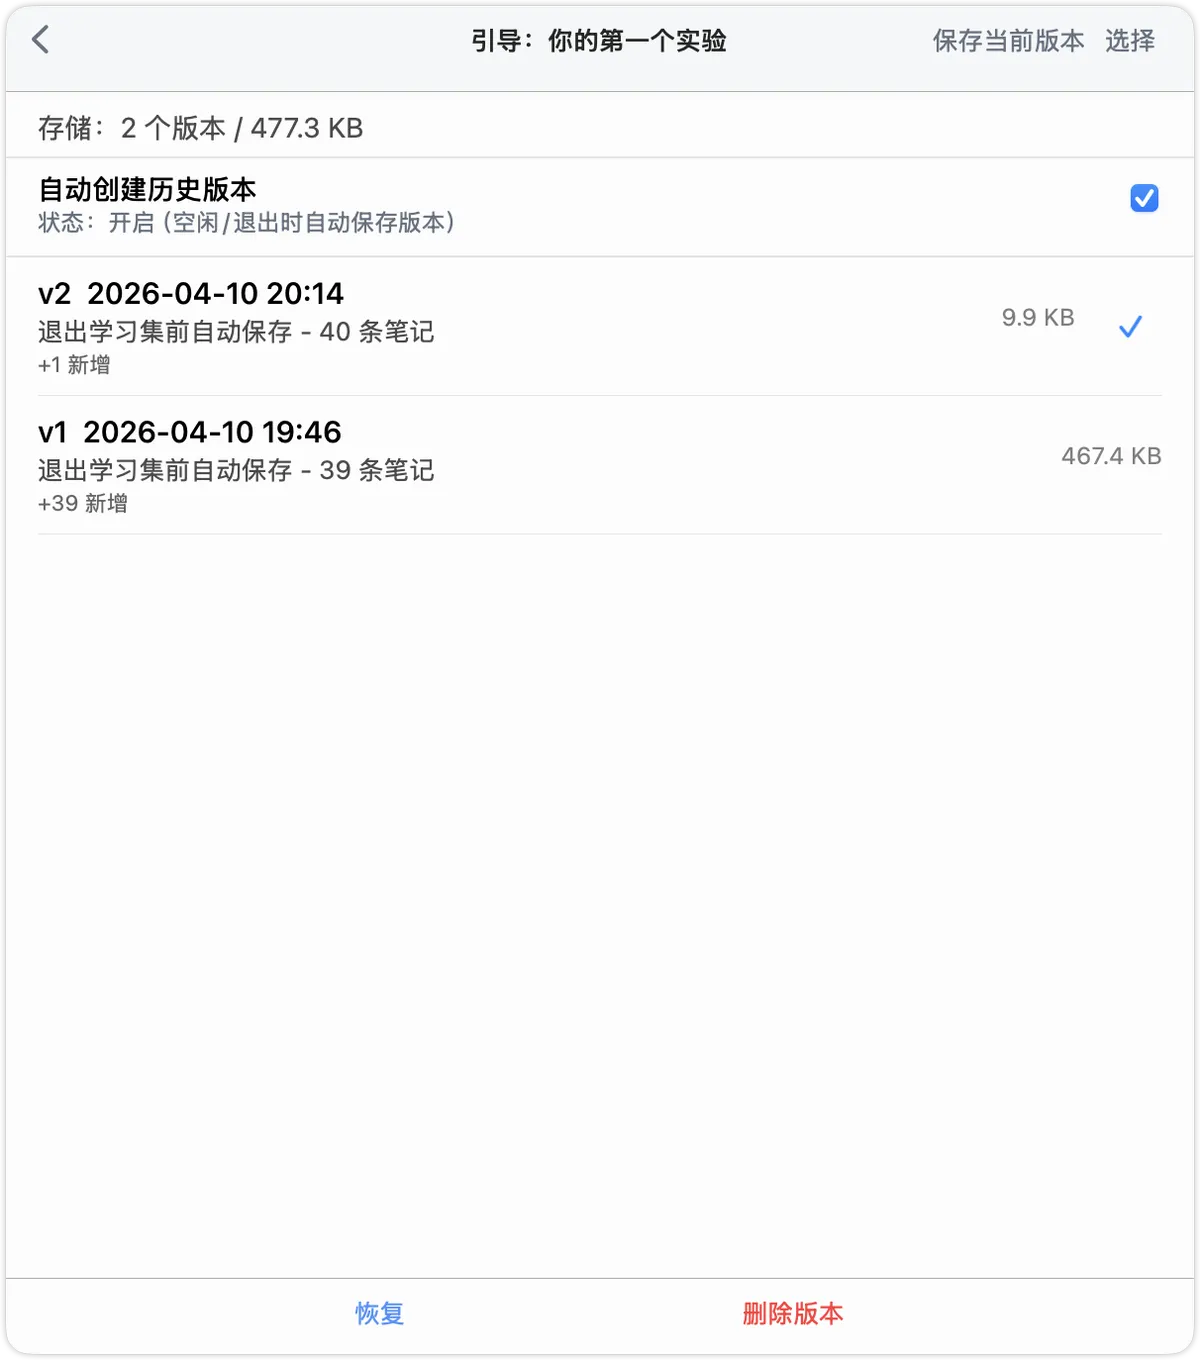
3. Tap to select the version you want, then tap Restore to restore the study set/document notebook to that version's state. You can also tap Delete Version to delete historical versions you don't need; for batch operations, tap Select to multi-select historical versions.
-
Auto-Create Version History: when checked, version history is automatically saved when you exit a study set or when idle💡"Exit" does not mean closing the app from the background; it is only triggered when you tap the MN home button to exit.
5.2 Managing and Viewing Version History Storage Usage
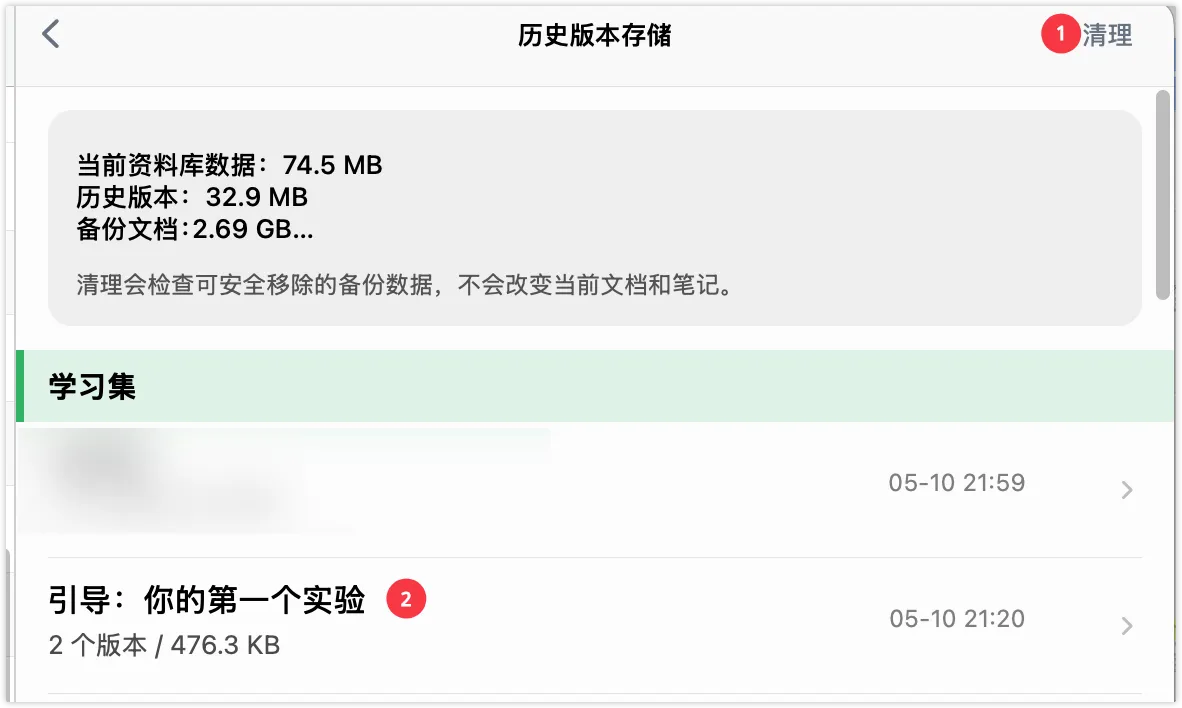
In the app's settings, under Storage & Cache, tap Manage Version History Storage to see how much storage space your notes and historical versions occupy.
Current Library Data: storage used by all your notesVersion History: storage used by previous historical versionsBacked-up Documents: the size of all documents in the database
- Tap
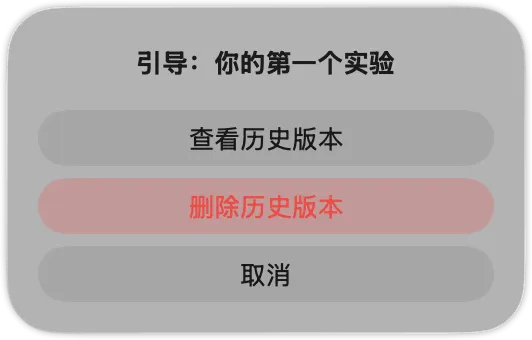
Clean Upto quickly clear all historical versions - Tap an item to
View Version HistoryorDelete Version History
5.3 View the Version History of a Specific Study Set Directly
Besides the Version Library, each study set also has its own version history management entry, which works exactly the same as the Version Library. By analogy with the mathematical concept of a "set", you can think of Version History as a "subset" of the Version Library.
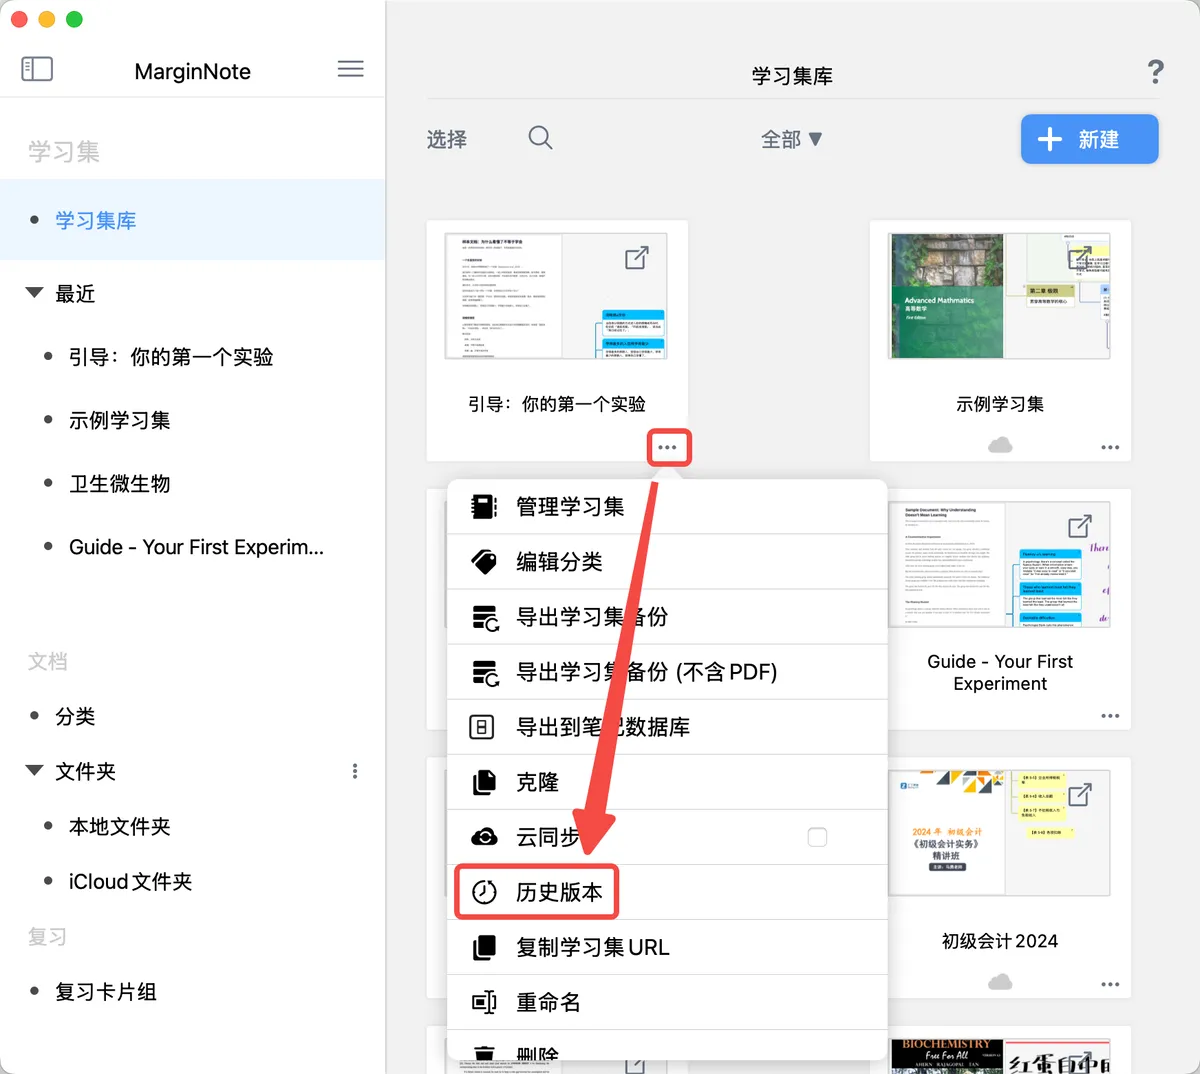
Tap the ... in the bottom-right corner of a study set → Version History to open that study set's version history screen.
6 Cache
The cache contains thumbnails, the OCR text index, and some backup files.
- Manage cache: tap
Settings-Data-Cache, tapClear Cache to Free Up Storage Space, and confirm to clear the cache and free up storage space.
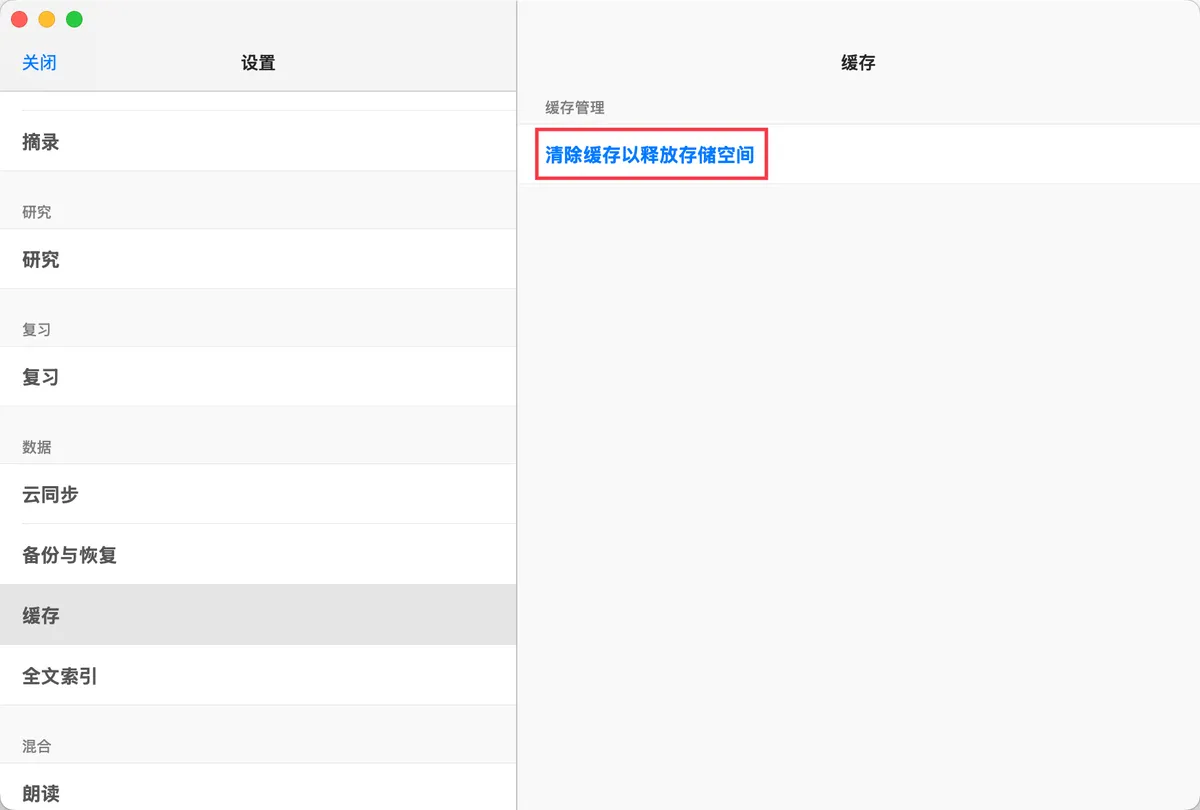
💡This action cannot be undone; the data will be permanently deleted.
- If your notes are intact and problem-free and you need to free up storage space, you can clear the cache. However, some content will need to be re-indexed, which may cause the device to heat up briefly.
- If you experience note loss, we do not recommend clearing the cache; contact our staff (service@marginnote.com) for support as soon as possible, and back up your note database.
7 Trash (Upgraded to the Version Library in version 4.3.0 and later; not recommended)
7.1 How to Enable the Trash
MN Settings - Backup & Restore - enable Trash (Legacy)
7.2 Trash Usage
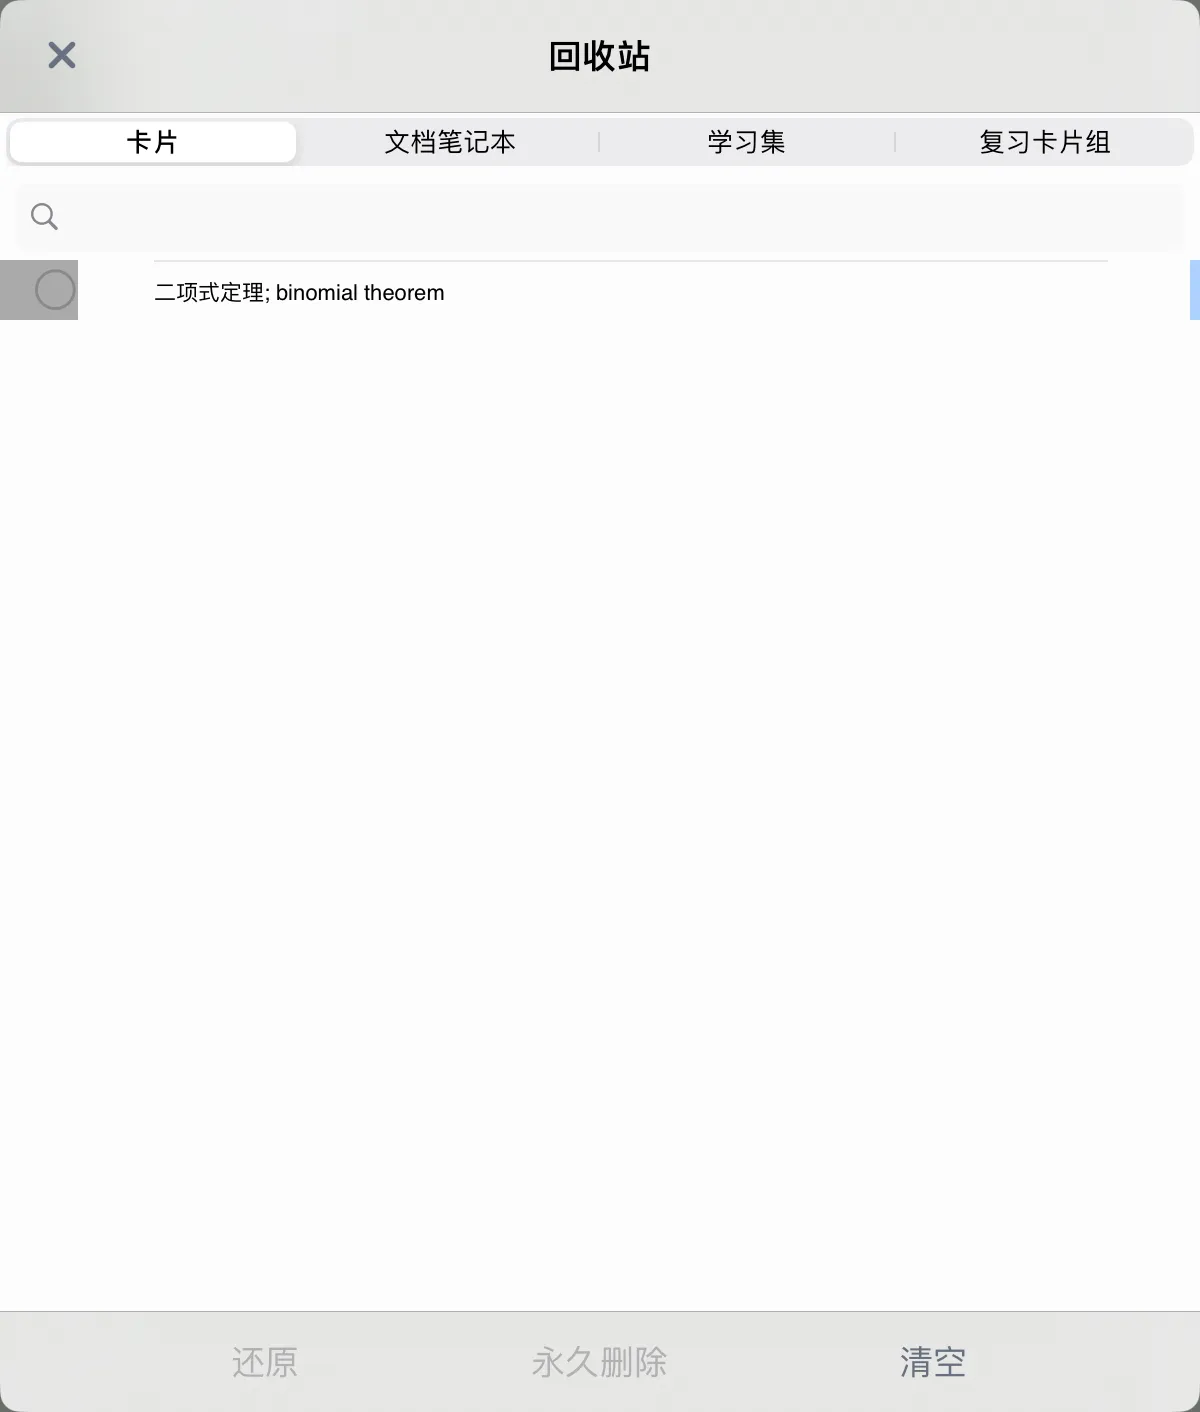
On the main screen, tap "More" - "Trash" to open the Trash view. There are separate sections for cards, document notes, study sets, and review card decks; deleted notes are arranged chronologically in the Trash, and you can search for the note item you want to restore, then select it to take action.
7.2.1 Restore
Tap this to restore the selected items.
7.2.2 Permanently Delete
Tap this to permanently delete the selected items.
💡This action cannot be undone; the data will be permanently deleted.
7.2.3 Empty
Tap this to choose to empty all contents of the Trash or just the contents of the current section/category; you can also cancel.
💡This action cannot be undone; the data will be permanently deleted.
-
Newly created study sets will not automatically have iCloud Sync enabled and must be enabled manually (see below); study sets that were already set to sync with iCloud will not have syncing turned off. ↩
-
Automatically enables iCloud Sync for every study set—both existing and newly created study sets will be enabled. ↩
-
Disables iCloud Sync for all study sets; changes to study sets will no longer affect the study sets already saved in iCloud. ↩
-
Resetting the sync buffer will cause all data on the current device to be re-synced, which may take a long time. You usually don't need to tap this; if syncing fails, first check the iCloud Sync FAQ. ↩
-
Files imported from outside the app will be imported by default to the app's iCloud folder location. ↩↩
-
When enabled, documents in local folders are synced whenever the document has new notes; otherwise, by default only documents in the iCloud folder are synced. ↩↩