The Card Pop-up Menu Bar and Its Customization
💡 Example scenarios
- Simple organizing: After generating a card, you sometimes need to tidy up its content and distinguish cards by color, tags, and the like.
- Enriching content: Sometimes you also need to ask AI about a card's content.
- Deeper linking: When organizing the mind map outline, you need to adjust a card's hierarchy level and cut, copy, and paste cards. You also need to link cards to one another.
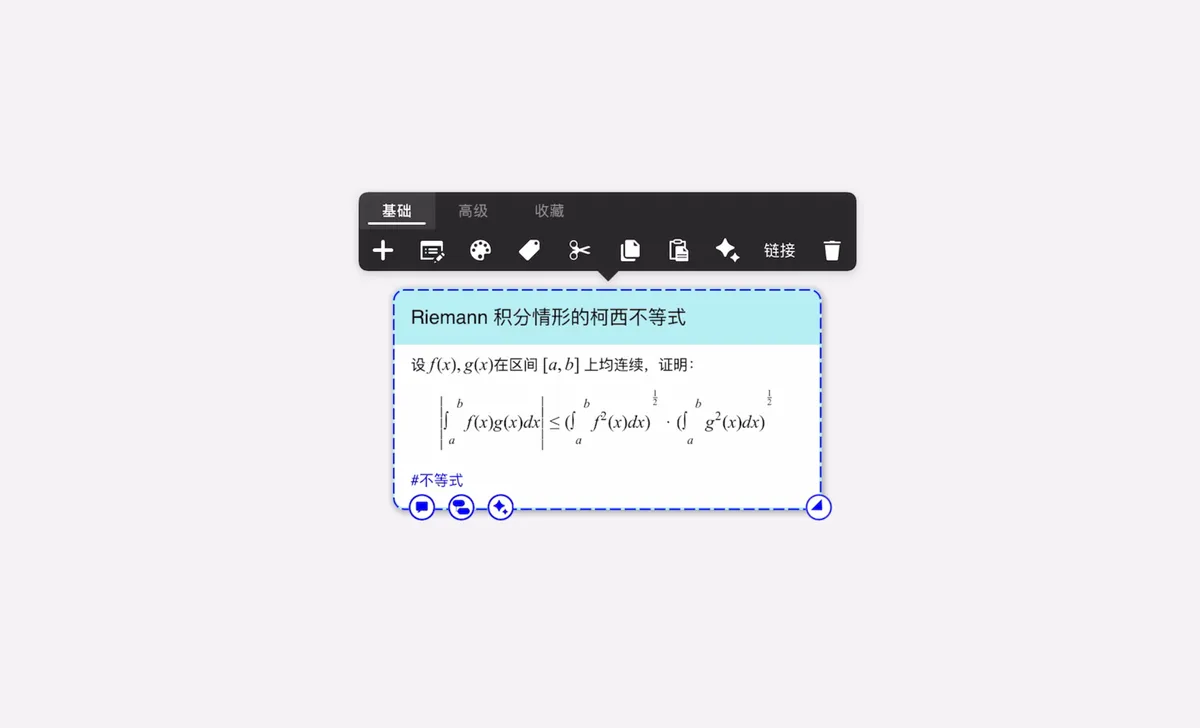
1 Bringing Up the Card Pop-up Menu
Tap a card, 🖼️ image, to edit and organize it:
2 Pop-up Menu Layout
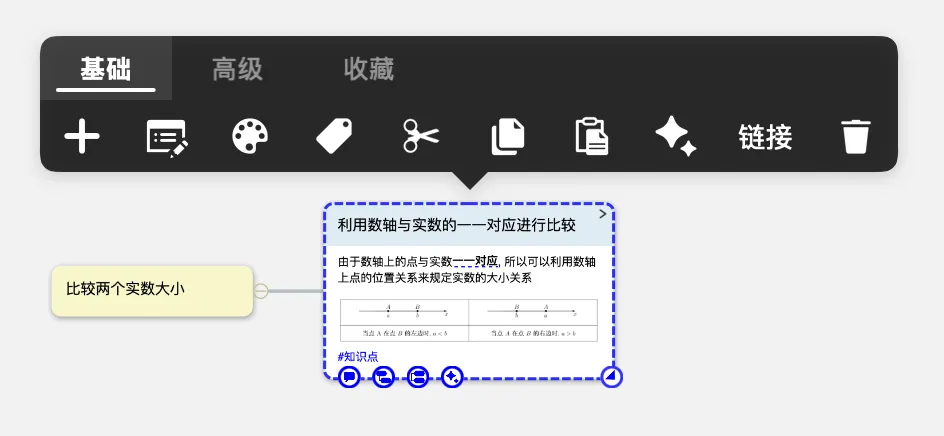
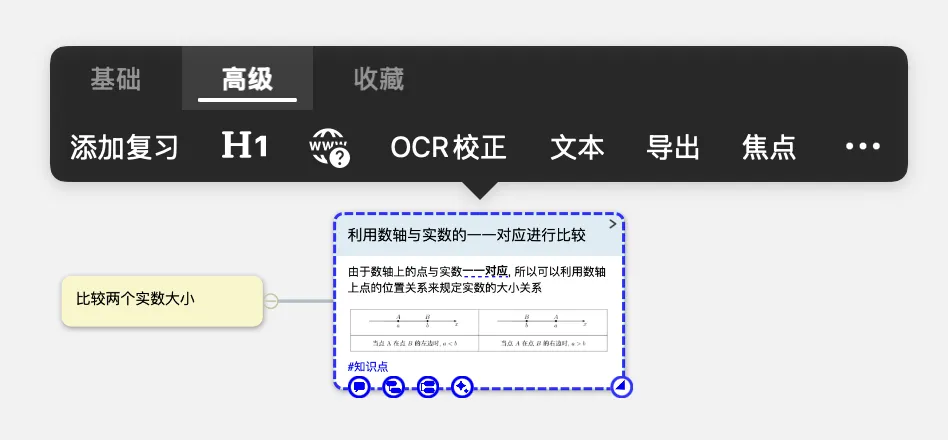
The pop-up menu bar has three sections: Basic, Advanced, and Favorites
- 🖼️ image: simple actions on the card, including add new card, card editor, select color, copy, cut, paste, ask AI, delete, and so on
- 🖼️ image: more advanced actions on the card, including add review, as title, OCR fix, Research (search in MN's built-in browser), text first, branch (choose a branch style), focus, collapse into a sub-mind map, and so on
💡 The functions shown in the pop-up menu bar change depending on the nature of the card. For example, a card without images will not show the "
text first" function.
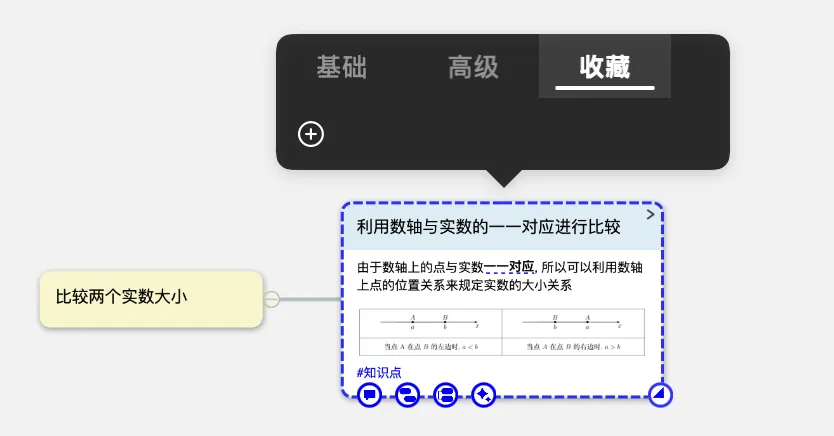
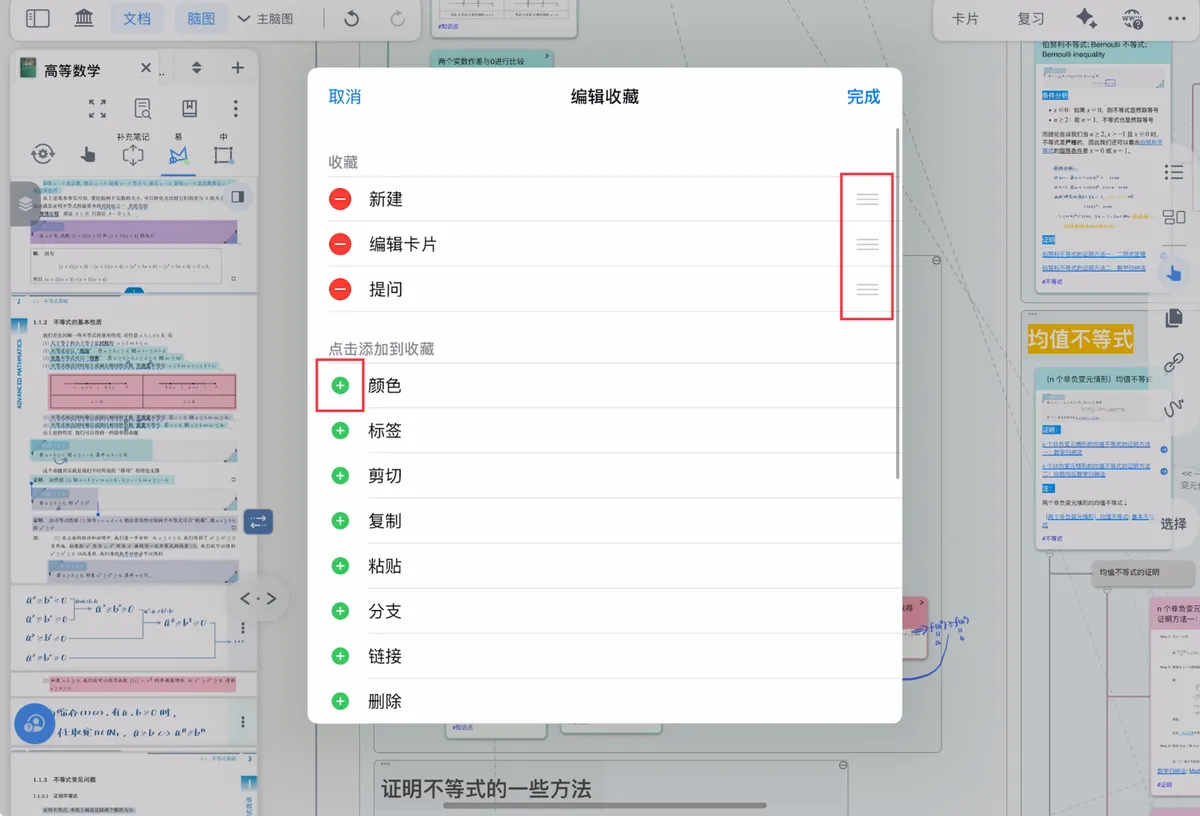
- 🖼️ image: frequently used functions from
BasicandAdvancedcan be gathered inFavorites, so you don't have to switch back and forth. Tap the "+" symbol to enter the favorites editing screen (shown below), 🖼️ image
3 Menu Bar Functions in Detail
3.1 Basic Menu Bar
3.1.1 Add New Card
Add new card
Tap Basic - the leftmost "+" symbol (as shown above) to add a new card at a hierarchy level relative to the current card
- Add new child card: creates a blank card one level below, placed at the very end of that level.
- Add new sibling card: creates a blank card on the same level, placed right next to the current card.
-
Add new parent card: creates a blank card one level above, placed at the card's original position.
💡 This function shortens the operation chain of "add a sibling card" → "move the same-level card into a lower level" → "adjust the order of that branch".
3.1.2 Editing a Card
Card editor
Tap Basic - the card editor icon (as shown above) to make detailed changes to the card's content. For details, see: Mind Map Cards ①: Creating and Editing Cards
3.1.3 Changing the Card Color
Select color
Tap Basic - the select color icon (as shown above) to change the card's color, as well as the color and highlight style of the card's corresponding excerpt
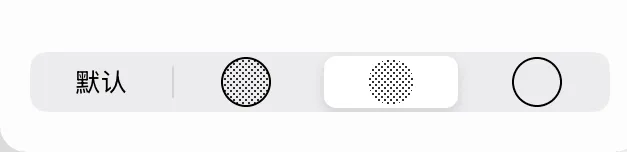
💡 You can choose a highlight style based on your scenario. For example, if you don't want the excerpt to stand out and interfere with highlighter marks in the document, choose the underline-only mode.



3.1.4 Choosing Card Tags
Tags
Tap Basic - the Tags icon (as shown above) to open the tags screen, where you can add multiple tags to a card and also perform actions such as add, delete, and rename tag.
💡 When searching for cards in the mind map navigation bar and the card grouping board, you can tap the filter icon (shown below) to filter the cards you need by tags and card color.
Filter
3.1.5 Cutting, Copying, and Pasting Cards
Cut
Copy
Paste
- Tap the cut icon; when
Card cut to pasteboardappears, the cut was successful.
💡 After cutting, the original card does not disappear immediately; instead, it disappears only after you paste it somewhere else, which helps prevent you from forgetting a card you have cut.
-
Tap the copy icon; when
Copied clones/references of x cards to pasteboardappears, the copy was successful.The difference between clone and reference: a cloned node is a duplicate of a node card, while a referenced node is a mirror of a node. For example, if you clone card A to get card B and then edit card A, card B will not sync card A's changes; if you reference card A to get card B, card B will sync card A's changes. For details, see: Card Copying: Clone and Reference
-
After copying a card, tap paste:
- You can tap an empty area of the mind map to paste, or
- You can tap another card and choose
Pastein the pop-up menu, so the copied card becomes a child node of that card.
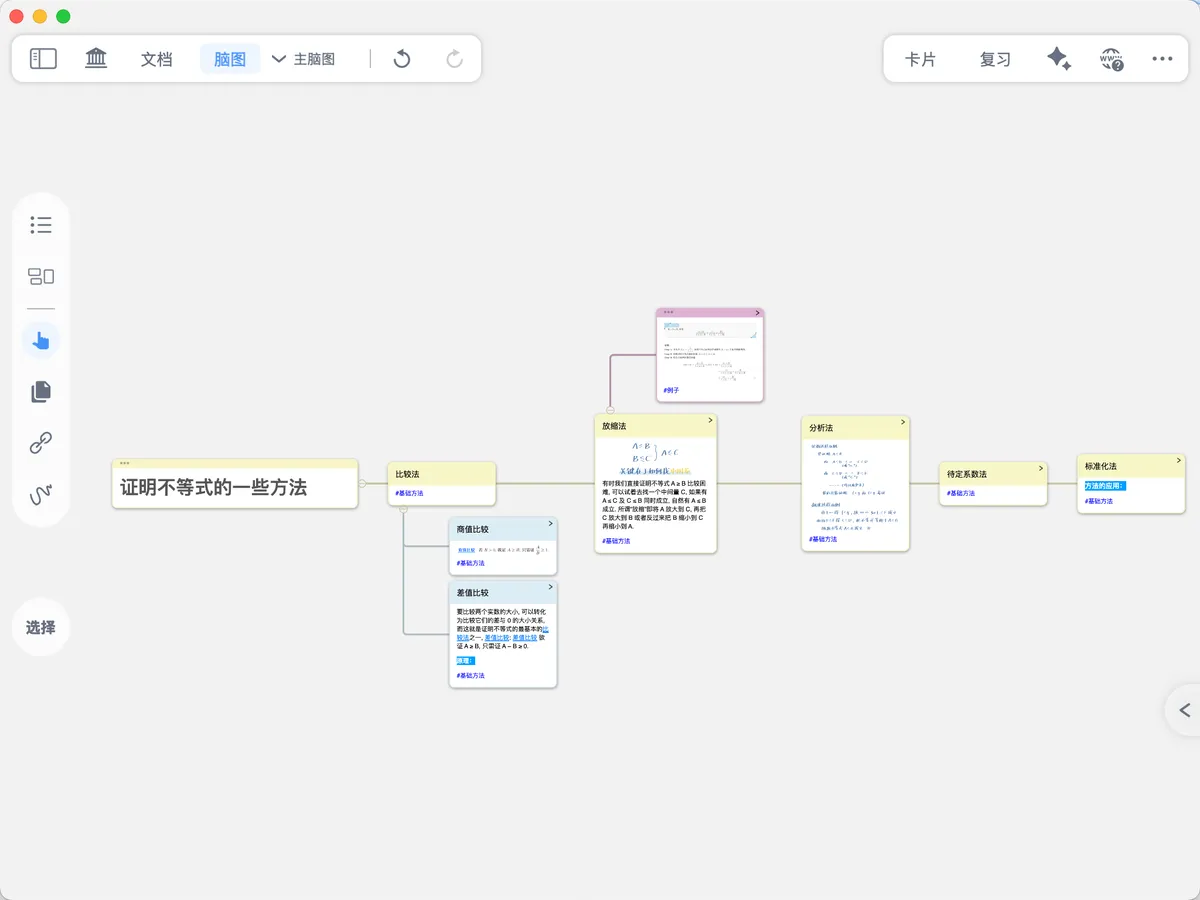
3.1.6 Changing the Card's Branch Style
💡 The "
Branch" function appears in the Basic pop-up menu only for cards that have child cards
Branch
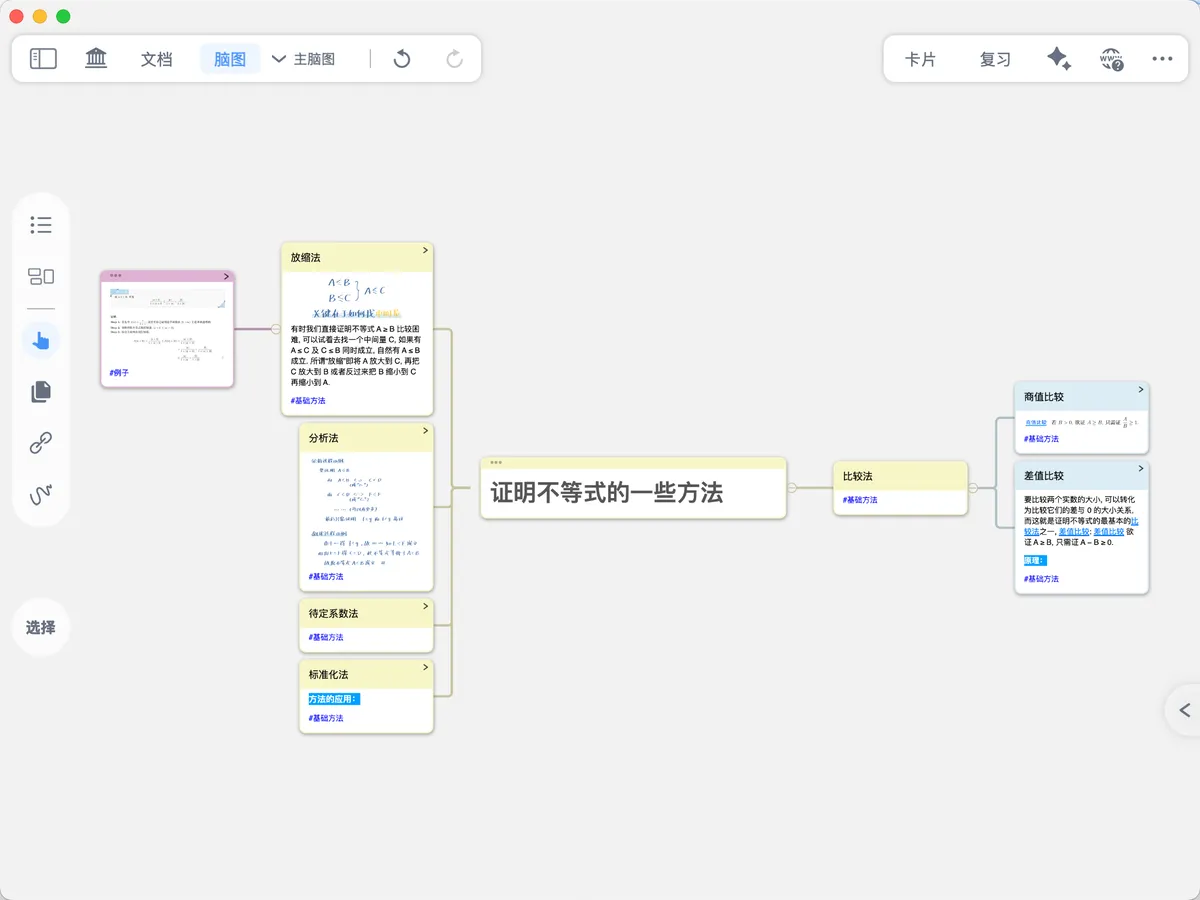
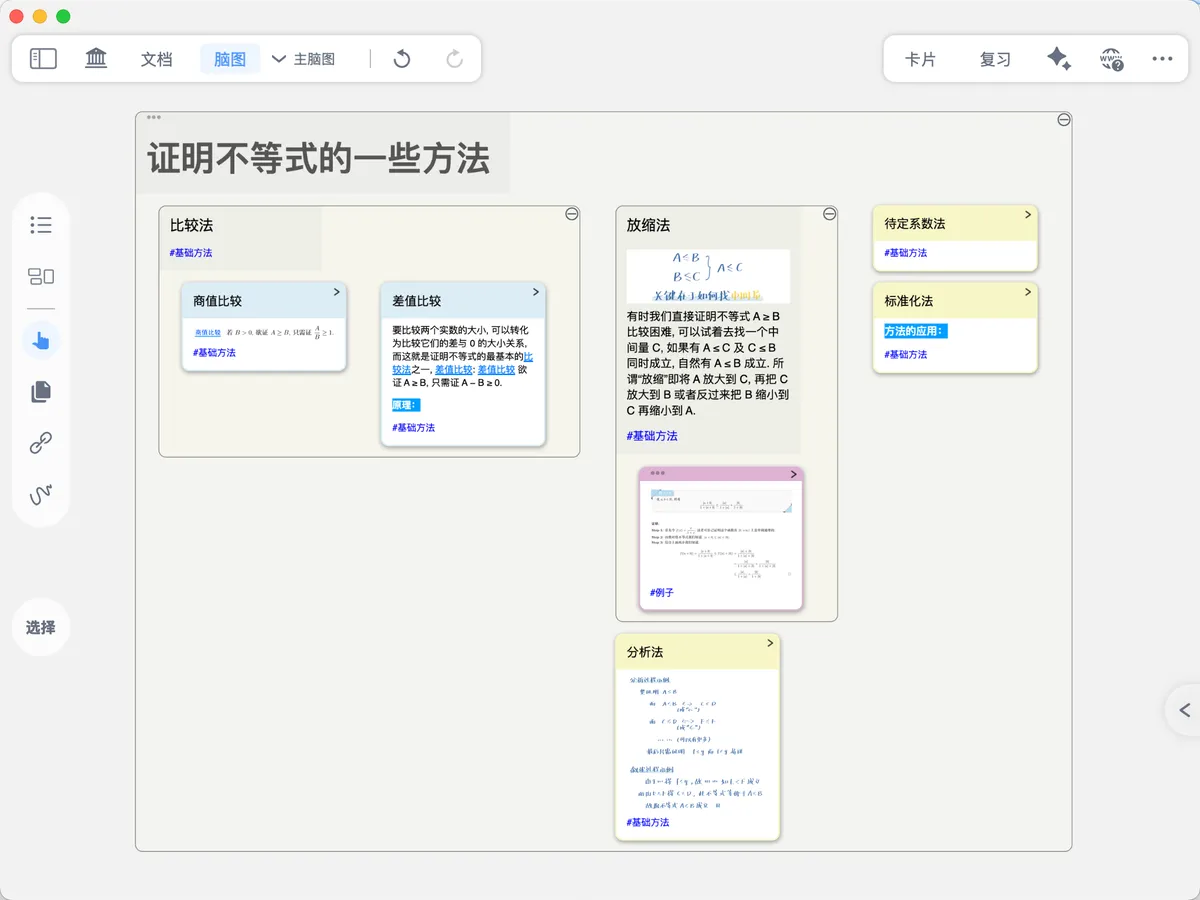
Tap Basic - the branch icon, and the Branch Style popup appears. There are 10 branch styles in total; choose one based on your personal habits and mind map needs.
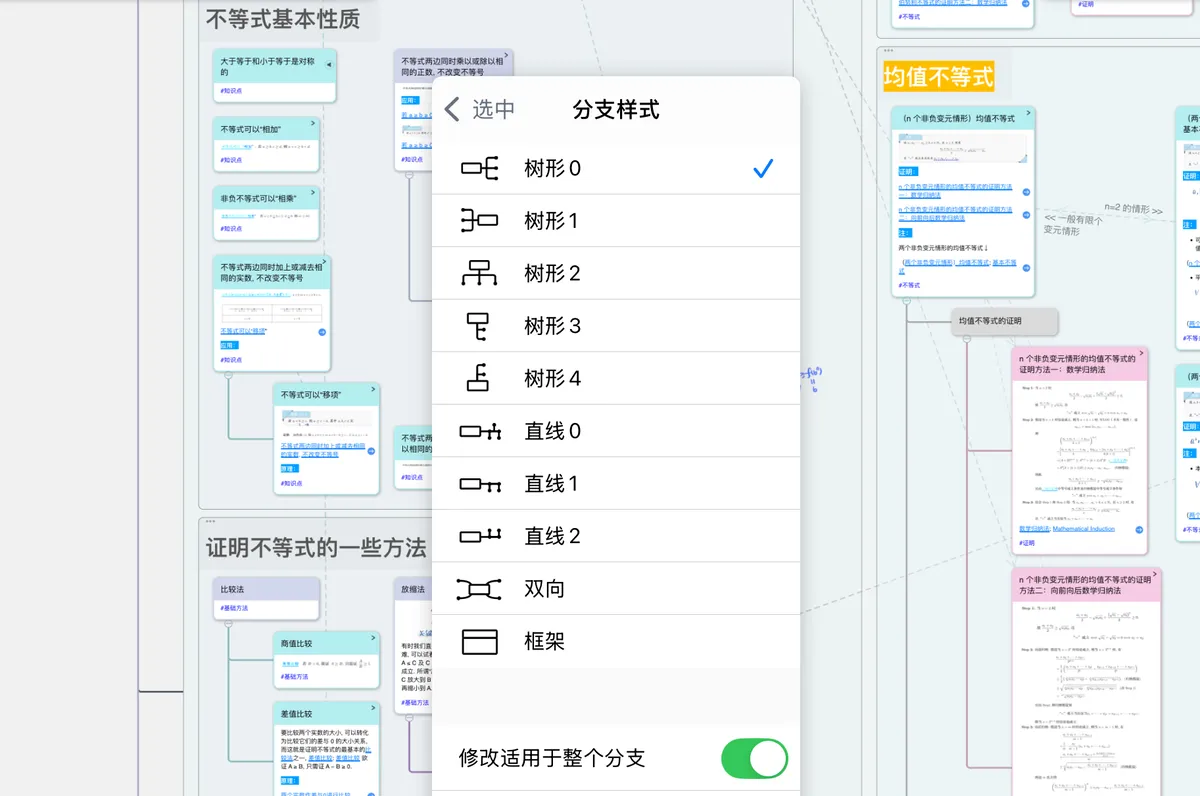
- Tree: sibling cards are arranged vertically; the most common branch style
- Line: sibling cards are arranged horizontally and connected by a straight line; often used to represent a timeline
- Two Way: sibling cards are arranged vertically but distributed evenly on both sides of the parent card; useful when there are too many sibling cards
- Framework: the parent card is shown as a frame, with child cards packed densely inside it; useful when you want to display as many cards as possible on the page, for example as a collection of unorganized cards
3.1.7 Ask
Ask AI
Tap Basic - the star icon (as shown above); after you select the various modes and prompts, the Ask AI popup appears.
This function lets AI supplement the card's content, analyze knowledge points, and more. For detailed steps, see: Getting to Know the Ask Popup: Asking AI In-Situ in Documents and Mind Maps
3.1.8 Link
Link
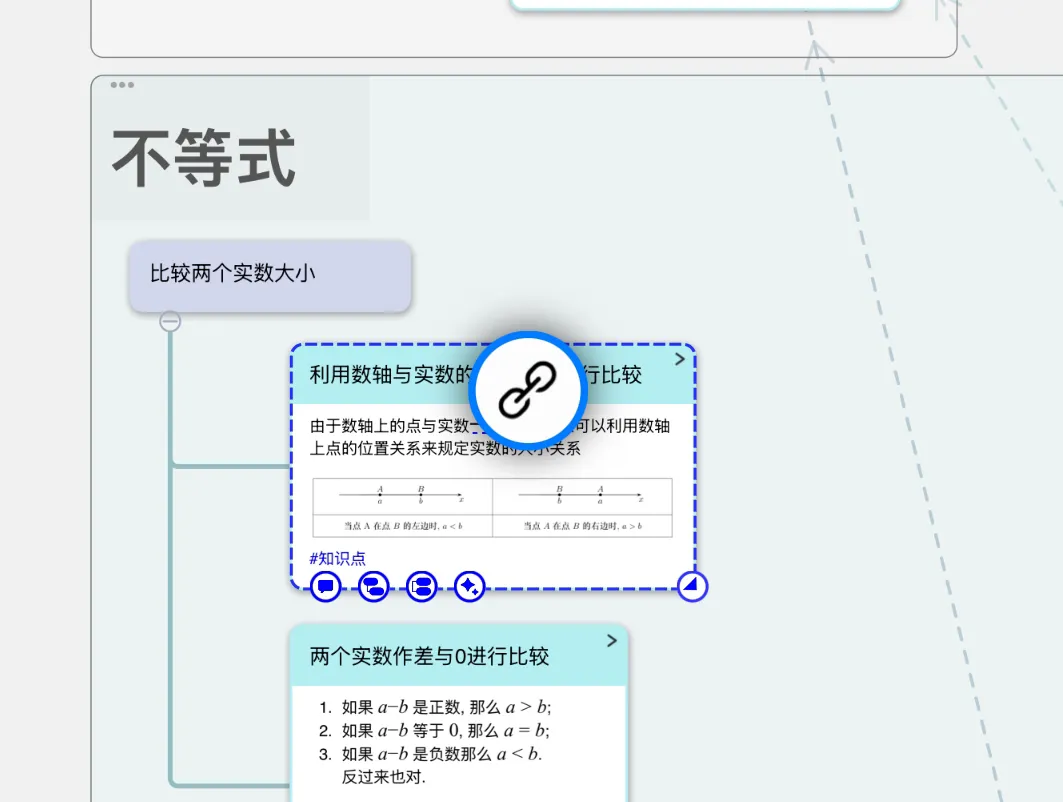
Tap Link to generate 🖼️ image; drag the link ball over the card you want to link to and release, and the two cards will be linked bidirectionally so you can jump between them to view later.
For details, see: Card Linking ①| One-Way and Two-Way Links: Free Association Across Hierarchy Levels
3.1.9 Focus
Tap Focus, and the card and its child cards enter a blank mind map, temporarily hiding other unrelated content so you can concentrate on sorting out the target branch.
For details, see: Mind Map Focus
3.1.10 Delete
Delete
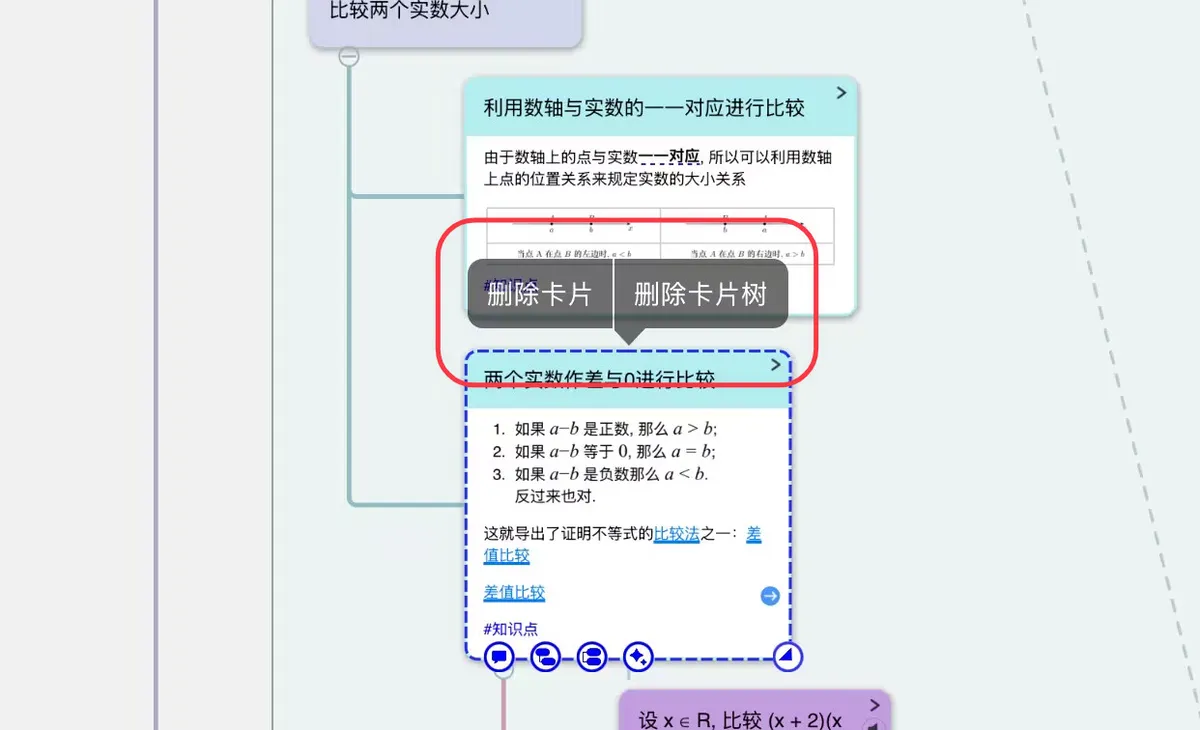
Tap the delete icon (as shown above), and the selected card is deleted. If the card has child cards, a Delete Card / Delete Tree option appears.
- Choose
Delete Card: deletes only this card; cards on the levels below automatically move up a level. - Choose
Delete Tree: deletes this card together with all cards on every level below it.
3.1.11 More
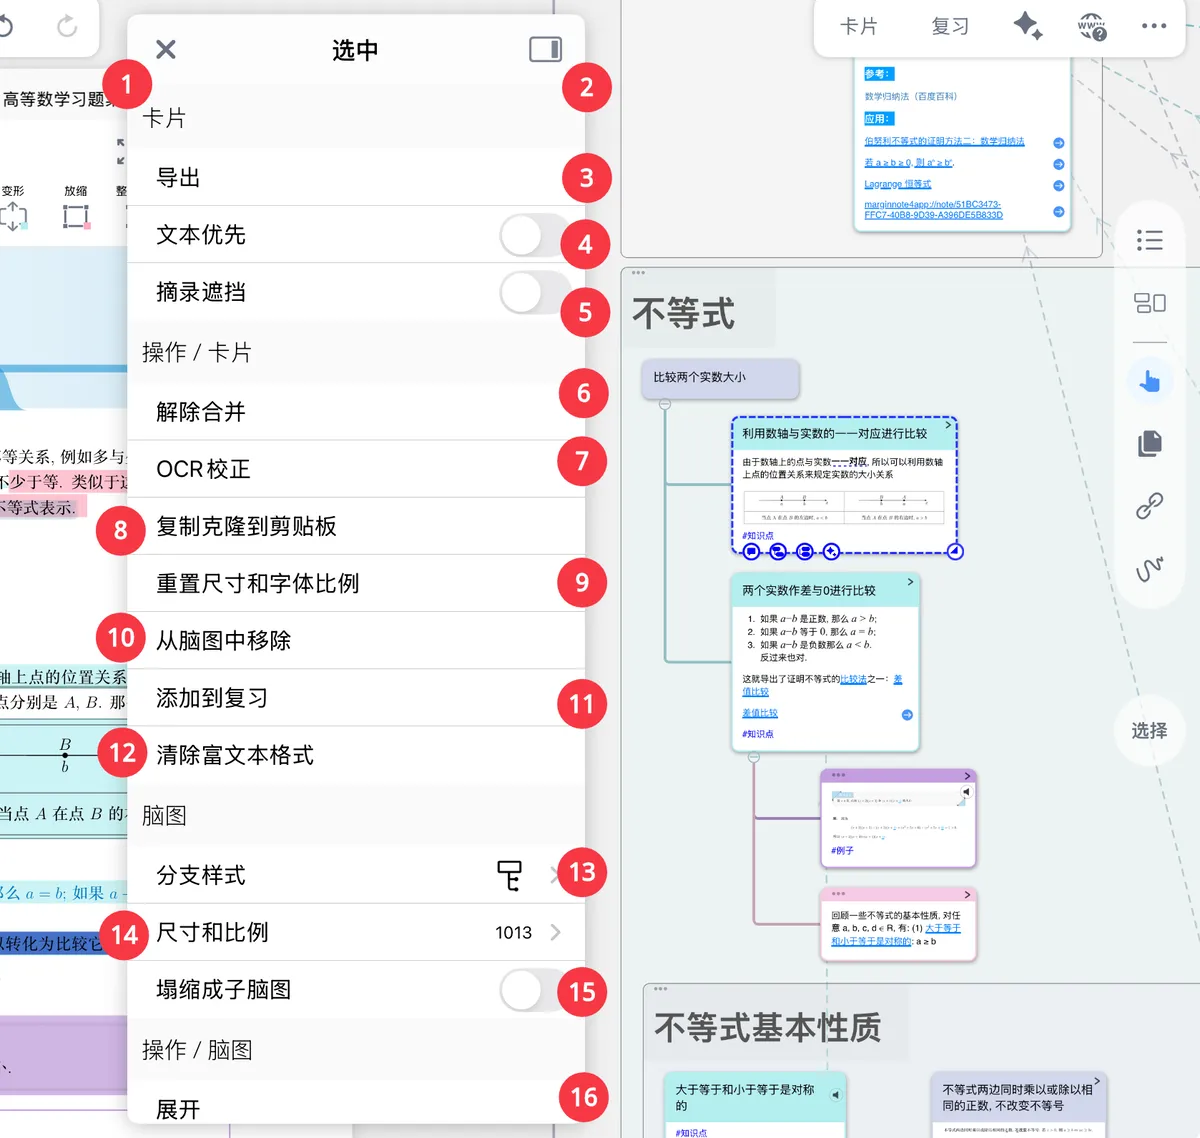
Tap Basic - More to perform additional actions on the selected card in the selected card actions panel.
3.1.11.1 Card
| No. | Name | Function | Notes |
|---|---|---|---|
| 1 | Close button | Tap to close the selected card actions panel; tapping an empty area of the mind map has a similar effect |
|
| 2 | Open on the right | Tap to dock the selected card actions panel to the right; tapping an empty area of the mind map will not close the panel, which helps prevent accidental taps |
|
| 3 | Export | Export the card as a PDF or a long image | |
| 4 | Text first | Turn this switch on and the card's rectangle/lasso excerpt is automatically converted to text. Conversely, turn it off if you want the rectangle/lasso excerpt to appear as an image |
Cards with images only |
| 5 | Excerpt occlusion | Turn this switch on and the card's corresponding excerpt is occluded in the document so you can review it | Cards with document excerpts only |
3.1.11.2 Actions / Card
| No. | Name | Function | Notes |
|---|---|---|---|
| 6 | Unmerge | Tap Unmerge, and the first excerpt in the card stays unchanged while the other excerpts become its child cards |
Cards with multiple excerpts only |
| 7 | OCR fix | Runs OCR recognition and correction on the card's excerpt content again; after tapping, the card's excerpt content is replaced with the corrected content | |
| 8 | Clone to pasteboard | Clones all of the card's content so you can paste it on an empty area of the mind map or under another card | Card Copying: Clone and Reference |
| 9 | Reset size and font scale | Resets the card width to 700 and the font scale to 1 | |
| 10 | Remove from mind map | Removes the card from the mind map without deleting it; you can find it later in the card grouping board |
|
| 11 | Add to review | Adds the selected card to the review card deck | |
| 12 | Clear rich text formatting | Clears formatting such as font, font size, color, paragraph alignment, and embedded images | |
| Not labeled | Text to Title | After tapping, the first excerpt paragraph is converted to a title. > 💡 The title field accepts only 250 characters; if the converted text exceeds this length, the excess is truncated. > After conversion, the title field can show only plain text; even if the original excerpt text contained markdown, rich text formatting, and so on, these special formats are lost after conversion to a title, and the original layout or extra content cannot be preserved. | Only when there is no title and the first paragraph is in text format |
3.1.11.3 Mind Map
| No. | Name | Function | Notes |
|---|---|---|---|
| 13 | Branch style | After tapping, the branch style selection screen opens, where you can choose branch structures such as Tree, Line, Two Way, and Framework. For details, see 10 Branch Styles & Sub-Mind Map Collapse |
|
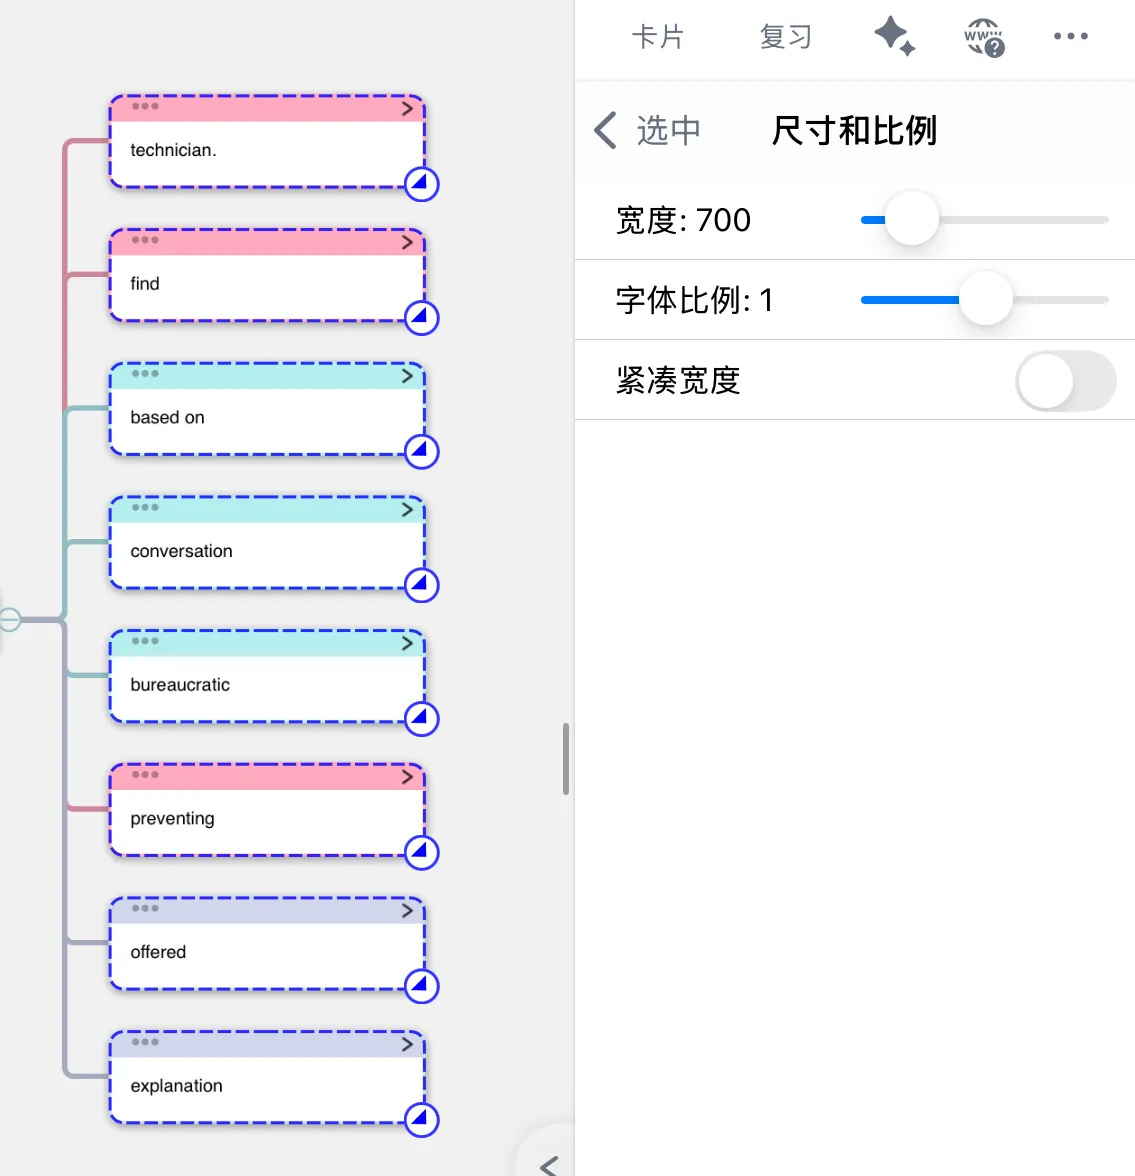
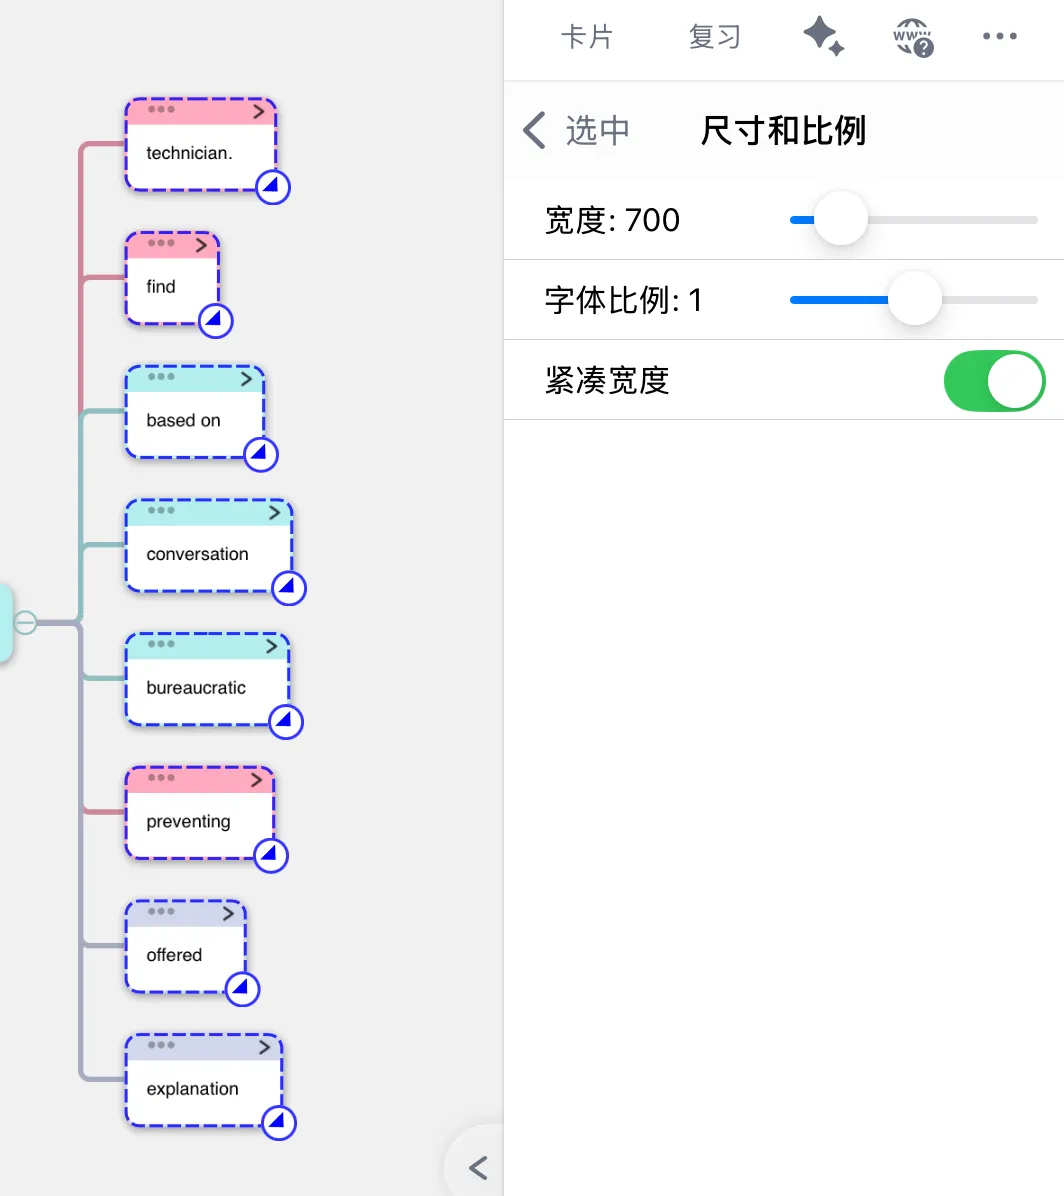
| 14 | Size and scale | After tapping, the size and scale details screen opens. Drag the card width and font scale sliders to dynamically adjust these styles. Turn on the compact width toggle, and the card width adjusts to the amount of text in the card so the card has no excess whitespace (see the comparison below), making the mind map more visually pleasing |
|
| 15 | Collapse into a sub-mind map | After tapping, the card becomes a sub-mind map, and all its child cards move into it. For details, see Creating and Managing Sub-Mind Map Levels | Only when a single card is selected |
3.1.12 Actions / Mind Map
| No. | Name | Function | Notes |
|---|---|---|---|
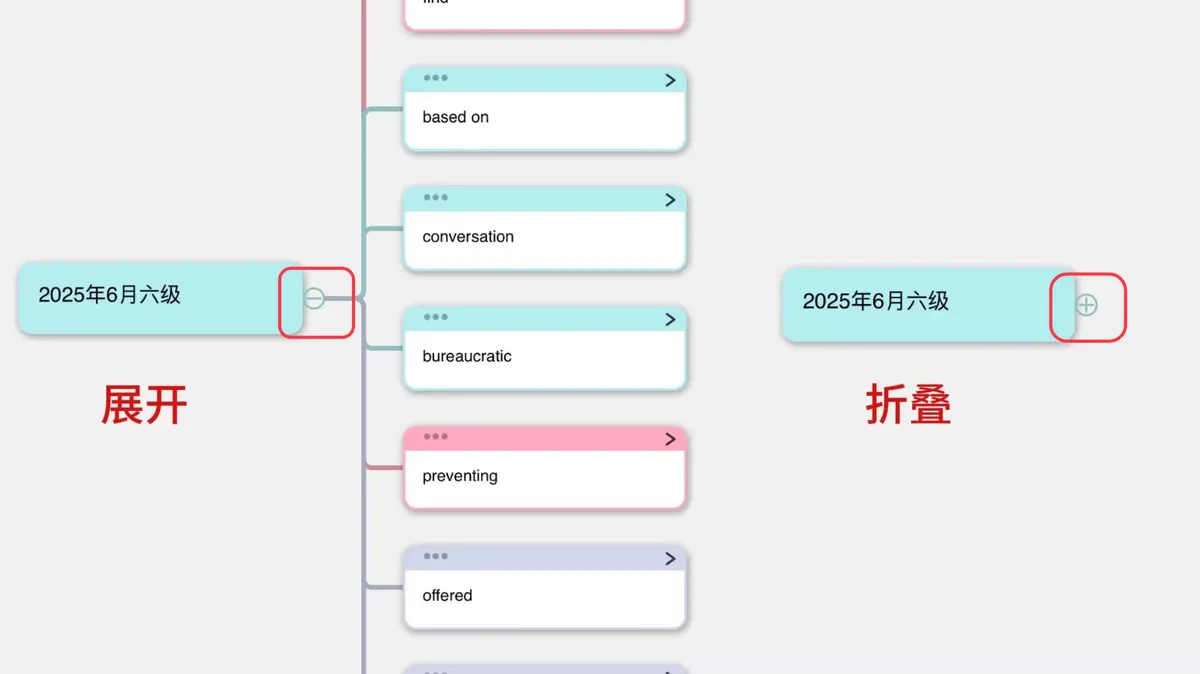
| 16 | Expand/Collapse | Tap Collapse to hide the card's child cards. Tap Expand to show the hidden child cards. > 💡 Tapping the + or - symbol at the end of a card in the mind map achieves the same result |
Cards with child cards only |
| Not labeled | Select Branch | Tap Select Branch, and the card and all cards on the levels below it are selected, so you can continue to batch-process them. > 💡 Sometimes a tree mind map is too long to select everything precisely in the mind map, and this function comes in handy |
3.2 Advanced
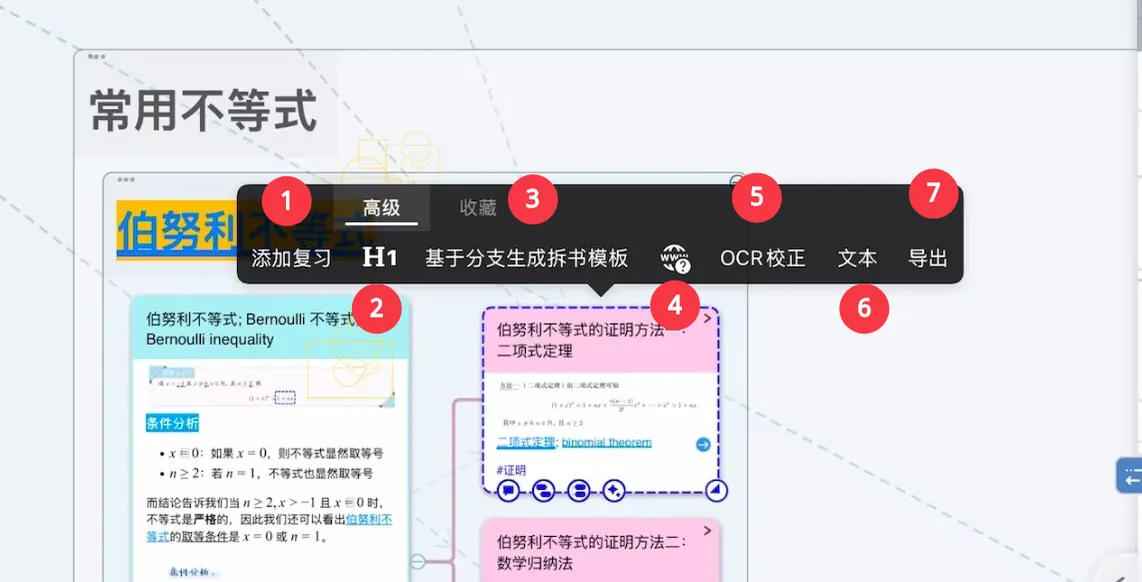
| No. | Name | Function | Notes |
|---|---|---|---|
| 1 | Add review | Adds the selected card to the review card deck | Cards not yet added to the review card deck only |
| 2 | H1 | After tapping, the first excerpt in the card body is converted to a title. > 💡 The difference from the option not labeled in the figure is that, when there is already a title, tapping H1 converts the title back into the card body | |
| 3 | Generate breakdown template from branch | Tap Generate breakdown template from branch, and AI analyzes the mind map structure and generates a breakdown template based on your personalized mind map. This template can be used for AI Breakdown in the Table of Contents of the document view |
|
| 4 | Search in browser | Tap this icon to open Research in the mind map sidebar and automatically search the card's content. For details, see: Search ③: Linking Documents with the Research Browser | |
| 5 | OCR fix | Tap OCR fix, and the card's excerpt portion is run through OCR again and the text in the card is updated |
Cards with excerpts only |
| 6 | Text | Tap Text, and the images in the card are corrected into text format |
Excerpts in image form only |
| 7 | Export | Export the card as a PDF or a long image |